If you have ever spent three hours sorting printed name tags for conferences into alphabetical stacks the night before doors open, you already know the frustration onsite badge label printing was designed to eliminate. Instead of printing every badge in advance and hoping nothing changes, onsite label printing produces each attendee’s name tag at the moment they check in, using live registration data and a small desktop printer that your staff can operate without technical training.
This guide walks through the full conference badge printing workflow: what the hardware looks like, how check-in runs step by step, how to handle walk-ins and last-minute changes, and what to do when things go wrong. If you are still deciding between printing methods, EventMobi’s complete conference badge design and printing guide walks through all three options and when each makes sense.
What Onsite Badge Label Printing Actually Is (And What It Isn’t)
Onsite badge label printing combines pre-branded badge stock with a thermal label printer connected to a check-in device. When an attendee checks in, the system retrieves their registration record and prints a label containing their name, company, title, and QR code. That label is applied to the pre-branded badge stock, which already carries the event’s design, logo, and color scheme. The entire process takes seconds.
This approach separates what stays the same (event branding) from what changes (attendee details). But it is not the only onsite printing method, and planners frequently confuse it with direct thermal printing.
Label Printing vs. Direct Thermal Printing: The Key Distinction
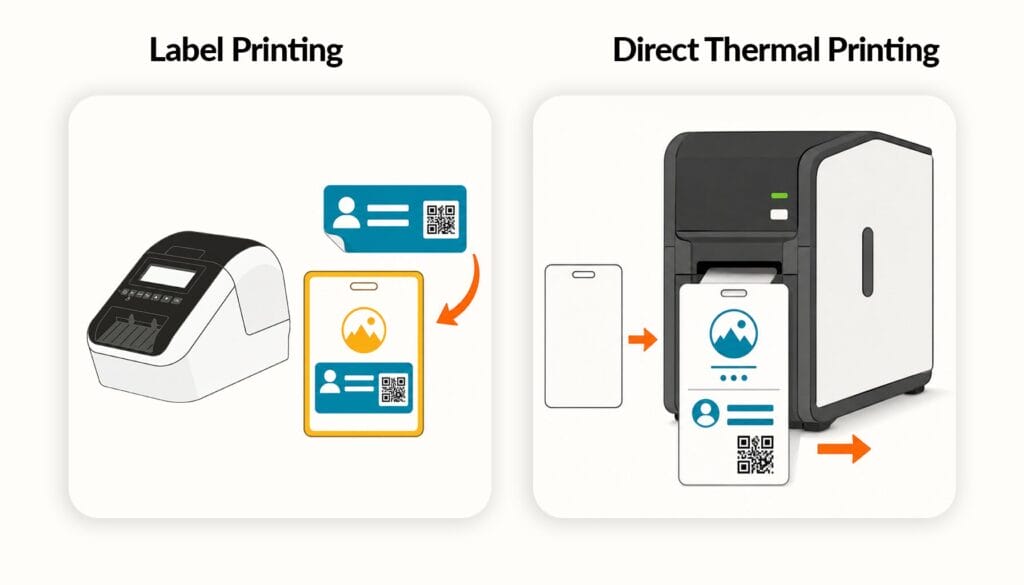
The difference between label printing and direct thermal badge printing comes down to components. Label printing uses two parts: pre-designed badge stock plus a printed label with attendee-specific data. Direct thermal printing produces the entire badge, including all branding and design, from blank stock using specialized hardware.
In practical terms, label printing is simpler and less expensive. Direct thermal printing requires dedicated badge printers that are more costly, and many events hire a vendor technician to operate them onsite. For conferences under 2,000 attendees, label printing handles the job with far less overhead.
Why Onsite Label Printing Became the Default for Professional Conferences
Pre-printed badges have a well-documented operational problem: they are static. Between registration close and event day, attendees change names, update titles, cancel, and register late. In practice, name changes, title updates, and late cancellations mean a measurable portion of pre-printed badges need correction before doors open. For a 500-person conference, that means 15 to 25 badges that need to be hand-corrected or reprinted anyway.
Onsite label printing sidesteps this entirely. Because labels print from live registration data, every badge reflects the most current information at the moment of check-in. There is no pre-sorting step (which can take two to four hours for a 500-person event) and no stack of unclaimed badges at the end of the day.
The Hardware You Need for Printed Name Tags for Conferences
Setting up an onsite badge label printing station requires three components: a thermal label printer, a check-in device, and pre-branded badge stock. Getting the right combination determines whether check-in runs at the speed attendees expect.
The Label Printer: What to Look For and What to Avoid
For conference badge printing, you need a thermal label printer, not an inkjet. Thermal printers use heat to transfer text and images onto specially coated label material, which means there is no ink to dry, smear, or run out mid-event. They print a label in two to five seconds, compared to 15 to 30 seconds for a typical inkjet label printer.
A standalone thermal label printer runs $300 to $500 at retail, though many event teams skip the DIY hardware route entirely. Purpose-built solutions like EventMobi’s BadgeON ship a complete station kit (iPad, printer, battery stand, label rolls, lanyards, and accessories) as a per-event rental, so you avoid sourcing and configuring individual components. Whether you buy your own printer or rent a station, look for 4-inch-wide label support (the standard for name badges) and both USB and Bluetooth connectivity. Avoid consumer-grade shipping label printers; they are built for intermittent home office use, not for printing 500 labels in a three-hour check-in window.
The Check-In Device: iPad, Tablet, or Laptop
The check-in device is the interface your staff uses to look up attendees and trigger label printing. Most badge label printer setups work with an iPad, Android tablet, or laptop.
iPads and tablets are portable, easy for staff to learn, and work well with QR code scanning using the built-in camera. Laptops offer larger screens for complex registration lookups. Either way, the device connects to the label printer via Bluetooth or USB, and your check-in software manages the data flow between the registration database and the printer.
Pre-Branded Badge Stock: How It Works with Label Printing
Pre-branded badge stock is the foundation that every printed label sits on. These are badge-sized cards (typically 4″ x 3″ or 4″ x 6″) printed in advance with your event’s logo, colors, design elements, and any fixed information like the event name and dates.
When an attendee checks in, the label prints and is placed onto the branded stock. The result is a professional, fully designed conference badge that looks like it was produced by a print shop, not assembled on the spot.
How the Check-In Workflow Produces Printed Name Tags for Conferences

The event check-in badge printing workflow follows the same sequence for every attendee, whether they pre-registered months ago or walked up five minutes before the keynote. Here is the conference badge printing workflow from start to finish.
Step 1: Attendee Arrives and Presents Their QR Code or Name
- The attendee approaches the check-in station and either scans a QR code from their confirmation email or provides their name to the check-in staff.
Step 2: Staff or Kiosk Locates the Registration Record
- The check-in device searches the registration database and pulls up the attendee’s record, displaying their name, company, badge type, and any session or access-level information tied to their registration.
Step 3: Label Prints and Is Applied to Badge Stock
- The staff member confirms the record and taps “Print.” The thermal label printer produces a label with the attendee’s personalized information in two to five seconds. The staff member peels the label and applies it to a piece of pre-branded badge stock.
Step 4: Badge Is Handed to Attendee with Lanyard
- The completed badge, now combining the event’s branded design with the attendee’s personalized label, is placed in a badge holder or attached to a lanyard and handed to the attendee. Total time from arrival to badge in hand: 15 to 45 seconds.
For throughput planning, EventMobi’s setup guidelines recommend planning for roughly 150 attendees per hour per station. A 600-person conference with a 90-minute check-in window needs at least four stations.
How Onsite Label Printing Handles Walk-Ins, Corrections, and VIP Additions

How does onsite badge printing handle walk-ins and name corrections? Walk-ins, misspellings, and last-minute VIP additions all follow the same core workflow as pre-registered attendees. Staff create or edit a registration record, and the label prints with the correct information immediately.
Walk-Ins: Same Workflow, No Separate Station Required
When a walk-in attendee arrives, staff create a new registration record on the check-in device, enter the attendee’s name and badge type, then print the label the same way they would for any pre-registered attendee. The process adds about 30 seconds compared to a standard check-in, and it eliminates the need for a separate “walk-in station” with blank badges and markers.
Name Corrections and Misspellings: Fix and Reprint in Seconds
If an attendee’s name is misspelled or their title has changed since registration, staff update the record on the check-in device and reprint the label. A reprinted label costs fractions of a cent and takes five seconds, compared to the awkwardness of crossing out a pre-printed badge and handwriting a correction.
Last-Minute VIP and Speaker Additions
Speakers, sponsors, and VIP guests added after registration closes receive the same quality badge as every other attendee. Because on-demand badge printing pulls from the live registration database, there is no visible distinction between a badge for someone who registered six months ago and one printed for a speaker added that morning.
The Most Common Label Printing Failures at Events, and How to Prevent Them
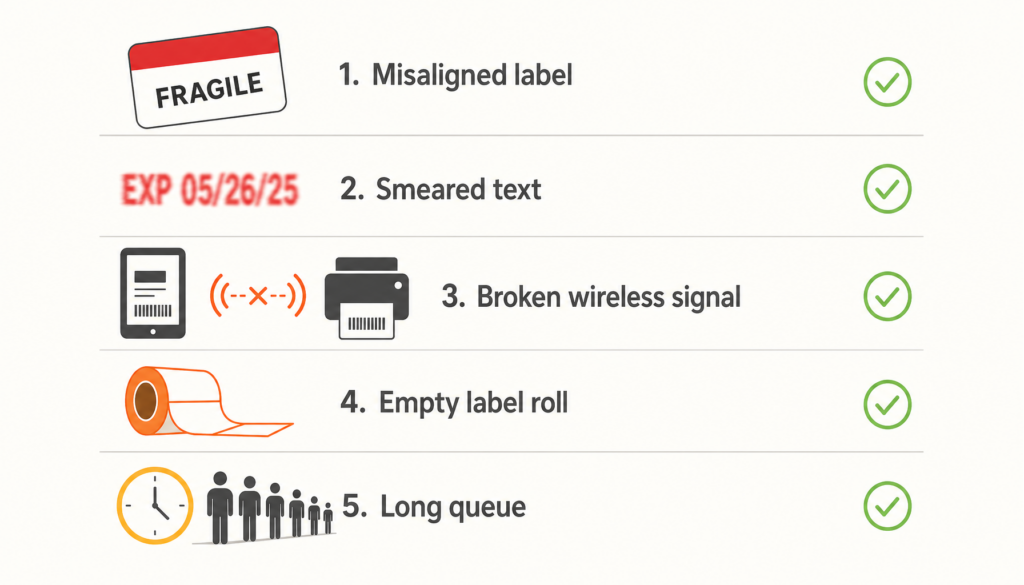
Even a well-planned badge label printer setup can hit problems during high-volume check-in. Here are the four failures that trip up event teams most often, and how to prevent them.
Label Misalignment
Labels print off-center or partially outside the label area. This is almost always caused by incorrect template settings in the print driver or check-in software. The fix: run a test print of at least five labels before doors open and adjust the margins until text is consistently centered.
Smearing or Faded Print
Text appears blurry, smeared, or faded. This happens when inkjet-compatible label stock is loaded into a thermal printer (or vice versa). Thermal printers require thermal-coated labels; standard paper labels will not produce a clean image. Verify label stock compatibility with your printer model before the event and bring a backup roll.
Connectivity Drops Between Printer and Check-In Device
The printer stops responding mid-check-in, usually because a Bluetooth connection dropped in a crowded venue. The prevention: use a USB connection as the primary link between the check-in device and the printer. Bluetooth works as a backup, but USB is more reliable in high-traffic RF environments.
Running Out of Label Stock Mid-Event
Running out of labels during check-in is avoidable. Order at least 15% more label stock than your expected attendance to account for walk-ins, reprints, and test prints. For a 500-person event, that means stocking at least 575 labels.
How Onsite Label Printing Integrates with Your Registration Platform
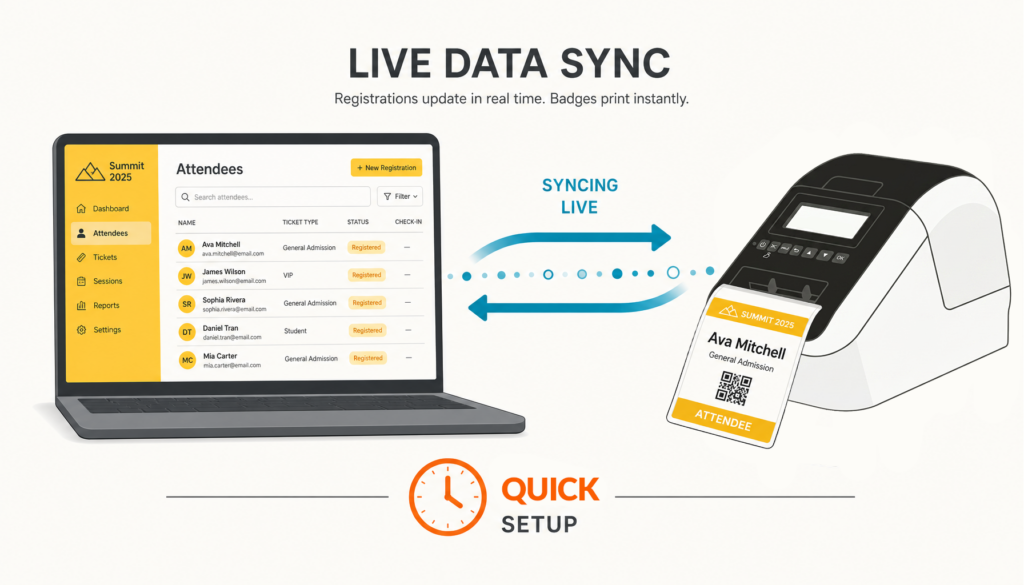
The real value of onsite badge label printing is not the printer; it is the live connection between the printer and your registration data. When an attendee updates their information after registering, the change is reflected at check-in without any manual CSV export or spreadsheet reconciliation.
This is why purpose-built event platforms outperform general-purpose label printing setups. EventMobi’s BadgeON connects badge label printing directly to the registration database, so check-in staff always work with current data. Session assignments, access levels, and custom fields all flow through to the badge label automatically. BadgeON stations are portable and designed for flexible placement. A battery pack workaround is available for venues without nearby outlets (with a fully battery-powered stand in development), and no technician is required to manage the setup.
Registration integration also means that check-in data feeds back into the platform in real time. You can see who has arrived, track no-shows, and share live attendance numbers with session coordinators without a separate tracking spreadsheet.
According to EventMobi’s operational guidelines, setup time for a single station, including connecting the printer, configuring the template, and running a test print with QR code scan verification, is approximately 20 to 30 minutes. Compare that to the two to four hours typically required to sort pre-printed badges for a 500-person event.
Printed Name Tags for Conferences FAQs
Onsite badge label printing is a check-in method where each attendee’s name tag is printed at the event venue when they arrive. A thermal label printer produces a label with the attendee’s name, company, and other details, and staff apply that label to pre-branded badge stock. It replaces the need to pre-print and sort individual badges before the event.
You need three things: a thermal label printer, a check-in device such as an iPad, tablet, or laptop, and pre-branded badge stock. The check-in device connects to the printer via USB or Bluetooth and runs software linked to your registration database. You will also need conference badges and lanyards or badge holders for the finished product.
Walk-ins are processed through the same workflow as pre-registered attendees. Check-in staff create a new registration record on the device, enter the walk-in’s name and details, and print the label immediately. No separate station, blank badges, or handwritten name tags are required.
Label printing uses two components: pre-designed badge stock carrying the event branding and a small printed label with attendee-specific data. Direct thermal printing produces the entire badge, design and attendee information included, from blank stock using specialized and more expensive hardware. Label printing is simpler, cheaper, and operable by event staff without technical training.
A single badge label prints in two to five seconds. The full check-in process, from attendee arrival to badge in hand, takes 15 to 45 seconds depending on whether the attendee scans a QR code or gives their name verbally. One station can process roughly 150 attendees per hour, so plan one station for every 150 attendees you expect during your peak check-in period.
The most common cause of a printer going offline is a dropped Bluetooth connection, which is frequent in crowded venues with heavy wireless traffic. The fix: use a USB connection as your primary link and keep Bluetooth as a backup. If the printer does disconnect, restarting the Bluetooth pairing or switching to USB typically resolves the issue in under a minute. Note that platforms like EventMobi’s BadgeON require an active internet connection for badge printing, so confirm your venue has reliable Wi-Fi or bring a mobile hotspot as a backup. Always bring a backup printer for events over 300 attendees.
Conclusion
Onsite badge label printing removes the two biggest time sinks from conference check-in: pre-sorting badges and managing last-minute changes by hand. With a thermal label printer, a check-in device, and pre-branded badge stock, your team can produce professional printed name tags for conferences in seconds, handle walk-ins and corrections through the same workflow, and avoid the common failures that slow down registration lines. Setup takes minutes per station (per EventMobi’s operational guidelines), compared to hours of pre-event badge sorting. For most conferences under 2,000 attendees, label printing is the most practical and cost-effective approach to onsite badging.

Need more help navigating your badge design and printing options?
Book your EventMobi demo today for expert advice and learn how EventMobi can help you create the right check-in experience for your events.
The post How Printed Name Tags for Conferences Work: The Complete Operational Guide appeared first on EventMobi.