Your First Local LLM API Project in Python Step-By-Step
Image by Editor | Midjourney
Interested in leveraging a large language model (LLM) API locally on your machine using Python and not-too-overwhelming tools frameworks? In this step-by-step article, you will set up a local API where you’ll be able to send prompts to an LLM downloaded on your machine and obtain responses back. Similar to ChatGPT, but entirely locally.
By following the steps below, you will:
- Set up Ollama on your machine: a user-friendly framework for locally running open LLMs like LLaMA, Gemma, or Mistral based on a basic interface.
- Use FastAPI to construct a robust and lightweight REST API that enables user-model interaction through HTTP requests.
- Send prompts and obtain near real-time responses from the LLM through your local endpoint, without relying on external services from cloud providers.
Warm-Up Readings
To get familiar or freshen up with familiar concepts and tools used in this article, here are some recommended readings:
The Step-by-Step Process
Off we go! The tutorial assumes you have Python 3.9 or later installed on your machine and have a basic-to-intermediate understanding of the Python language. With that in mind, the code is designed to be implemented in a Python project created in an IDE like Visual Studio Code or similar — note that this is not an online notebook-friendly tutorial, as we need to download and use an LLM locally.
Installing Ollama and Downloading an LLM Locally
Depending on your operating system, you may download one version of Ollama or another from its website. Once downloaded and launched, open a terminal and type in this command:
This command will pull (download) a Llama 3 LLM locally — by default, the model downloaded is referenced as llama3:latest as of writing. Be warned, the first time you download it, it will take some time to fully download, largely depending on your internet connection’s bandwidth. Once fully pulled, a conversation assistant will be automatically launched in the terminal, where you can start interacting.
Note, however, that we will take a different approach and show the basic steps to build a local Python-based LLM API. To do that, let’s switch to our IDE.
Create a Python Project in VS Code (or other IDE)
Assuming you are using VS Code (you may need to take slightly different actions if working with other IDEs), create a new project folder in the file directory, called “local-llm-api” or similar.
Inside the folder, we will create two files, called “main.py” and “requirements.txt”. Let’s leave the Python file blank for now, and add the following to the “requirements.txt” file and save the changes:
Setting up a virtual environment is recommended when working with local LLMs because it isolates dependencies, prevents conflicts among library versions, and keeps your overall development environment tidy. In VS Code, you do this by:
- Opening the command palette by pressing Command + Shift + P.
- Typing or selecting Python:Create Environment followed by Venv.
- Choose a suitable Python version (I chose Python 3.11).
- You should now be prompted to pick the “requirements.txt” file created earlier to install the listed dependencies, which is crucial as we will need FastAPI, Uvicorn, and Requests in our Python program.
If the last step does not work, try running on the IDE’s terminal:
|
pip install fastapi uvicorn requests |
Main Python program
Let’s get back to the empty “main.py” file we created earlier, and add the following code:
|
1 2 3 4 5 6 7 8 9 10 11 12 13 14 15 16 17 18 19 20 21 22 23 24 25 26 27 28 29 30 31 32 33 34 35 36 37 38 39 40 41 42 43 44 45 46 47 48 49 50 |
from fastapi import FastAPI from pydantic import BaseModel import requests import json import uvicorn import os # Added for environment variable usage
app = FastAPI()
class Prompt(BaseModel): prompt: str
@app.post(“/generate”) def generate_text(prompt: Prompt): try: # Use environment variables for host and model, with fallbacks ollama_host = os.getenv(“OLLAMA_HOST”, “http://localhost:11434”) ollama_model = os.getenv(“OLLAMA_MODEL”, “llama3:latest”)
response = requests.post( f“{ollama_host}/api/generate”, # f-string for host json={“model”: ollama_model, “prompt”: prompt.prompt}, # Use ollama_model stream=True, timeout=120 # Give model time to respond ) response.raise_for_status() # Raise an exception for HTTP errors (4xx or 5xx)
output = “” for line in response.iter_lines(): if line: data = line.decode(“utf-8”).strip() if data.startswith(“data: “): data = data[len(“data: “):] if data == “[DONE]”: break try: chunk = json.loads(data) output += chunk.get(“response”) or chunk.get(“text”) or “” except json.JSONDecodeError: print(f“Warning: Could not decode JSON from line: {data}”) # Added for debugging continue
return {“response”: output.strip() or “(Empty response from model)”}
except requests.RequestException as e: return {“error”: f“Ollama request failed: {str(e)}”}
if __name__ == “__main__”: # For development, reload=True can be useful. For production, use reload=False. uvicorn.run(“main:app”, host=“127.0.0.1”, port=8000, reload=False) |
Don’t panic just yet: we are about to break down and explain some key parts of this code:
app = FastAPI()creates the Web API fueled by a REST service that, once the Python program is executed, will start listening and serving requests (prompts) using a local LLM.class Prompt(BaseModel):andprompt: strcreate the JSON input schema whereby we can introduce the prompt for the LLM.@app.post("/generate")anddef generate_text(prompt: Prompt):define the function that leverages an API endpoint to send prompts and obtain model responses.- The following code is crucial:
response = requests.post(
“http://localhost:11434/api/generate”,
json={“model”: “llama3:latest”, “prompt”: prompt.prompt},
stream=True,
timeout=120
)
It sends the prompt to the specified local LLM fetched by Ollama. Importantly, here you must make sure the model name is among the ones you downloaded (in my case,
"llama3:latest"). You can check the names of the local models downloaded on your machine by typing the commandollama listin a terminal. - Lastly, this code reads the streamed response and returns it in a legible format.
|
for line in response.iter_lines(): ... chunk = json.loads(data) output += chunk.get(“response”) or chunk.get(“text”) or “”
return {“response”: output.strip()} |
Running and Testing the API
Once you’ve saved the Python file, click on the “Run” icon or run python main.py in the terminal. You should see something like this as part of the IDE’s output:
|
INFO: Uvicorn running on http://127.0.0.1:8000 (Press CTRL+C to quit) |
That means one thing: the REST server is up and running, and the service is accessible via http://127.0.0.1:8000/docs. Open this URL on your browser and if everything went correctly, you’ll see a FastAPI documentation interface like this:
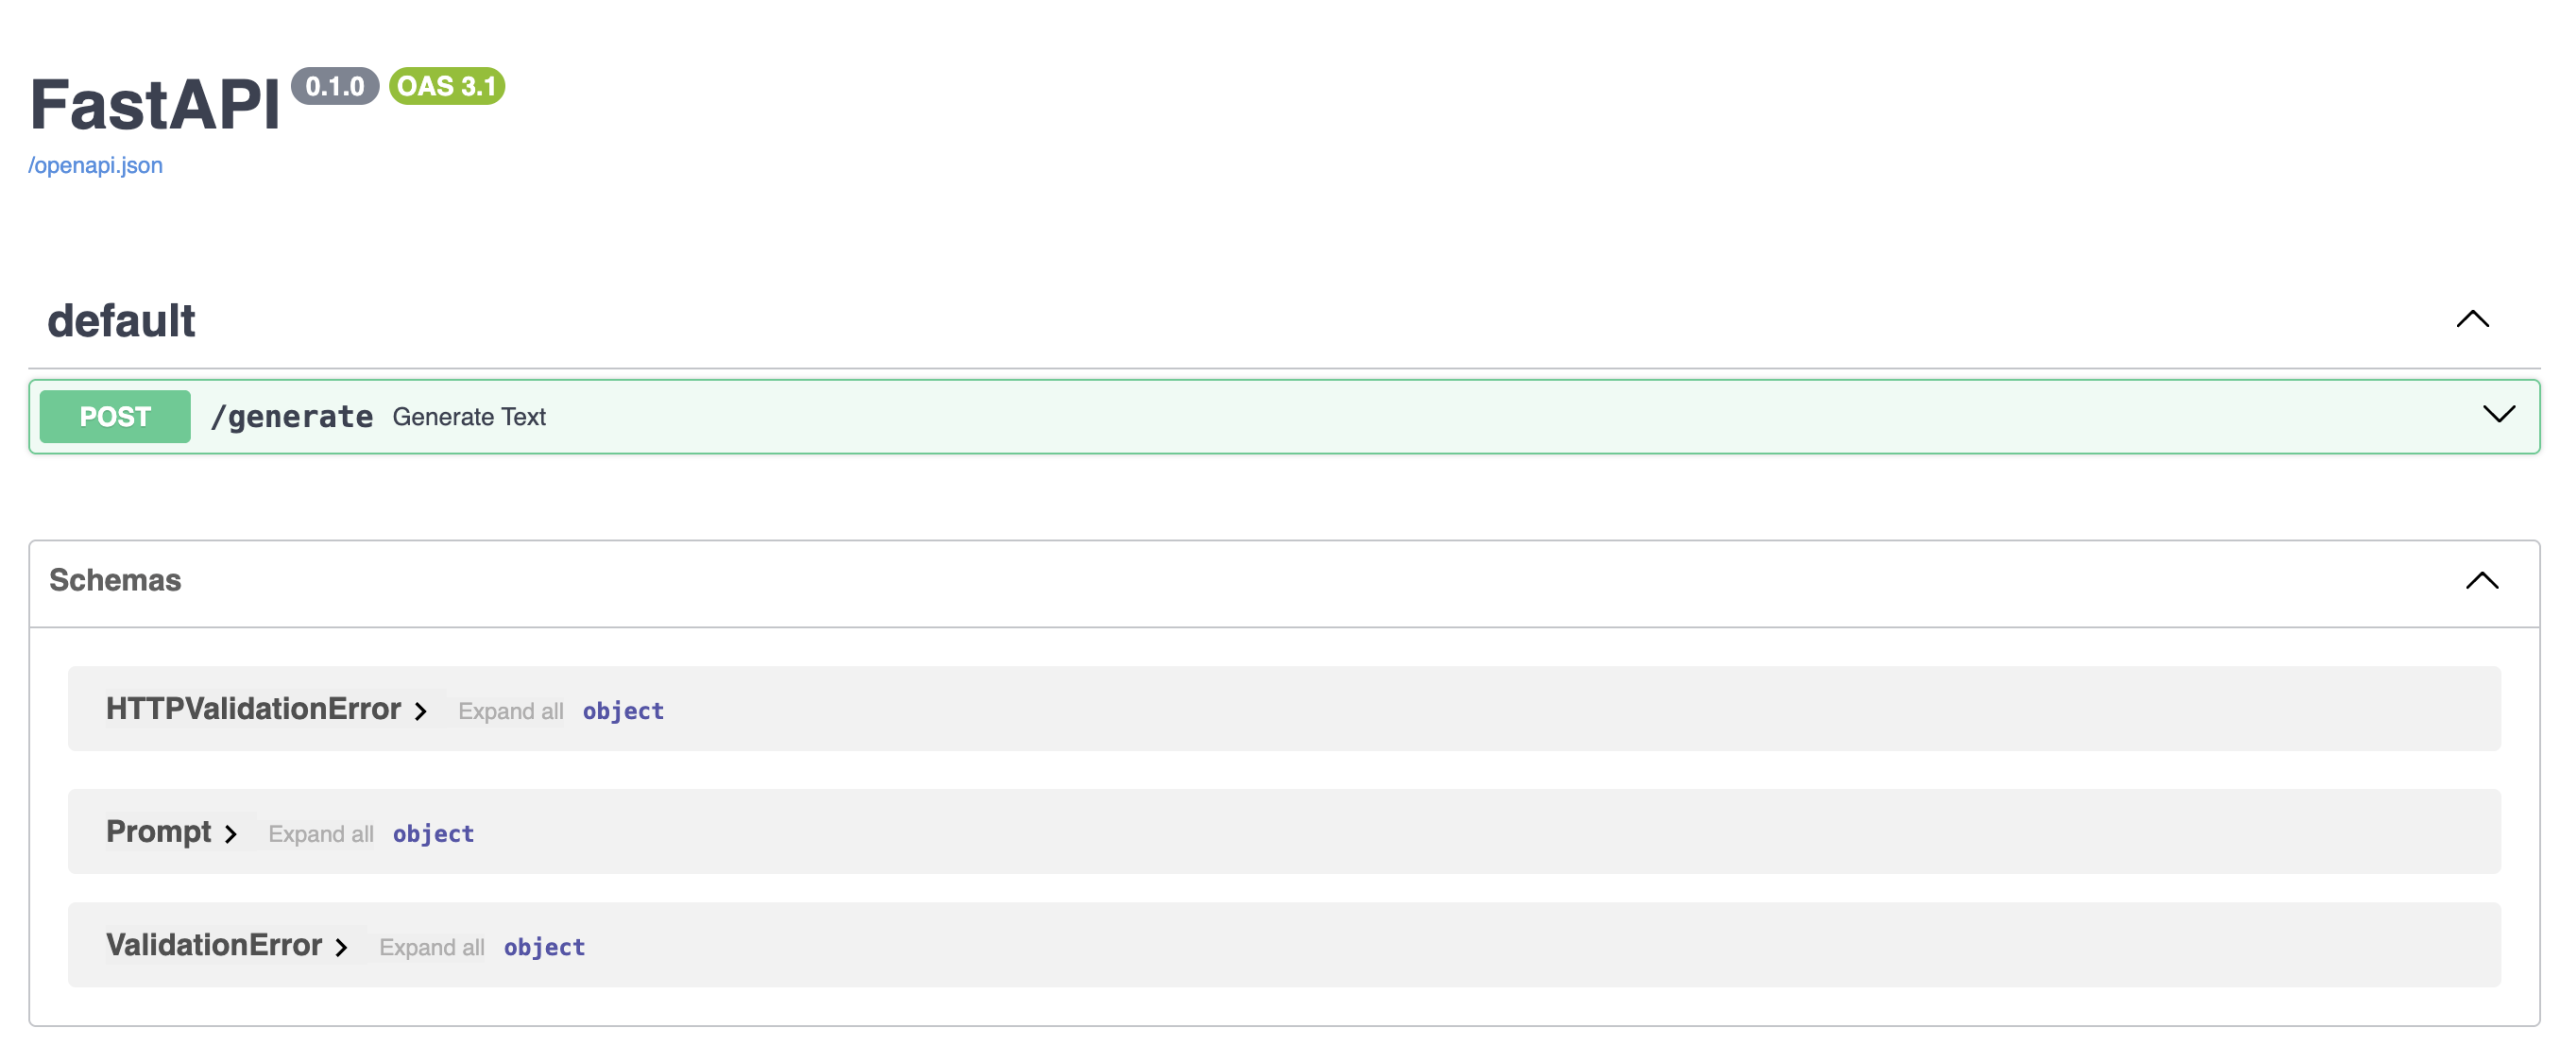
You’re very close to prompting your local LLM: how exciting! In the interface displayed, click the arrow beside the POST/generate box to unfold it, and click the “Try it out” button.
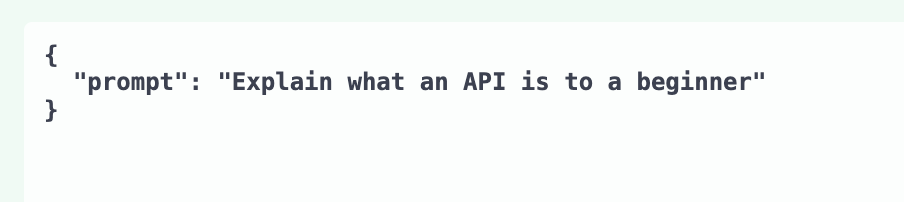
Enter a prompt of your choice to ask the LLM for something. You must do it in a dedicated JSON-like parameter value, as shown below, by replacing the default prompt: "string". For instance:
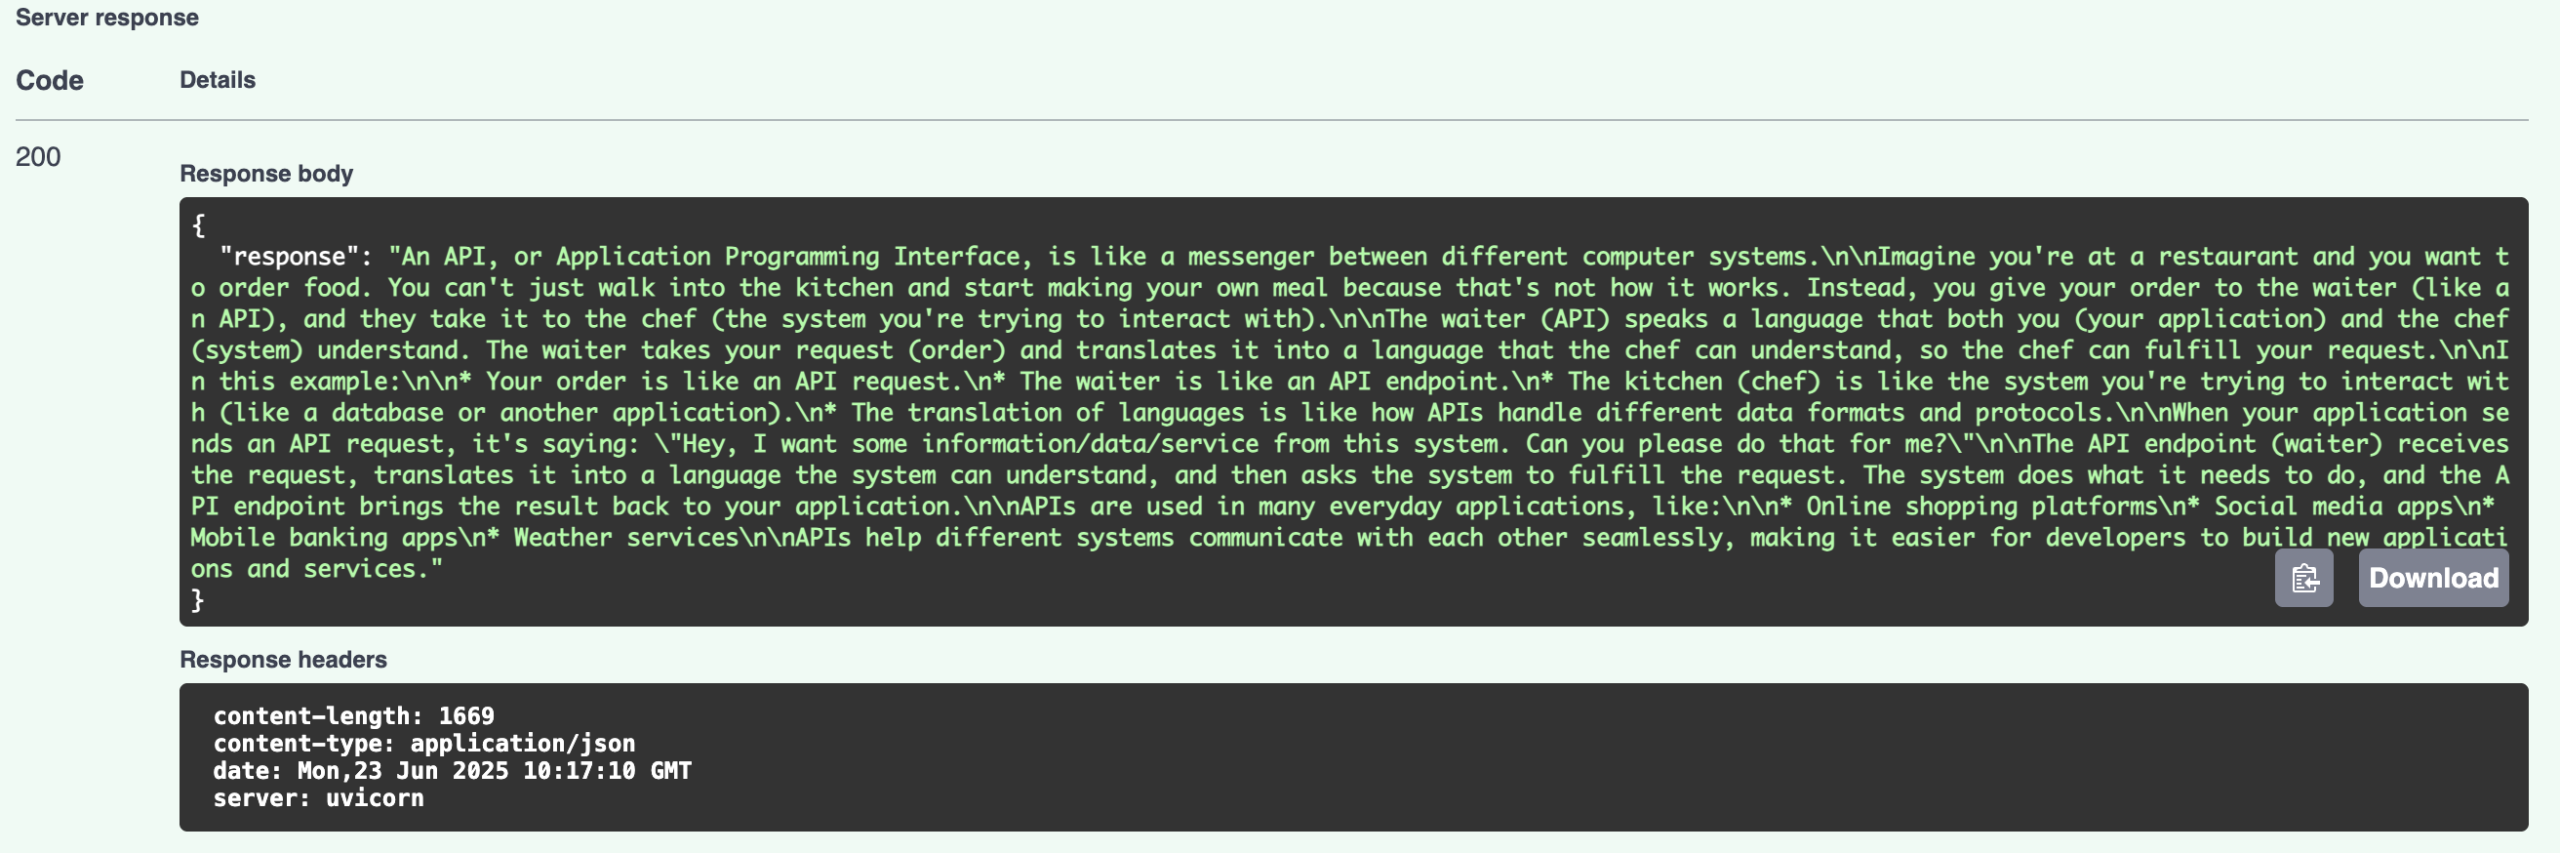
Once you click the “Execute” button, in a few seconds you may get the response by slightly scrolling down:
Congratulations, you set up your own local LLM API!
Possible ideas for advanced improvements on this first demo could include building a frontend that consumes the FastAPI-based API, for instance, using Streamlit. You may also want to explore the use of fine-tuned models for custom or domain-specific use cases like marketing, insurance, logistics, etc.
Concluding Remarks
This article showed step by step how to set up and run your first local large language model API, using local models downloaded with Ollama, and FastAPI for quick model inference through a REST Service-based interface. All by running a local Python program from your IDE within the comfort of your machine.