

Ever noticed a mistake after you’ve published a post? One surefire way to save you from embarrassing corrections is to use a social media approval workflow.
Having an effective social media approval process in place will ensure that everything sent out the door is high-quality, error-free, and brand-appropriate.
Here, we’ll explain how to set up a social media approval workflow that allows your team to collaborate more accurately and efficiently.
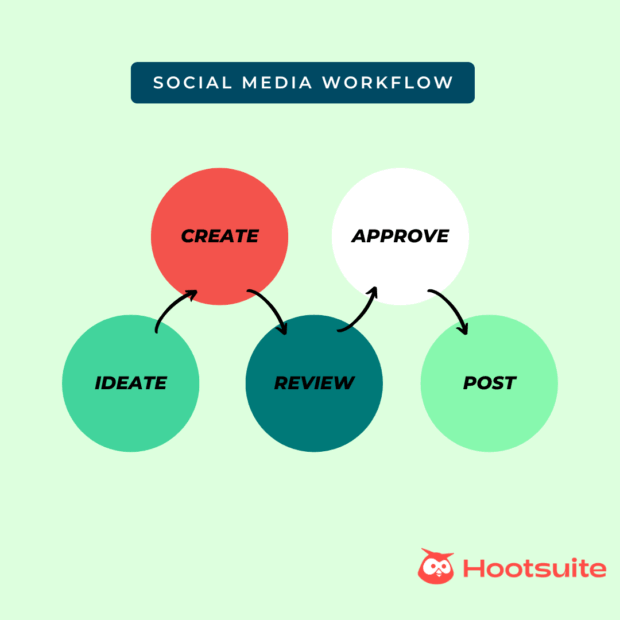
A social media approval workflow is the step-by-step system your team uses to review, edit, and approve content before it goes live. It brings structure to the creative process so that social media posts don’t slip through with typos, broken links, or off-brand messaging.
The workflow usually starts with a draft (written by a content creator or strategist), moves through internal reviews, and ends with final sign-off. In some cases, there may also be feedback loops, legal review, or design tweaks along the way.
Good workflows are built for how your team actually works. They account for your team size, your publishing schedule, and how your stakeholders prefer to communicate. The goal isn’t to over-engineer the process — it’s to keep your social media strategy moving smoothly and avoid last-minute surprises.
What makes a good social media approval process?
To set up a solid social media and content approval workflow, you’ll need a few key building blocks. Here’s a quick checklist:
- Clear roles: Everyone should know who creates, who reviews, and who approves.
- Social media style guide: Helps your team stay on-brand with voice, hashtags, tone, and more.
- Publishing timeline: A plan that shows when posts are due and when they go live.
- Deadlines (internal and external): Keeps everyone on track, especially for launches, events, or client work.
- Reliable notification system: Make sure the right people are pinged at the right time (not buried in Slack threads).
- Easy communication tools: Choose a tool that makes it simple to leave feedback or ask questions.
- Error-checking apps: Use tools that catch broken links, spelling errors, or duplicate posts before they go out.
- Regular check-ins: Set a reminder to review and update your workflow every few months.

Why teams need an approval process
A social media approval process isn’t just for enterprise brands or agencies. It’s useful for any team or individual social media manager who wants to stay on track and publish high-quality content.
The most obvious benefit? Social media workflows catch mistakes. Typos, broken links, off-brand language — these are easy to miss when you’re moving fast. A second (or third) set of eyes makes a big difference.
It also helps with consistency. When multiple people are creating content, a shared approval system ensures your posts still sound like they came from one brand voice. This matters just as much for small brands as it does for big ones.
Then there’s the time-saving factor. With a clear plan in place, teams spend less time chasing content approvals or making last-minute edits. Everyone knows:
- What’s due
- When to review
- Who gives the final go-ahead
That way, if there’s an issue down the line, it’s easy to backtrack and figure out exactly who did what, and how to fix it going forward.
In regulated industries, an approval step can also act as a safety net. It keeps your content compliant and reduces the risk of something going live that shouldn’t.
And finally: feedback. A good workflow builds in space for it. Whether it’s catching a small issue or rethinking a headline, reviewers get the chance to optimize a piece of content before it hits publish.
Who’s involved in a typical workflow?
The people in your approval workflow will depend on your team setup. But in most cases, you’ll find some mix of the following roles:
- Content creator: Handles content creation, including writing the posts, and adding visuals, links, and hashtags.
- Editor or peer reviewer: Reviews the post for clarity, grammar, and tone.
- Designer (if needed): Creates or approves any creative assets, like graphics or video.
- Marketing or brand lead: Makes sure the content supports your campaign goals and sounds on-brand.
- Legal or compliance reviewer: Required for some industries — especially if the post includes disclaimers, claims, or sensitive information.
- Final approver: The person who gives the go-ahead to publish or schedule posts.
In smaller teams, one person may take on multiple roles. In larger teams, each of these steps might involve a different person or department.
A social media approval tool is software that helps your team review and approve posts before they go live. It keeps your workflow organized, so nothing slips through the cracks.
Key features to look for in a tool
Here are the must-have features to look for when choosing a social media approval tool:
- Multi-user team collaboration: Let multiple team members work on the same post. This way copywriters, editors, designers, and approvers can all access the same content in one place.
- Role-based permissions: Control who can draft, edit, comment, or approve. This helps avoid accidental changes and keeps the content approval process clean.
- Automated notifications: Send alerts to the right people at the right time. No more missed deadlines or forgotten tasks.
- Mobile access: Make quick edits or approvals on the go. Helpful for teams that don’t want to be tied to a desk.
- Commenting and feedback tools: Leave notes directly on a post draft, instead of jumping between platforms to give feedback.
- Version history: See what changed, who made the change, and when. Useful if something needs to be rolled back or reviewed.
- Deadline tracking: Stay on schedule with built-in timelines or approval windows. Helps avoid last-minute scrambles.
- Integration with publishing tools: The best approval tools connect with your social media management tool (like Hootsuite) so approved posts can go live automatically.
You can create your approval process from scratch, of course, or you could save time and use our free social media approval template. (We’re all about making life easier for our readers.)
Bonus: Download our bundle of free customizable social media workflow templates and set up a clear approval process for your team in minutes.
In our humble opinion, Hootsuite’s approval workflow is the best around. But FYI, the approval feature and ability to assign permissions are only available on Advanced and Enterprise plans.
If you’re on a Standard plan, though, you can still manage your team’s access and roles and assign posts and comments to team members.
Here’s how to set up and manage Hootsuite’s approval workflow.
Step 1: Set up approval permissions for your team
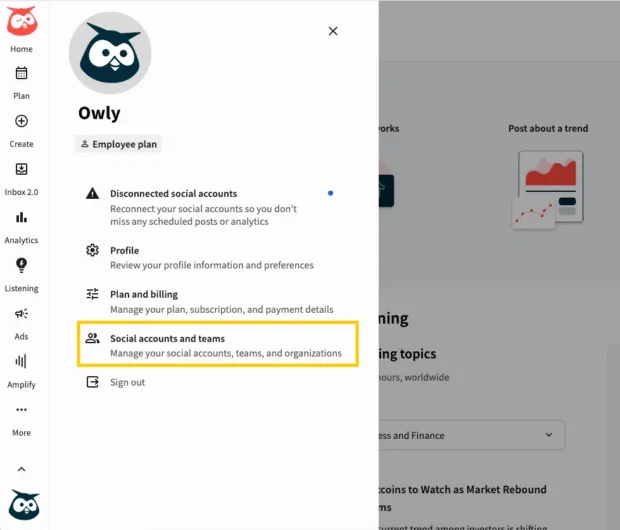
First, log in to your account and go to your profile at the bottom of the left menu in your Hootsuite dashboard. Then, select Social accounts and teams.
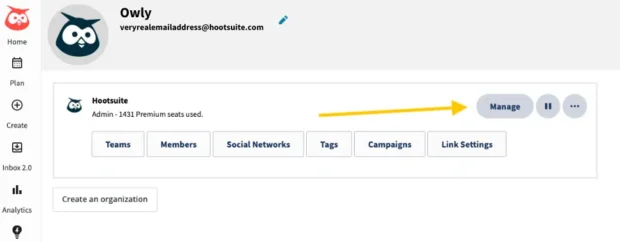
Next, select Manage.
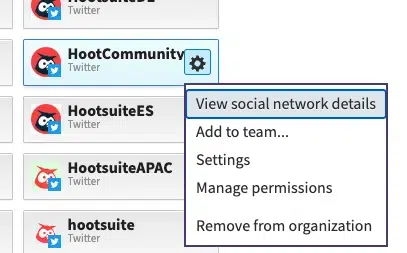
Identify the social account for which you want to set up approval permissions.
Point to the social account, select Settings, and then choose Manage permissions.
In the Permissions tab, set the appropriate permissions for each member based on their roles:
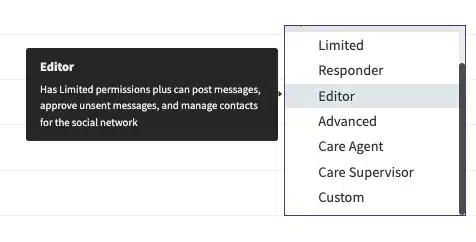
Not sure what each permission level includes? Here’s a quick breakdown to help you decide:
- To require a member’s posts to be approved before publishing, select either Limited, Responder, or Custom-Publish Message with Approval permissions.
- To ensure that a member’s Inbox 2.0 comments and replies are approved, select either Limited, Responder, or Custom-Comment and reply with Approval permissions.
- To designate a member as an approver, select either Advanced, Editor, or Custom-Approve Messages permissions.
Step 2: Set up a team of approvers
In many cases, you’re going to want to set up a whole team of people who can approve content. Make sure you choose more than one person; it helps to have a backup in case your main approver is unavailable.
Here’s how to create an approval team:
- Go to your profile and select Social accounts and teams, then select Manage
- Select Add a team
- Provide details for your team, including their social account affiliations
Step 3: Configure custom approvals
With your approval teams in place, it’s time to configure custom approvals for your social accounts:
- Point to the social account within your organization for which you want to set up custom approvals
- Select Settings and then choose Settings again
- On the Profile settings tab, find the Custom Approvals section
- Select Edit custom approval
- In the 1st approver search box, choose the approval team you created earlier
- Click Save and Set to confirm your custom approval settings
If you require an extra layer of security or review, you can add second or third tiers of approval.
For each additional tier, repeat the process of selecting the approval team and configuring custom approvals as outlined in Step 3.
Step 4: Approve content before it goes live
Now that your approval workflow is in place, you can get those posts out the door. Here’s how to approve, edit, or reject content.
Go to Plan, select your organization, and then select Approvals.
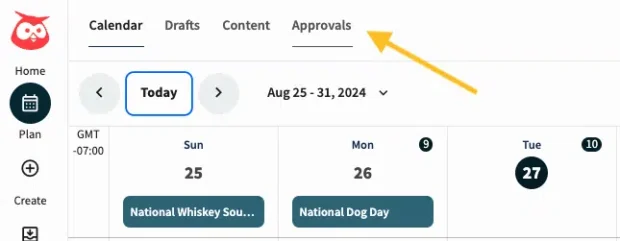
You can view content waiting to be approved by posts that are Assigned to you, Created by you, Rejected, or Expired. You can filter your approvals by post type, social account, or by date using the options at the top of the page.
Select the content to view it. To edit the content before you approve it, open a post, and then select Edit from the top of the page.
Then, select Approve or Reject.
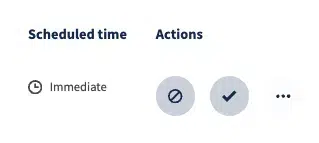
And that’s it! Unless you have second or third approvers, approved content is published (or scheduled) right away.
5 best practices for building an efficient approval workflow, according to the experts
A good social media approval workflow doesn’t need to be complicated — but it does need to work. We asked Nicole O’Neill, a UK-based freelance Social Media Consultant, how she approaches approval workflows with her clients.
Here’s what she shared.
1. Build around how your client or team actually works
“There’s no one-size-fits-all approach [to creating a social media approval workflow],” O’Neill says. “The best approval workflow is the one that actually works for the client, and that often means being agile and adaptive to how you work — not forcing them into your system.”
Some of her clients prefer content delivered in a formal deck on a set schedule, while others are far more casual.
“I have one client who is SO busy and doesn’t have time to sit down and read a full presentation. So instead, I just WhatsApp her the content directly. She gives me feedback/approves, and we’re able to manage it smoothly like that.”
Whether structured or informal, the goal is the same: to keep things running smoothly on both sides.
2. Set expectations early, then stick to them
To minimize delays, O’Neill recommends creating a clear timeline from the very beginning.
“If you’re working with an agency or bigger team, you’ll likely need to work with more formal timelines. In those cases, I find it really helpful to map everything out from the start: when they’ll get content, when I need feedback, when it needs to go live.”
For ongoing work, she often sets recurring dates. “I’ve usually set content to land with them by the 20th, feedback is due by the 25th, and that gives me time to make edits and schedule content before the end of the month. That kind of clarity saves so much back and forth.”
3. Use collaboration tools that make sense for you and them
While there are plenty of platforms built for workflow management, O’Neill finds that a simple, shared document often works best. “I wish I could say I was a fancy tool gal, but I’m just a big fan of Google Slides.”
Because her work is mostly in paid social, she uses a single template that includes campaign structure, budgets, audiences, assets, copy, and URLs. “Clients can comment or make edits directly, and because it’s live, we’re always working from the same version.”
That flexibility also means adapting to the client’s preferences. “In one case, I use Figma instead, because the client is a designer and uses Figma himself… The key is choosing a setup that’s easy for you and the client — not just the client.”
4. Give yourself more time than you think you’ll need
Things will take longer than expected, especially when you’re juggling multiple approvals or edits. “Build in more time than you think, at every stage,” O’Neill advises. “More time to create content. More time for clients to review. And definitely more time for amends.”
Some clients barely have changes; others want multiple rounds. If you leave enough time for both, you won’t be stuck scrambling with 48 hours to go.
5. Don’t overcomplicate it
At the end of the day, the goal of an approval process isn’t to be impressive — it’s to be effective.
“Don’t be afraid to keep it simple,” says O’Neill. “The point of an approval workflow isn’t to impress your client with a complex system. It’s best to focus on keeping things moving. Whether it’s a live deck or a quick WhatsApp message, the best process is the one everyone actually uses.”
Social media approval workflow FAQ
What is the social media workflow process?
The social media workflow process is the series of steps a social media marketing team follows to plan, create, review, approve, and publish content across social media platforms. It helps organize tasks, set deadlines, and ensure every post meets quality and brand standards before going live.
How do I create a social media approval workflow?
To create a social media approval workflow, start by mapping out each stage your content goes through (from drafting to publishing). Define who is responsible at each step (e.g. creator, editor, approver), set clear deadlines, and choose tools that support collaboration and version control. The workflow should reflect your social media team’s structure and be easy to follow and repeat.
What should be included in a social media approval workflow?
A strong approval workflow should include clear roles and responsibilities, a social media content calendar or timeline, internal deadlines for feedback, review checkpoints, and a final sign-off before publishing. It should also include a system for tracking edits, communicating feedback, and storing version history.
Who should approve social media content?
Approval should come from whoever is ultimately responsible for brand messaging and compliance. This could be a social media manager, brand lead, client, or legal/compliance team, depending on the industry and team structure. For most teams, having one final approver helps avoid confusion and delays.
Do small teams need approval tools?
Yes — small teams benefit from approval tools just as much as large ones. Even if there are only two or three people involved, having a structured way to review content and approve it helps avoid errors, miscommunication, and last-minute changes. Many tools are lightweight and scalable, making them a good fit for smaller content workflows.
Can I automate my social media approval process?
Yes. Many social media management platforms, like Hootsuite, offer automation features for approvals. Teams can set up rules for notifications, assign tasks based on role, and move content through the workflow automatically, saving time and reducing back-and-forth.
Build a winning social media marketing strategy with less time and effort. Use Hootsuite’s social media approval features to make sure none of your posts fall through the cracks. Assign work to your teammates, get notifications when content needs to be edited, and provide feedback to each other — all from one dashboard. Try it free today.


