
If you’re getting started with Python or data science, chances are you’ve heard of Jupyter Notebook. But what exactly is it, and how can you install it on your Windows 11 computer? Don’t worry in this tutorial, I’ll walk you through what is Jupyter Notebook, how to download Jupyter Notebook, and how to install it using both pip and Anaconda. We’ll also cover how to launch it as well as some online Jupyter Notebook options if you don’t want to install it locally.
Read More: How to Disable Weather Widget in Windows 11?
What is Jupyter Notebook?
Jupyter Notebook is an open-source interactive environment that allows you to write and run code in real time. While it supports multiple programming languages, it is most widely used with Python. With Jupyter, you can write and execute code step by step, making it easier to test and debug. It also enables you to create powerful visualizations using libraries like Matplotlib and Seaborn that helps you analyze and present data effectively. Beyond coding, Jupyter lets you document your work with text, markdown, and images, turning your projects into well-structured reports. You can even share your work effortlessly through .ipynb files which makes collaboration simple and efficient.
Method 1: Install Jupyter Notebook with pip (Recommended for Python Users)
This method is best if you already have Python installed or prefer lightweight installations.
Install Python
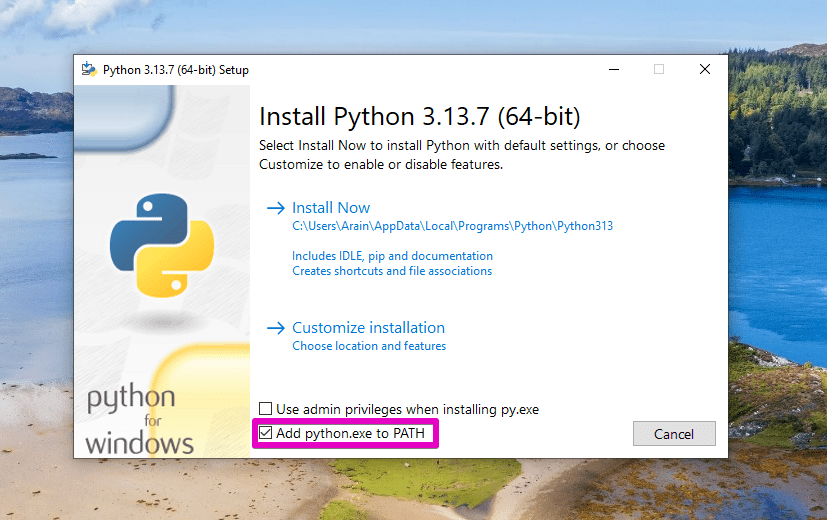
- Go to the official Python Downloads Page. Download the latest version for Windows.

- Run the installer and make sure to tick “Add Python to PATH” during installation.
Download Jupyter Notebook
Now that Python is installed and configured, you can download Jupyter Notebook using pip, Python’s package installer.
Check Pip Installation
Pip usually comes with Python. Let’s check its version first.
- Open the Command Prompt .
- Type pip –version and press Enter.
- You should see the pip version, like “pip 23.2.1.” This confirms pip is working.
Install Jupyter Notebook with Pip
Now you are ready to install Jupyter Notebook.
- In the Command Prompt, type the following command: pip install jupyter
- Press Enter.
- Pip will start downloading and installing all the necessary files for Jupyter Notebook. This might take a few minutes as it downloads several packages.
- Once the installation is complete, you will see messages about successful installation of various packages.
Verify Jupyter Notebook Installation
After installation, you can check that Jupyter Notebook is ready.
- In the Command Prompt, type jupyter –version and press Enter.
- You will see a list of versions for different Jupyter components, such as jupyter_client, jupyter_core, etc. This means Jupyter Notebook is installed.
Create and Use a Jupyter Notebook File
With Jupyter Notebook installed, you can now create your first notebook and run Python code.
Start Jupyter Notebook
You should always start Jupyter Notebook from the folder where you want to save your work. This helps keep your files organized.
- Create a Folder: Go to any location on your computer (e.g., your Desktop or Documents folder). Create a new folder. You can name it “Jupyter Notebooks” or anything you like.
- Open Command Prompt in the Folder:
- Open the new folder you just created.
- Click on the address bar at the top of the folder window (where it shows the folder path).
- Delete the path text and type CMD.
- Press Enter. This will open the Command Prompt directly in your new folder.
- Launch Jupyter Notebook: In this Command Prompt window, type: jupyter notebook
- Press Enter.
- Your web browser will automatically open a new tab. This tab will show the Jupyter Notebook interface, which looks like a file browser.
Create a New Notebook
Now you can create a new Python notebook.
- In the Jupyter Notebook web interface, click on the “New” button in the top right corner.
- From the dropdown menu, select “Notebook” and then “Python 3 (ipykernel)” or similar (the Python version you installed).
- A new browser tab will open. This is your blank Jupyter Notebook.
Run Your First Python Code
Let’s try running a simple Python command.
- In the first cell of your new notebook, type: print(“Hello, World!”)
- To run the code, click the “Run” button in the toolbar (it looks like a right-pointing triangle).
- You will see “Hello, World!” printed below the cell. You have successfully run your first Python code in Jupyter Notebook!
Save and Rename Your Notebook
It’s important to save your work.
- To save your notebook, click “File” in the menu bar, then select “Save Notebook.”
- To rename your notebook, click “File” then “Rename…” or simply click the title “Untitled” at the top of the page.
- Type a new name, for example, “My First Notebook,” and click “Rename.”
- If you go back to the folder where you started Jupyter Notebook, you will see a new file with the extension .ipynb (e.g., My First Notebook.ipynb). This is your Jupyter Notebook file.
Opening Notebooks in Visual Studio Code (Optional)
You can also open .ipynb files in other code editors like Visual Studio Code if you have it installed. Simply double-click the .ipynb file, and it may open directly in Visual Studio Code, allowing you to view and edit your notebook there as well.
You have now successfully downloaded, installed, and set up Jupyter Notebook on your Windows 11 computer. You also learned how to create a new notebook, run Python code, and save your work. Jupyter Notebook is a versatile tool that will help you in your Python journey, whether for learning, data analysis, or other projects. Keep practicing, and explore all the features Jupyter Notebook offers.
Method 2: Install Jupyter Notebook with Anaconda (Beginner-Friendly)
If you’re new to Python or want a full data science toolkit, Anaconda is the easiest option.
Download Anaconda
Visit the Anaconda Downloads Page. Download Anaconda. On the Anaconda website, find the “Free Download” button. Start the download. The installer for Windows will be visible. Click “Download” to begin. The file is large, around 951 MB, so it may take some time to finish.

Install Anaconda on Your Computer
Once the Anaconda installer finishes downloading, follow these steps to install it.
- Open the installer. Locate the downloaded file (usually in your Downloads folder). Right-click on it and choose “Open” to start the setup.
- Begin the setup. The Anaconda setup window will appear. Click “Next” to continue.
- Agree to the license. Read the license agreement. Then, click “I Agree” to move forward.
- Choose the installation type. For most users, selecting “All Users” is a good choice. Click “Next”.
- Pick an install location. The setup will show a default folder where Anaconda will install. This usually works fine. Anaconda needs about 5 GB of space. Click “Next”.
- Advanced options. You will see advanced installation options. It is best to keep the default settings as they are recommended. You can also select the option to clear the package cache once the installation is complete. Click “Install” to begin the installation process.
- Finish installation. The installation will take some time. Once it is done, a message will appear saying it was successful. Click “Next”. Click “Next” again.
- Complete the setup. You may see options to launch Anaconda Navigator or learn more. For this guide, you can uncheck these options. Then, click “Finish”.
Explore Anaconda Tools
After installing Anaconda, you get two main tools to manage your Python environment: Anaconda Prompt and Anaconda Navigator.
What is Anaconda Prompt?
The Anaconda Prompt is a command-line interface (CLI). It looks like a simple text window where you type commands. You use it to manage different Python environments and install or update software packages within Anaconda. This tool is powerful for those who like to work with text commands.
What is Anaconda Navigator?
The Anaconda Navigator is a graphical user interface (GUI). This means it has buttons and menus you can click. It helps you manage your Anaconda distribution without typing commands. Navigator lets you easily launch applications like Jupyter Notebook, Spyder, and RStudio.
Launch Jupyter Notebook
Now that Anaconda is installed, you can launch Jupyter Notebook.
- Open Start Menu. Click the Start button on your Windows 11 computer.
- Search for Anaconda Prompt. Type “Anaconda” into the search bar. You will see “Anaconda Prompt” in the search results.
- Start Anaconda Prompt. Click on “Anaconda Prompt” to open it.
- Type the command. In the Anaconda Prompt window, type jupyter notebook. Press Enter.
- Jupyter Notebook opens. Your web browser will automatically open a new tab or window. This will show the Jupyter Notebook interface running on your local computer at localhost.
Create Your First Jupyter Notebook Project
A project in Jupyter is called a notebook. Here is how to create one:
Navigate Your Files
When Jupyter Notebook opens in your browser, it shows a list of files and folders from your computer. You can browse through your desktop files directly from this interface. This helps you choose where to save your new notebooks.
Make a New Folder
It is good practice to keep your projects organized.
- Click “New”. In the Jupyter Notebook interface, find the “New” button in the top right corner.
- Select “Folder”. From the dropdown menu, click on “Folder”. This will create a new folder named “Untitled Folder”.
- Rename the folder. Select the “Untitled Folder” by checking the box next to it. Then, click the “Rename” button at the top of the page. You can name it something like “AmitPython”. Click “Rename” to confirm.
- Open the new folder. Click on the newly named folder (e.g., “AmitPython”) to enter it. This is where you will store your notebook.
Create a New Python Notebook
Now, create the actual notebook file.
- Click “New” again. Inside your new folder, click the “New” button.
- Select “Python3”. Choose “Python3” from the options. This will open a brand new notebook in a new browser tab.
- Rename your notebook. The new notebook will be called “Untitled”. Click on the word “Untitled” at the top of the page. A rename box will appear. Type a new name, like “demo”.
- Understand the file type. Jupyter Notebooks have the file extension .ipynb. This stands for “IPython Notebook”. Click “Rename” to save the new name.
Run Your First Python Code
You are now ready to write and run Python code in your new notebook.
- Type your code. In the first cell of your notebook, type a simple Python command. For example, to display text, you use the print() function.
print(“My name is Zarnab”)
- Run the cell. To run this code, you have two options:
- Press CTRL + ENTER on your keyboard.
- Click the “Run” button (which looks like a triangle) in the toolbar above the cell.
- See the output. After running the cell, the text “My name is Amit Diwan” will appear right below the cell. This shows your Python program works correctly.
You have successfully installed Jupyter Notebook on Windows 11 and run your first Python program. This powerful web application helps you combine code, text, and visuals in one place. Jupyter Notebook is a fantastic tool for learning Python, exploring data, and sharing your work with others.
Online Jupyter Notebook Options
Don’t want to install anything? You can use online Jupyter Notebook platforms:
Read More: Crack Kaggle: The Ultimate Data Science
Final Thoughts
Jupyter Notebook on Windows 11 can be installed quickly and without hassle, whether you choose the lightweight pip install jupyter notebook method or the beginner-friendly Anaconda distribution. In just a few steps, you’ll have a powerful environment ready for coding, data visualization, and experimentation. For those who prefer not to download software, online Jupyter Notebook platforms like Google Colab or Kaggle are excellent alternatives. No matter which option you select, Jupyter Notebook gives you the ability to write, test, and explain your code interactively. Once set up, it becomes a versatile tool for learning, research, and professional projects. Start today and unlock the full potential of Python with Jupyter Notebook!


