Why You Should Add Your Business to Apple Maps
You should add your business to Apple Maps because it lets you reach potential customers who use that platform to search for local businesses.
Apple Maps is the default mapping service on Apple devices (iPhone, iPad, Mac, Apple Watch, etc.). Which means your potential reach is quite high.
Plus, an Apple Maps business listing is free and grants you access to analytics tools that show how users interact with your listing.
How to Add a Business to Apple Maps
Follow these steps to add a business on Apple Maps:
1. Log In to Apple Business Connect
To add your business to Apple Maps, go to Business Connect and click “Get Started.”

If you already have an Apple account, enter your email address or phone number, then click “Continue.”
If not, click “Create Your Apple Account” and follow the setup instructions.

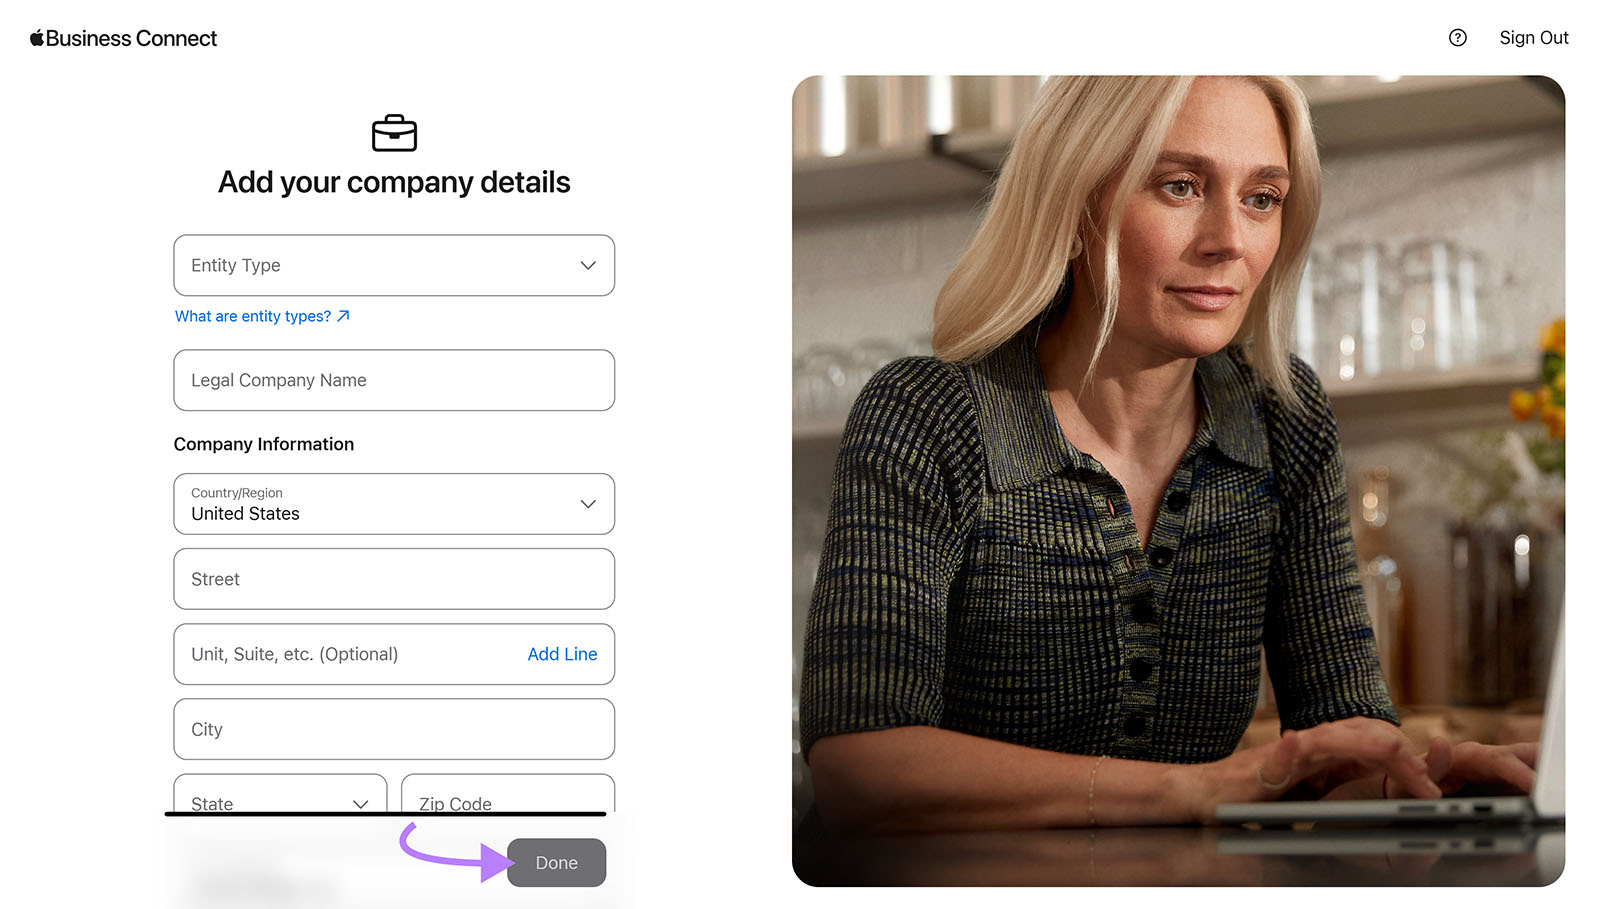
2. Add Your Company Details
After logging in to your Apple account, add the following company details:
- Entity type
- Legal company name
- Country/region
- Address
- Phone number
- Website
Once you fill this out and agree to Apple’s terms of service, click “Done.”

3. Add a Location
To designate where your business is physically located, click “Locations” > “Add a Location.”

Search for your business name. Here, you’ll have two options:
- If your business doesn’t show up in search results, create a new listing
- If your business shows up in search results, claim the listing

We’ll walk you through creating a new listing.
The process for claiming a listing is quite similar to this one, but instead of filling out all the information from scratch, you’ll review the existing information about your business and correct mistakes.
Click “Add a new location with this name.”

Enter your business’s physical address.
On the map that appears on the right side, move the pin to select the exact location, then click “Next.”

In the next step, add these details:
- The listing’s default language
- Display name
- Primary business category
- Country/region
- Phone number
- Website (optional)
As you enter information, the preview on the right will show how your listing will display to users.
When you’re done, click “Next.”

Enter your business hours, then click “Next.”

Review the details you entered. And answer the question about whether your company owns the brand or if the brand is a franchise. Then, click “Next.”

The final step is to get your listing verified. To do this, you’ll need to add the business’s government ID. The type of document you can add will depend on your country, but this could be a tax registration number, business registration number, etc.
Then, choose one of the two options:
- Add an official company document: A document that confirms your business’s name and address, like a business license or a utility bill
- Validate your domain: Upload a TXT record to your DNS server to validate your company’s website domain
After filling out the verification form, click “Send for Review.”

Apple will notify you once your listing is verified, and your listing will start showing up in Apple Maps.
How to Optimize Your Apple Maps Listing
Optimizing your Apple Maps listing can help your business show up more often in relevant searches customers conduct on Apple devices. And ensures your business information is accurate and up-to-date.
Here are the steps you can take to optimize your Apple Maps listing:
- Fill out all the available fields. Add your business name, business category, address, phone number, hours of operation, and website URL to ensure your listing is complete.
- Upload high-quality images. Show your customers photos of products/services and the interior and exterior of your business to build trust.
- Optimize for voice search. Use natural language in your business description and include detailed information about your services so you can appear in highly specific voice searches. For example, “restaurants with gluten-free meals in chicago.”
- Ensure name, address, and phone number (NAP) consistency. Keep your NAP information consistent and correct on other platforms like Google Business Profile, Yelp, Bing Places, your website, etc. Because it ensures prospective customers have the right information and can help you appear more prominently in search.
- Use accurate location data. Use a pin to place the exact business location. Or use precise latitude and longitude coordinates.
Matt Bowman, Founder of Thrive Internet Marketing Agency, recommends the latter approach for locations:
“It significantly improves location accuracy, especially for businesses located in shopping centers, multi-building complexes, or areas with confusing address systems. For a client’s restaurant located in a busy strip mall, adding precise coordinates moved their Apple Maps pin from the parking lot to their actual storefront entrance.”
It’s also a good idea to optimize your Yelp profile because Apple Maps often pulls information from Yelp.
Jade Hallam, Managing Director of Clever Clicks Digital, recommends investing time in Yelp and encouraging reviews:
“Apple Maps heavily relies on Yelp for photos, categories, reviews, and operational data. Add the most specific and relevant business categories. And encourage customers to upload photos with their reviews, because user-generated content is frequently pulled into your Apple Maps listing.”
Create and Manage All Your Business Listings
Listing your business on Apple Maps will get it in front of more potential customers. And you can amplify that reach by using additional online listings.
Semrush’s Listing Management tool lets you easily find missed listing opportunities and distribute your information across the web in a few simple steps.
For example, the tool found 30 opportunities for this local business.
To automatically distribute your information to these directories, sign up for the Semrush Local Toolkit.
If you already have, simply click “Continue setup.”

Confirm your information and click “Distribute business info.”

Try Listing Management to start building your local listings.


![How Search Engines Work [Explained]](https://mgrowtech.com/wp-content/uploads/2025/08/how-search-engines-work-sm-120x86.png)

