When doors open at 8:00 a.m. and hundreds of people arrive at once, a badge QR code that will not scan becomes a real operational problem: check-in lines back up, your team performs manual lookups, and attendees start the day frustrated.
So the question is, how do you make event badges with QR codes scan quickly and accurately during peak arrival using the registration data you already have?
For more context on badge design and production workflows, see EventMobi’s complete conference badge design and printing solution.
Introduction
QR codes are common, but onsite check-in is not the same environment as a marketing campaign or a restaurant QR menu. At doors, you’re scanning quickly, under mixed lighting, with imperfect badge handling and very little patience from people in line.
If you put a QR code on a conference badge to speed up check-in, the real risk isn’t that QR technology fails — it’s that the code is treated like a design element or a way to store visible attendee details instead of what it should be: a reliable key that connects a scan to the correct registration record.
When that connection is weak, you get repeat problems: duplicate records, stale exports, last-minute registrants missing from pre-printed sets, or badges that look fine on screen but scan inconsistently onsite. Organizers need a workflow that keeps registration data and badge QR codes tightly bound.
This post outlines a practical, repeatable approach grounded in standards and real operational constraints. The QR Code standard ISO/IEC 18004 is often referenced by scanner and print vendors; for an accessible overview of QR codes and how they work, see GS1. Before you change badge design or printing, check your data-to-code mapping so the QR serves as an identity key rather than a marketing destination.
An Event Badge QR Code Is an Identity Key (Not a Marketing QR)
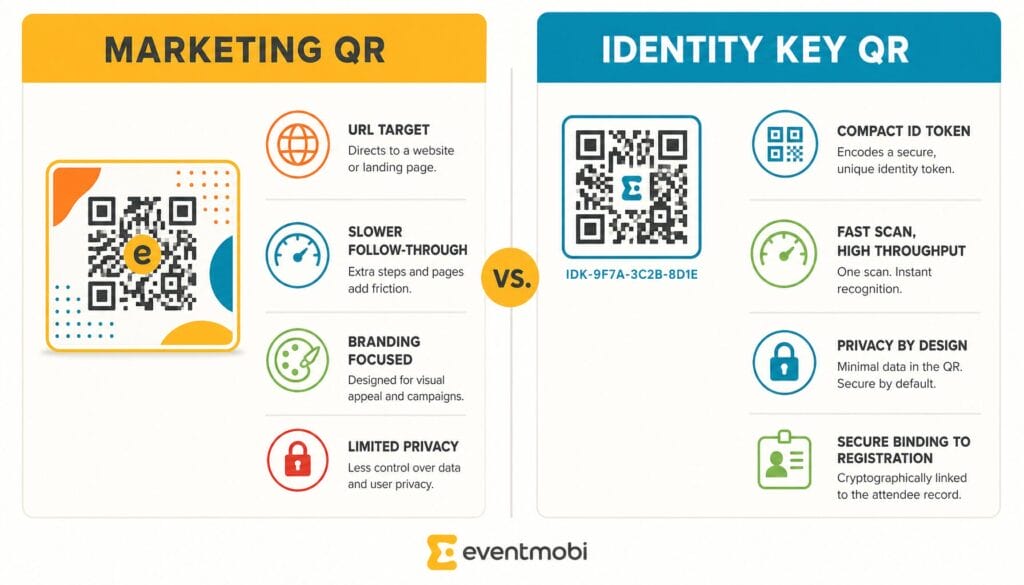
Most QR codes you see send you somewhere — a website URL, a menu, or an app download link. Those are “destination” QR codes designed for marketing or content distribution.
An event badge QR code should serve a different purpose. For onsite operations it should act as an identity key that resolves directly to a live attendee record in your registration or event management system.
Quick example: a marketing QR might encode a URL to a sponsor page; an identity-key QR encodes a registration identifier so a scan returns the attendee’s current record and permissions.
So what does “reliably onsite” mean in practice? Well, first it comes down to speed. A scan should return the attendee record fast enough to keep check-in flowing — aim for sub-2 second lookups where network latency allows
- Accuracy: The scan should consistently pull up the correct attendee record and log the right action (arrival, session attendance, access)
This is why the guide skips QR history and generic engagement tips: scanner hardware helps, but most onsite failures trace back to encoding choices, print setup, material glare, or workflows that don’t keep a single source of truth between registration data and badge codes.
How Registration Data Becomes a Unique QR Code
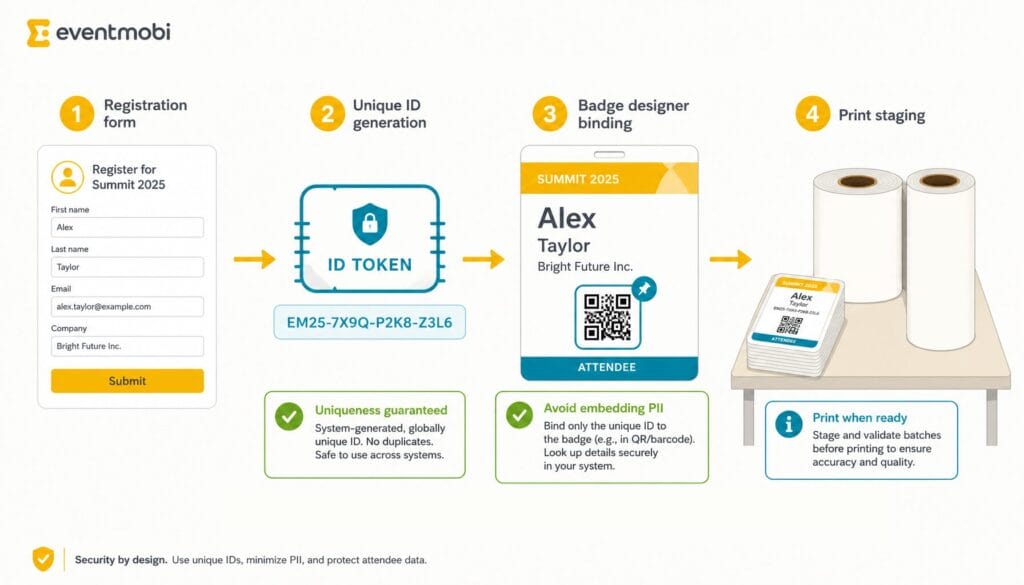
If badge QR codes are failing onsite, step back and confirm the data flow. The simplest reliable pattern ties each printed code back to a single system-of-record so scans always resolve to the right registration data.
Flow map (system-of-record):
Attendee registers → platform stores attendee record → platform generates a unique identifier → badge template includes a QR field → badge label prints with an attendee-specific QR code
Why uniqueness matters (even when names match)
In real events you’ll see duplicate or similar names: assistants registering multiple people, siblings with the same name, or quick edits to titles and companies. Relying on names causes ambiguity. Instead, base the QR on a unique identifier such as a Registration ID (e.g., REG-000123) or a Attendee Universally Unique Identifier (UUID) — spelled out here as Universally Unique Identifier the first time
That identifier keeps badge QR code scanning reliable when records update, names collide, or last-minute registrations arrive.
How “badge designer binding” should work
Do the binding once in your badge designer: add a QR element to the badge layout, bind it to the attendee identifier field in your attendee list, and let the platform generate each attendee’s code at print time. This keeps the badge, the QR, and the registration record linked automatically.
You should not be manually generating QR codes one-by-one or pasting static codes into templates — those steps introduce mapping errors and stale information.
The anti-pattern that causes onsite pain
A common failure path looks like this:
- Export attendee data to a CSV
- Generate QR codes in a third-party tool
- Re-import the QR codes somewhere else
- Hope nothing changes between export and doors open
That chain creates real operational risk: attendee updates after export may be missing, late registrations can be absent from printed badges, and manual mapping raises mismatch chances. Scan logs may not reconcile back to the original registration record.
If you must use exports, add a one-line remediation: run a final sync immediately before printing and perform a quick reconciliation (sample 50 badges) to catch mapping errors. Better yet, keep the identifier generation and QR binding inside the same platform used for registration and onsite printing to avoid brittle handoffs.
What to Encode and How Scans Resolve to Workflows
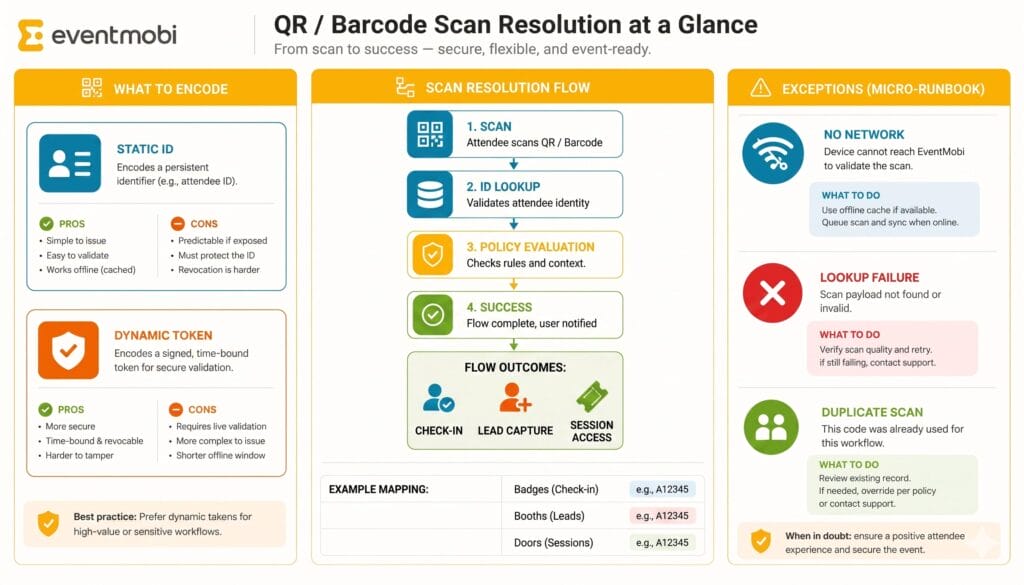
What should you actually encode in a QR on a conference badge?
Default recommendation: encode a unique attendee identifier — for example regID=12345 or a UUID like 550e8400-e29b-41d4-a716-446655440000 — and avoid storing PII such as email addresses or phone numbers in the code.
Encoding an identifier gives you a simple, reliable operational chain:
- Scan
- Decode identifier
- Look up the attendee record in your registration system
- Execute the correct action (check-in, print label, admit to session)
- Log the event with timestamp, device/location, and action type for later reporting
Static vs. “dynamic identity key” (in event terms)
“Static” and “dynamic” are often used loosely. For events, this distinction matters operationally: Static: the code contains fixed text or a URL not tied to the attendee record (a marketing/content use). Dynamic identity key: the code contains an identifier that resolves to the attendee’s current record in your system — more resilient for onsite workflows and reprints
If your priority is onsite check-in speed, dynamic identity keys are usually the better choice because you can change permissions, badge text, or workflows without reissuing codes.
Mapping scans to workflows (what the system should do)
Scanning can support multiple workflows beyond arrival. Use this mapping to validate system behavior and logging:
| Where You Scan | System Returns | Action Logged |
|---|---|---|
| Main check-in | Attendee record, registration status | Mark attendee as arrived, optionally trigger label print; log timestamp and station ID |
| Session entrance/CE tracking | Attendee record plus session context | Create attendance record for that attendee and session; log session ID and time |
| Exhibitor booth (lead retrieval) | Attendee contact profile based on permissions | Create exhibitor lead record for follow-up (consent and data-sharing rules apply) |
| Restricted area | Entitlements and access rights for that attendee | Allow or deny entry and log the attempt with location context |
Exception handling you should define before onsite
Decide your fallback flows in advance. Examples to include in your runbook:
- Attendee not found — run a quick manual name/email search; if matched, reprint a label bound to the platform identifier
- Duplicate scan — show existing arrival timestamp and ask staff to confirm (don’t automatically overwrite)
- Access denied (wrong ticket type/day/session) — present the entitlement reason and route to the help desk
- Offline or weak connectivity — enable local caching or an offline lookup mode, then reconcile logs when online
Defining these rules ahead of time removes guesswork at the counter and protects the attendee experience while keeping scan-based tracking and reporting clean.
Print for Scan Reliability: Why Labels Beat Direct Badge Printing
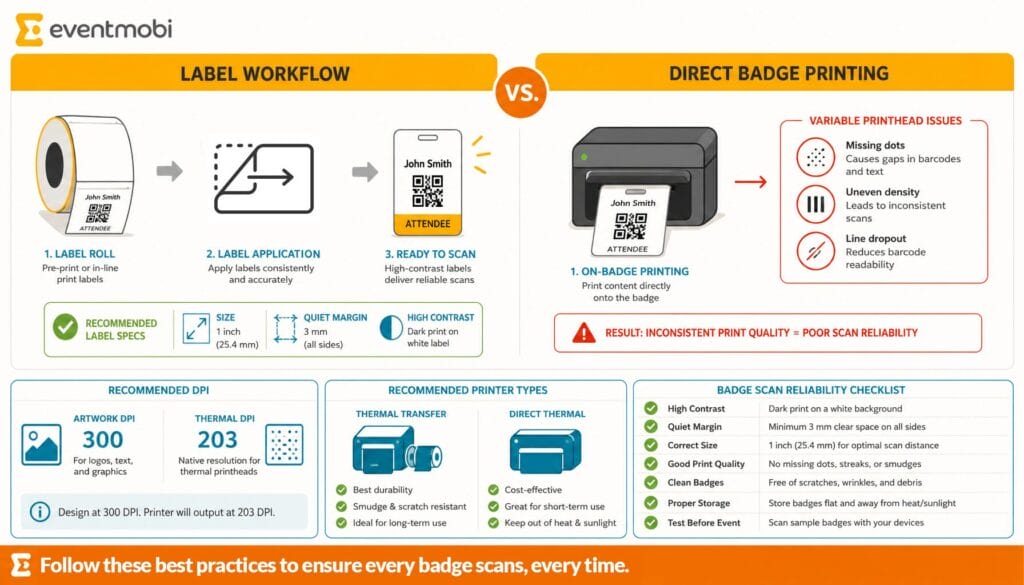
What’s the most practical way to print QR-enabled badges that will scan consistently onsite?
For many events that print onsite or expect late changes, badge labels are often the more forgiving operational choice versus printing directly on badge stock. Labels aren’t universally best, but they’re a strong default when speed, reprints, and minimizing waste matter.
Why labels often work better for onsite operations
- Easier error recovery: reprint a small label instead of discarding a full badge card or holder
- On-demand printing: print the most current registration data at arrival for accurate names and entitlements
- Reduced glare risk: matte label stock scans more reliably than glossy laminated cards in many lighting conditions
- Less waste: print only for attendees who show up, which is especially useful for larger events and variable RSVP rates
- Station flexibility: compact label printers are easy to deploy across multiple lanes or satellite desks
Required print specs (North America units)
Use these practical baseline specs as a starting point and validate them with testing on your actual printer, stock, and scanners.
- Minimum QR code size: 1 in × 1 in (2.54 cm × 2.54 cm). For 203 DPI printers, increase physical size slightly to preserve scannability.
- Quiet zone: around 1/8 in (3 mm) of clear space on all sides; no text, borders, or decorative elements should intrude into this area.
- Contrast: high contrast is essential — black on white is safest. Avoid gradients, patterns, or colored backgrounds behind the code.
- Resolution: export artwork at 300 DPI when producing printable artwork files. Many direct thermal onsite printers print at 203 DPI; when using 203 DPI, increase the code’s physical size to compensate.
- Material and glare: glossy lamination and plastic holders can produce reflections that break scans—prefer matte label stock or train staff to tilt the badge to reduce glare.
Hardware guidance (printer and stock)
If you’re printing labels onsite, direct thermal printers are a common choice because they avoid ink supplies and simplify logistics.
Commonly used setups include the Brother QL-820NWB paired with Brother DK Series 2.4 in × 3.5 in die-cut labels for on-demand badge labels. Test your exact printer and label size ahead of the event to confirm code size, margins, and quiet zones are preserved.
Quick practical checklist for print testing: print a sample badge on your actual label stock, scan it with the devices staff will use, check at counter height and under venue-like lighting, and confirm the code decodes reliably from typical working distances.
Operational Realities: Scanning Process, Staff Training, and Peak Throughput

If your goal is fast check-in, two things must work together: scannable badges and a trained team that follows consistent rules.
Staff training basics (the scanning fundamentals)
Scanning technique is teachable in minutes. Train staff with a short script: hold the scanner a few inches from the code, keep it as perpendicular as possible, and move smoothly rather than waving. Angle and glare are the most common causes of failure, so the first corrective move is to tilt the badge slightly to cut reflections. Adopt a two-tries SLA: after two quick attempts, route the attendee to the fallback workflow (manual name/email search) so the line keeps moving. Reinforce a polite, consistent line message staff can use when diverting an attendee (e.g., “I’ll do a quick search so the line can keep moving—one moment please”).
Lane design inputs (throughput math)
Let expected arrivals and time drive your lane design. For example, 400 arrivals in 30 minutes equals about 13.3 check-ins per minute total; plan station capacity and staffing to meet that rate with a buffer. A reliable layout separates traffic into two lanes: a scan-and-print lane for the majority of attendees and a help/search lane for exceptions (name issues, reprints, walk-ins). Keeping exceptions out of the main flow prevents one problem from delaying many people and preserves the attendee experience.
Micro-runbook: what to do when a scan fails
Provide staff a short, consistent sequence to follow instead of improvising. Example micro-runbook:
- Try 1: Scan at perpendicular angle, normal distance.
- Try 2: Tilt badge slightly to reduce glare; nudge scanner a few inches closer or farther.
- If still failing: move attendee to help lane for manual name/email search and quick verification against the registration system.
- If the record is valid but the code is damaged or low-contrast: reprint a label and attach it to the badge before letting the attendee proceed.
- Log the exception (reason, staff initials, time, station) for post-event review and tracking.
Also consider accessibility: offer staff a script and a discreet route for attendees who need extra assistance, and ensure your fallback workflow preserves privacy and consent when searching by name or email.
What a Well-Built System Looks Like in Practice
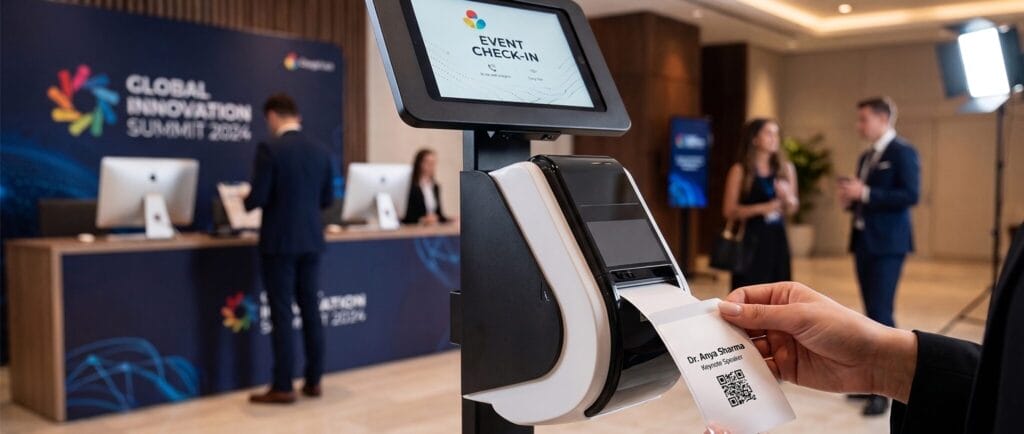
Everything in this guide comes down to one operational rule: the QR code on the badge and the attendee record in your registration system must remain linked at every step — registration, updates, printing, and every scan onsite. When that connection is tight, check-in is fast and reporting is accurate; when it breaks, you get duplicate records, manual lookups, and frustrated attendees.
A purpose-built event platform keeps the data and badge generation in one place. The QR on the badge is generated from the same record that gets updated when an attendee changes a title, marked when they check in, and pulled into post-event attendance and tracking reports.
EventMobi’s BadgeON is designed around this model: a station pairs an iPad with a compact wireless Brother label printer, scans a QR from an attendee’s confirmation email or virtual badge in the event app, pulls the current record, and prints the label on the spot. That removes the need for pre-sorted badge banks or a separate correction station and eliminates gaps between registration data and what ends up on the badge.
Pre-event testing checklist (run it like a drill)
- Print sample badges using your exact printer and label/badge stock — do this at least 48–72 hours before the event.
- Test with the precise scanning devices and apps staff will use onsite (verify app versions and permissions).
- Scan at realistic distances and angles on a counter-height surface to confirm operator technique and station layout.
- Test under lighting conditions similar to the venue (include fluorescent, LED, and natural light if applicable).
- Confirm each scan pulls up the correct record and logs the correct action and timestamp.
- Run a peak-arrival drill using your expected arrival rate (for example, simulate 400 arrivals in 30 minutes) to validate lane design and staffing.
- Test exception scenarios: canceled records, duplicate scans, offline mode/reconciliation, and label reprint flows.
Conclusion
If your primary job is getting attendees checked in quickly, the badge QR code has one clear mission: act as a dependable identity key that connects a scan to the right registration record.
Follow proven scannability specs, keep your registration data and badge generation tightly linked, and run realistic drills before doors open — when you do, QR code scanning becomes invisible infrastructure: fast, accurate, and low-friction for attendees and staff alike.
Next step: download or print your event checklist, run a 48–72 hour pre-event print test, and confirm your lane and staffing plan to protect the attendee experience and your brand.
Looking for an event platform that makes event registration, check-in and badge printing with QR codes easy?
Event Badges with QR Codes FAQs
The post Event Badges with QR Codes: What Every Event Planner Needs to Know appeared first on EventMobi.