
Gemini 2.5 Flash Image is our latest, fastest, and most efficient natively multimodal model. What makes Gemini 2.5 Flash unique is its native multimodal architecture. It was trained from the ground up to process text and images in a single, unified step. This allows for powerful capabilities beyond simple image generation, such as conversational editing, multi-image composition, and logical reasoning about image content.
Here are the key things you can do:
- Text-to-image: Generate high-quality images from simple or complex text descriptions.
- Image + text-to-image (editing): Provide an image and use text prompts to add, remove, or modify elements, change the style, or adjust colors.
- Multi-image to image (composition & style transfer): Use multiple input images to compose a new scene or transfer the style from one image to another.
- Iterative refinement: Have a conversation to progressively refine your image over multiple turns, making small adjustments.
- Text rendering: Generate images that contain clear and well-placed text, ideal for logos, diagrams, and posters.
This guide will teach you how to write prompts and provide instructions that get better results from Gemini 2.5 Flash. It all starts with one fundamental principle:
Describe the scene, don’t just list keywords. The model’s core strength is its deep language understanding. A narrative, descriptive paragraph will almost always produce a better, more coherent image than a simple list of disconnected words.
You can try these with code from the official documentation or start creating right away in Google AI Studio.
Creating images from text
The most common way to generate an image is by describing what you want to see.
1. Photorealistic scenes
For realistic images, think like a photographer. Mentioning camera angles, lens types, lighting, and fine details will guide the model toward a photorealistic result.
Template:
A photorealistic [shot type] of [subject], [action or expression], set in [environment]. The scene is illuminated by [lighting description], creating a [mood] atmosphere. Captured with a [camera/lens details], emphasizing [key textures and details]. The image should be in a [aspect ratio] format.
Example prompt:
A photorealistic close-up portrait of an elderly Japanese ceramicist with deep, sun-etched wrinkles and a warm, knowing smile. He is carefully inspecting a freshly glazed tea bowl. The setting is his rustic, sun-drenched workshop. The scene is illuminated by soft, golden hour light streaming through a window, highlighting the fine texture of the clay. Captured with an 85mm portrait lens, resulting in a soft, blurred background (bokeh). The overall mood is serene and masterful. Vertical portrait orientation.
Example output:
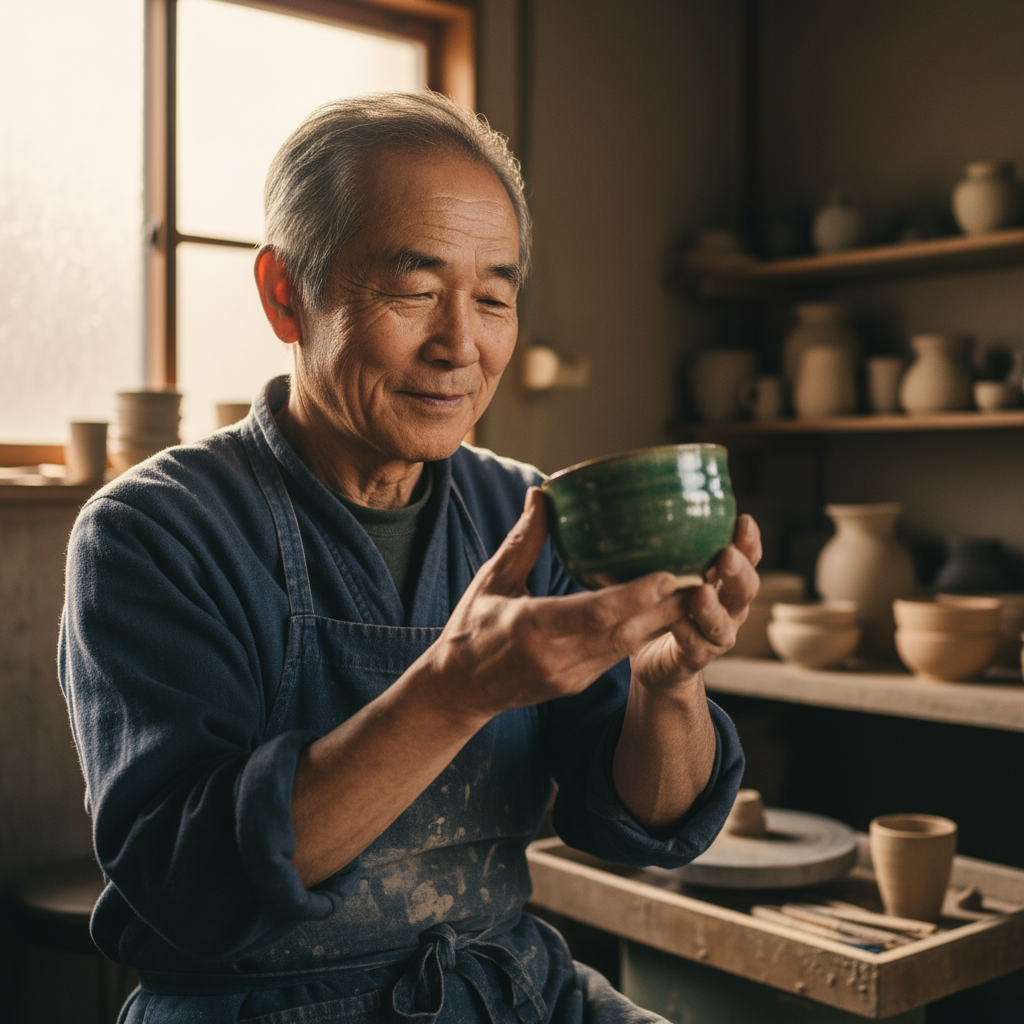
A photorealistic close-up portrait of an elderly Japanese ceramicist…
2. Stylized illustrations & stickers
To create stickers, icons, or assets for your projects, be explicit about the style and remember to request a white background if you need one.
Template:
A [style] sticker of a [subject], featuring [key characteristics] and a [color palette]. The design should have [line style] and [shading style]. The background must be white.
Example prompt:
A kawaii-style sticker of a happy red panda wearing a tiny bamboo hat. It’s munching on a green bamboo leaf. The design features bold, clean outlines, simple cel-shading, and a vibrant color palette. The background must be white.
Example output:

A kawaii-style sticker of a happy red panda…
3. Accurate text in images
Gemini 2.5 Flash Image can render text within images. Be clear about the exact text you want, describe the font style, and set the overall design.
Template:
Create a [image type] for [brand/concept] with the text “[text to render]” in a [font style]. The design should be [style description], with a [color scheme].
Example prompt:
Create a modern, minimalist logo for a coffee shop called ‘The Daily Grind’. The text should be in a clean, bold, sans-serif font. The design should feature a simple, stylized icon of a coffee bean seamlessly integrated with the text. The color scheme is black and white.
Example output:
![]()
Create a modern, minimalist logo for a coffee shop called ‘The Daily Grind’…
4. Product mockups & commercial photography
Create clean, professional product shots for e-commerce, advertising, or branding.
Template:
A high-resolution, studio-lit product photograph of a
on a [background surface/description]. The lighting is a [lighting setup, e.g., three-point softbox setup] to [lighting purpose]. The camera angle is a [angle type] to showcase [specific feature]. Ultra-realistic, with sharp focus on [key detail]. [Aspect ratio].Example prompt:
A high-resolution, studio-lit product photograph of a minimalist ceramic coffee mug in matte black, presented on a polished concrete surface. The lighting is a three-point softbox setup designed to create soft, diffused highlights and eliminate harsh shadows. The camera angle is a slightly elevated 45-degree shot to showcase its clean lines. Ultra-realistic, with sharp focus on the steam rising from the coffee. Square image.
Example output:
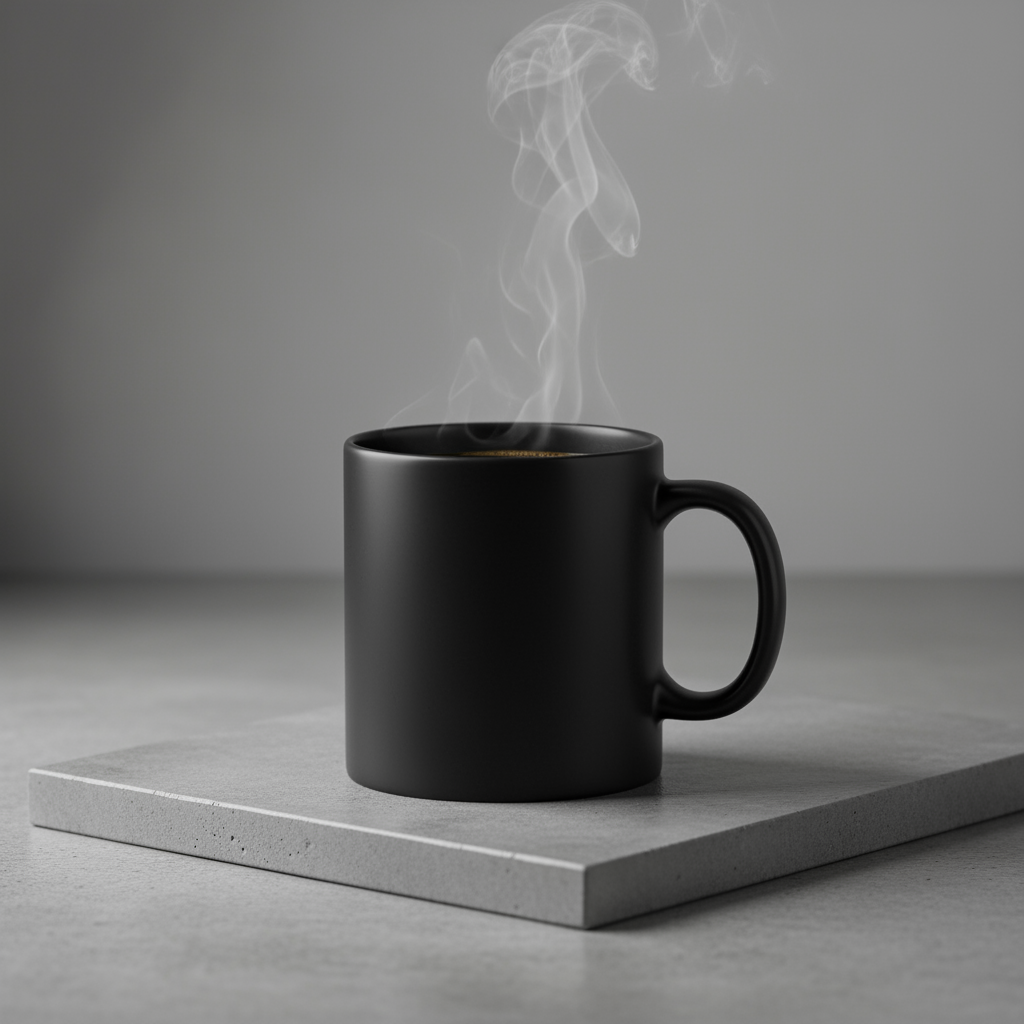
A high-resolution, studio-lit product photograph of a minimalist ceramic coffee mug…
5. Minimalist & negative space design
Create backgrounds for websites, presentations, or marketing materials where you plan to overlay text.
Template:
A minimalist composition featuring a single [subject] positioned in the [bottom-right/top-left/etc.] of the frame. The background is a vast, empty [color] canvas, creating significant negative space. Soft, subtle lighting. [Aspect ratio].
Example prompt:
A minimalist composition featuring a single, delicate red maple leaf positioned in the bottom-right of the frame. The background is a vast, empty off-white canvas, creating significant negative space for text. Soft, diffused lighting from the top left. Square image.
Example output:

A minimalist composition featuring a single, delicate red maple leaf…
6. Sequential art (comic panel / storyboard)
Create compelling visual narratives, panel by panel, ideal for developing storyboards, comic strips, or any form of sequential art by focusing on clear scene descriptions.
Template:
A single comic book panel in a [art style] style. In the foreground, [character description and action]. In the background, [setting details]. The panel has a [dialogue/caption box] with the text “[Text]”. The lighting creates a [mood] mood. [Aspect ratio].
Example prompt:
A single comic book panel in a gritty, noir art style with high-contrast black and white inks. In the foreground, a detective in a trench coat stands under a flickering streetlamp, rain soaking his shoulders. In the background, the neon sign of a desolate bar reflects in a puddle. A caption box at the top reads “The city was a tough place to keep secrets.” The lighting is harsh, creating a dramatic, somber mood. Landscape.
Example output:

A single comic book panel in a gritty, noir art style…
Editing images with text
This is where Gemini 2.5 Flash Image multimodality truly shines. You can provide one or more images alongside your text prompts for editing, composition, and style transfer.
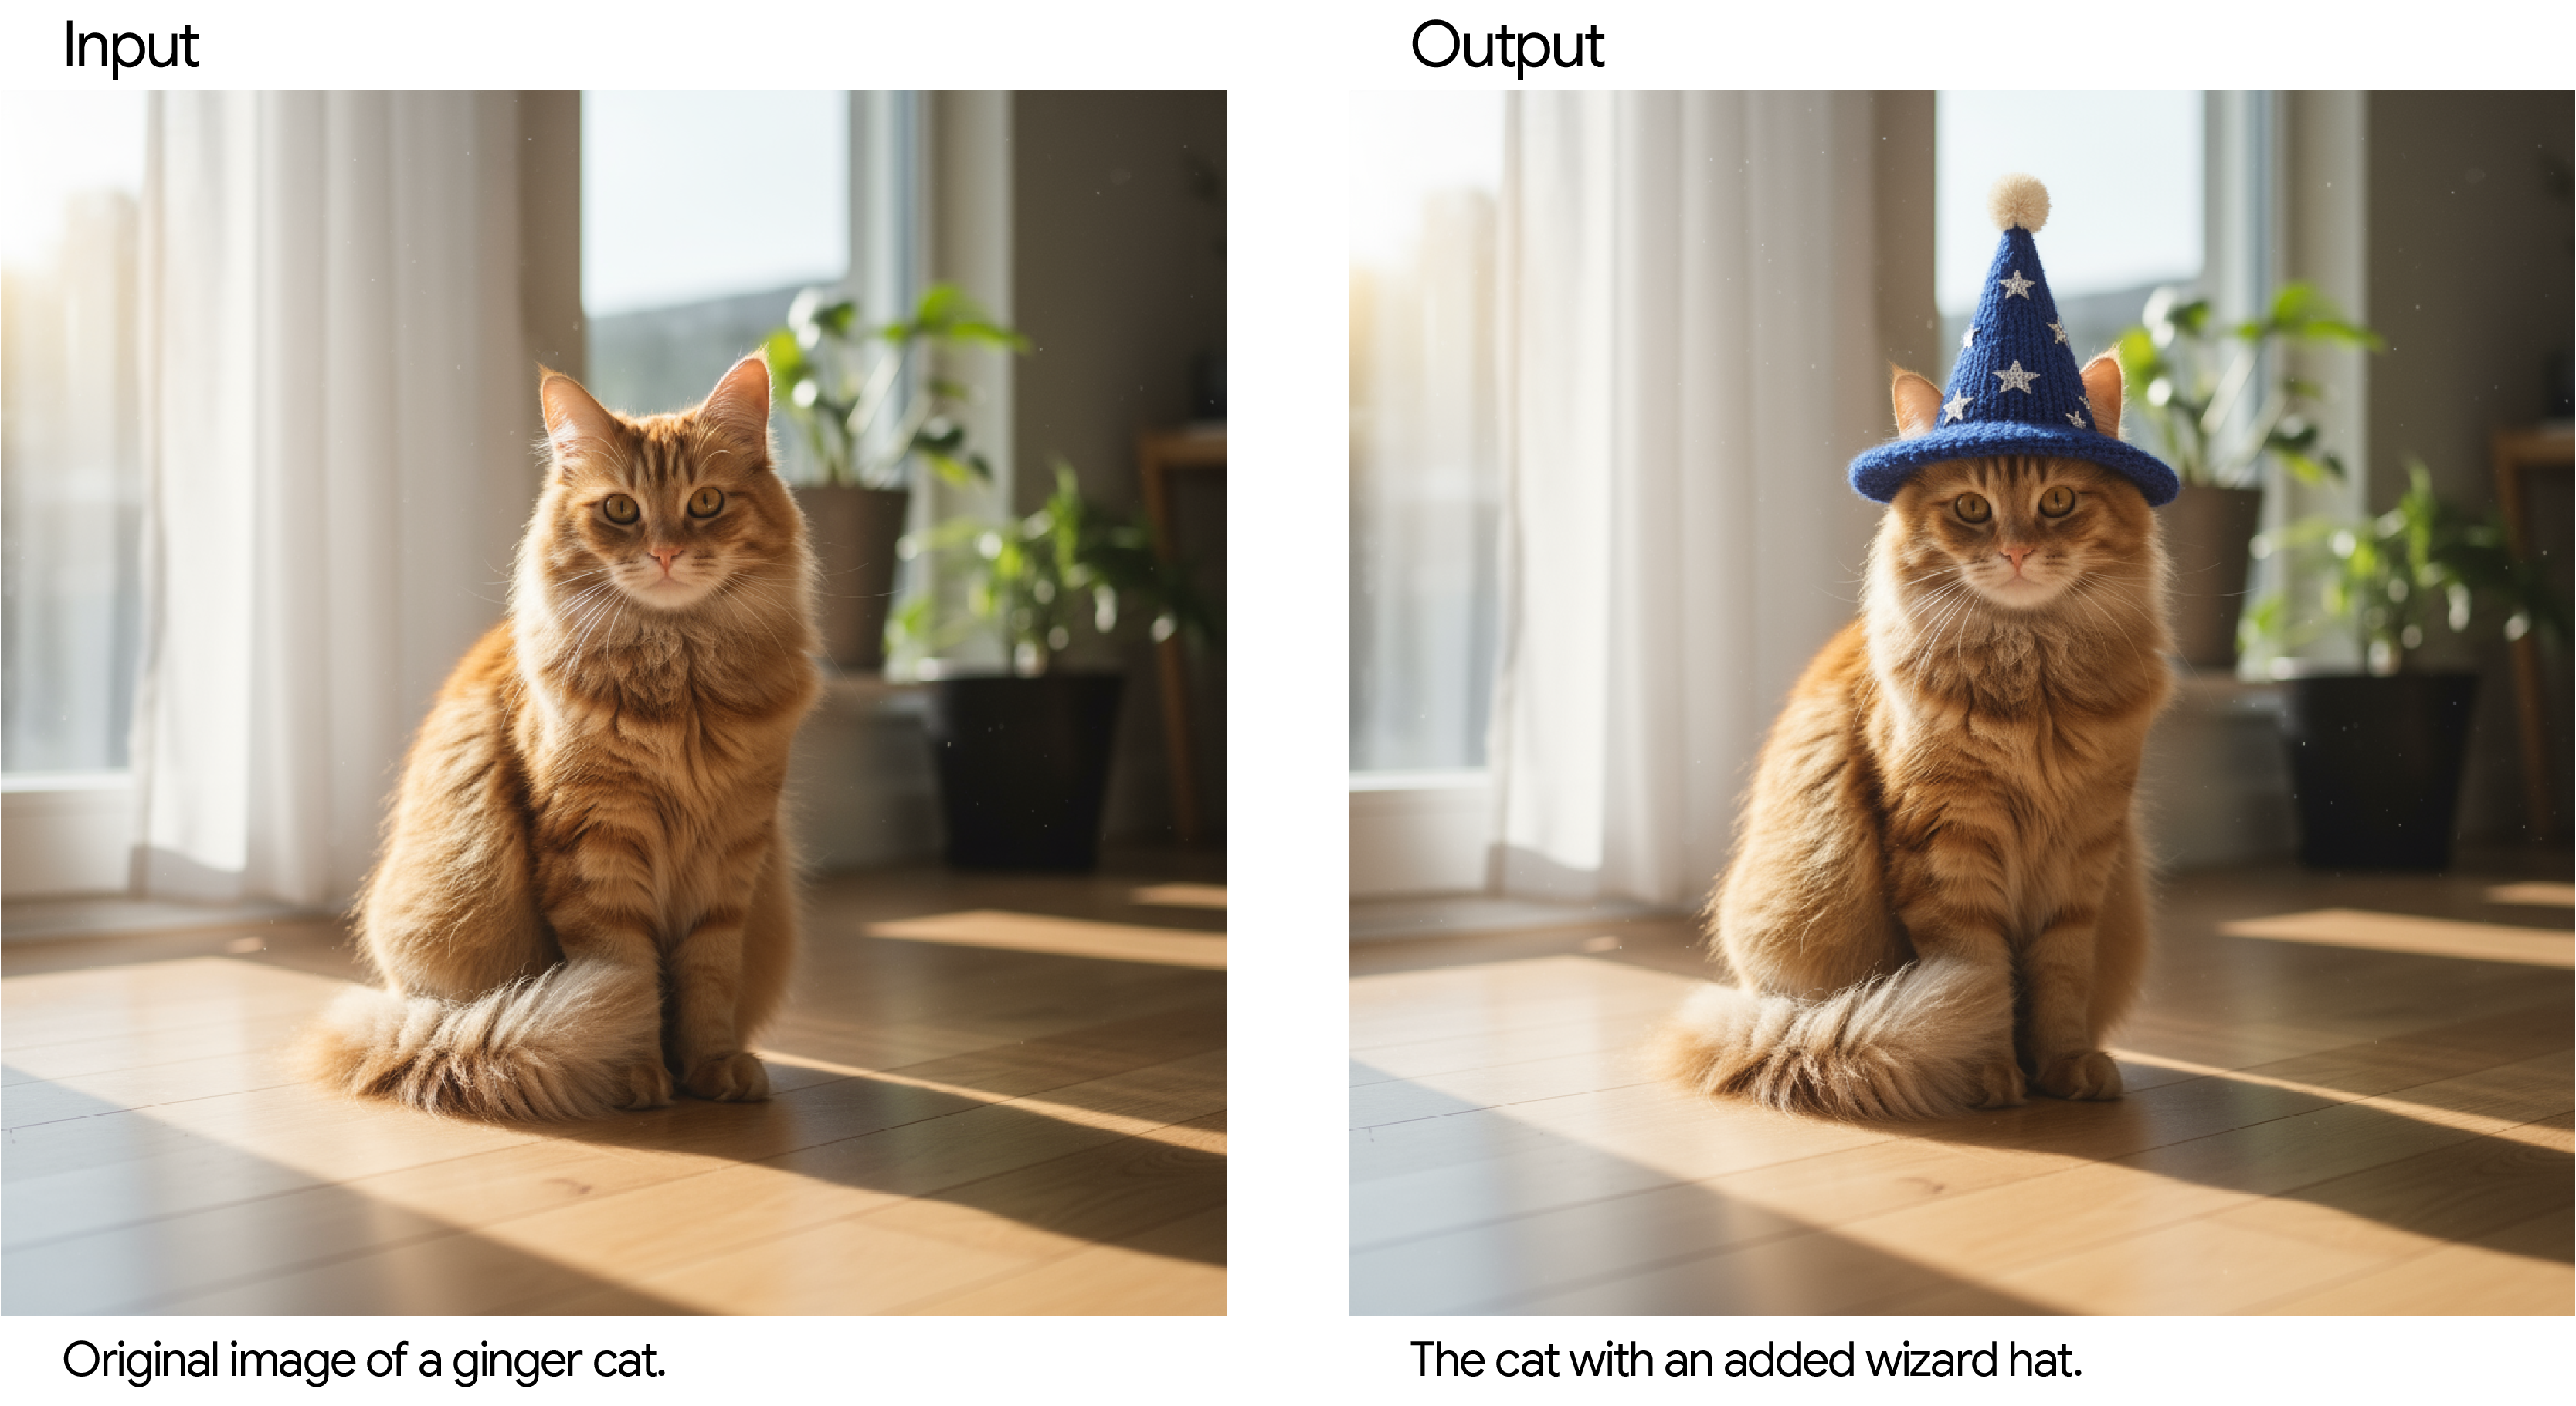
1. Image editing: Adding & removing elements
Provide an image and simply describe the change you want. The model will analyze the original image’s style, lighting, and perspective to make the edit look natural and maintain character consistency across a series of images.
Template:
Using the provided image of [subject], please [add/remove/modify] [element] to/from the scene. Ensure the change is [description of how the change should integrate].
Example prompt:
Using the provided image of my cat, please add a small, knitted wizard hat on its head. Make it look like it’s sitting comfortably and matches the soft lighting of the photo.
Example input & output:
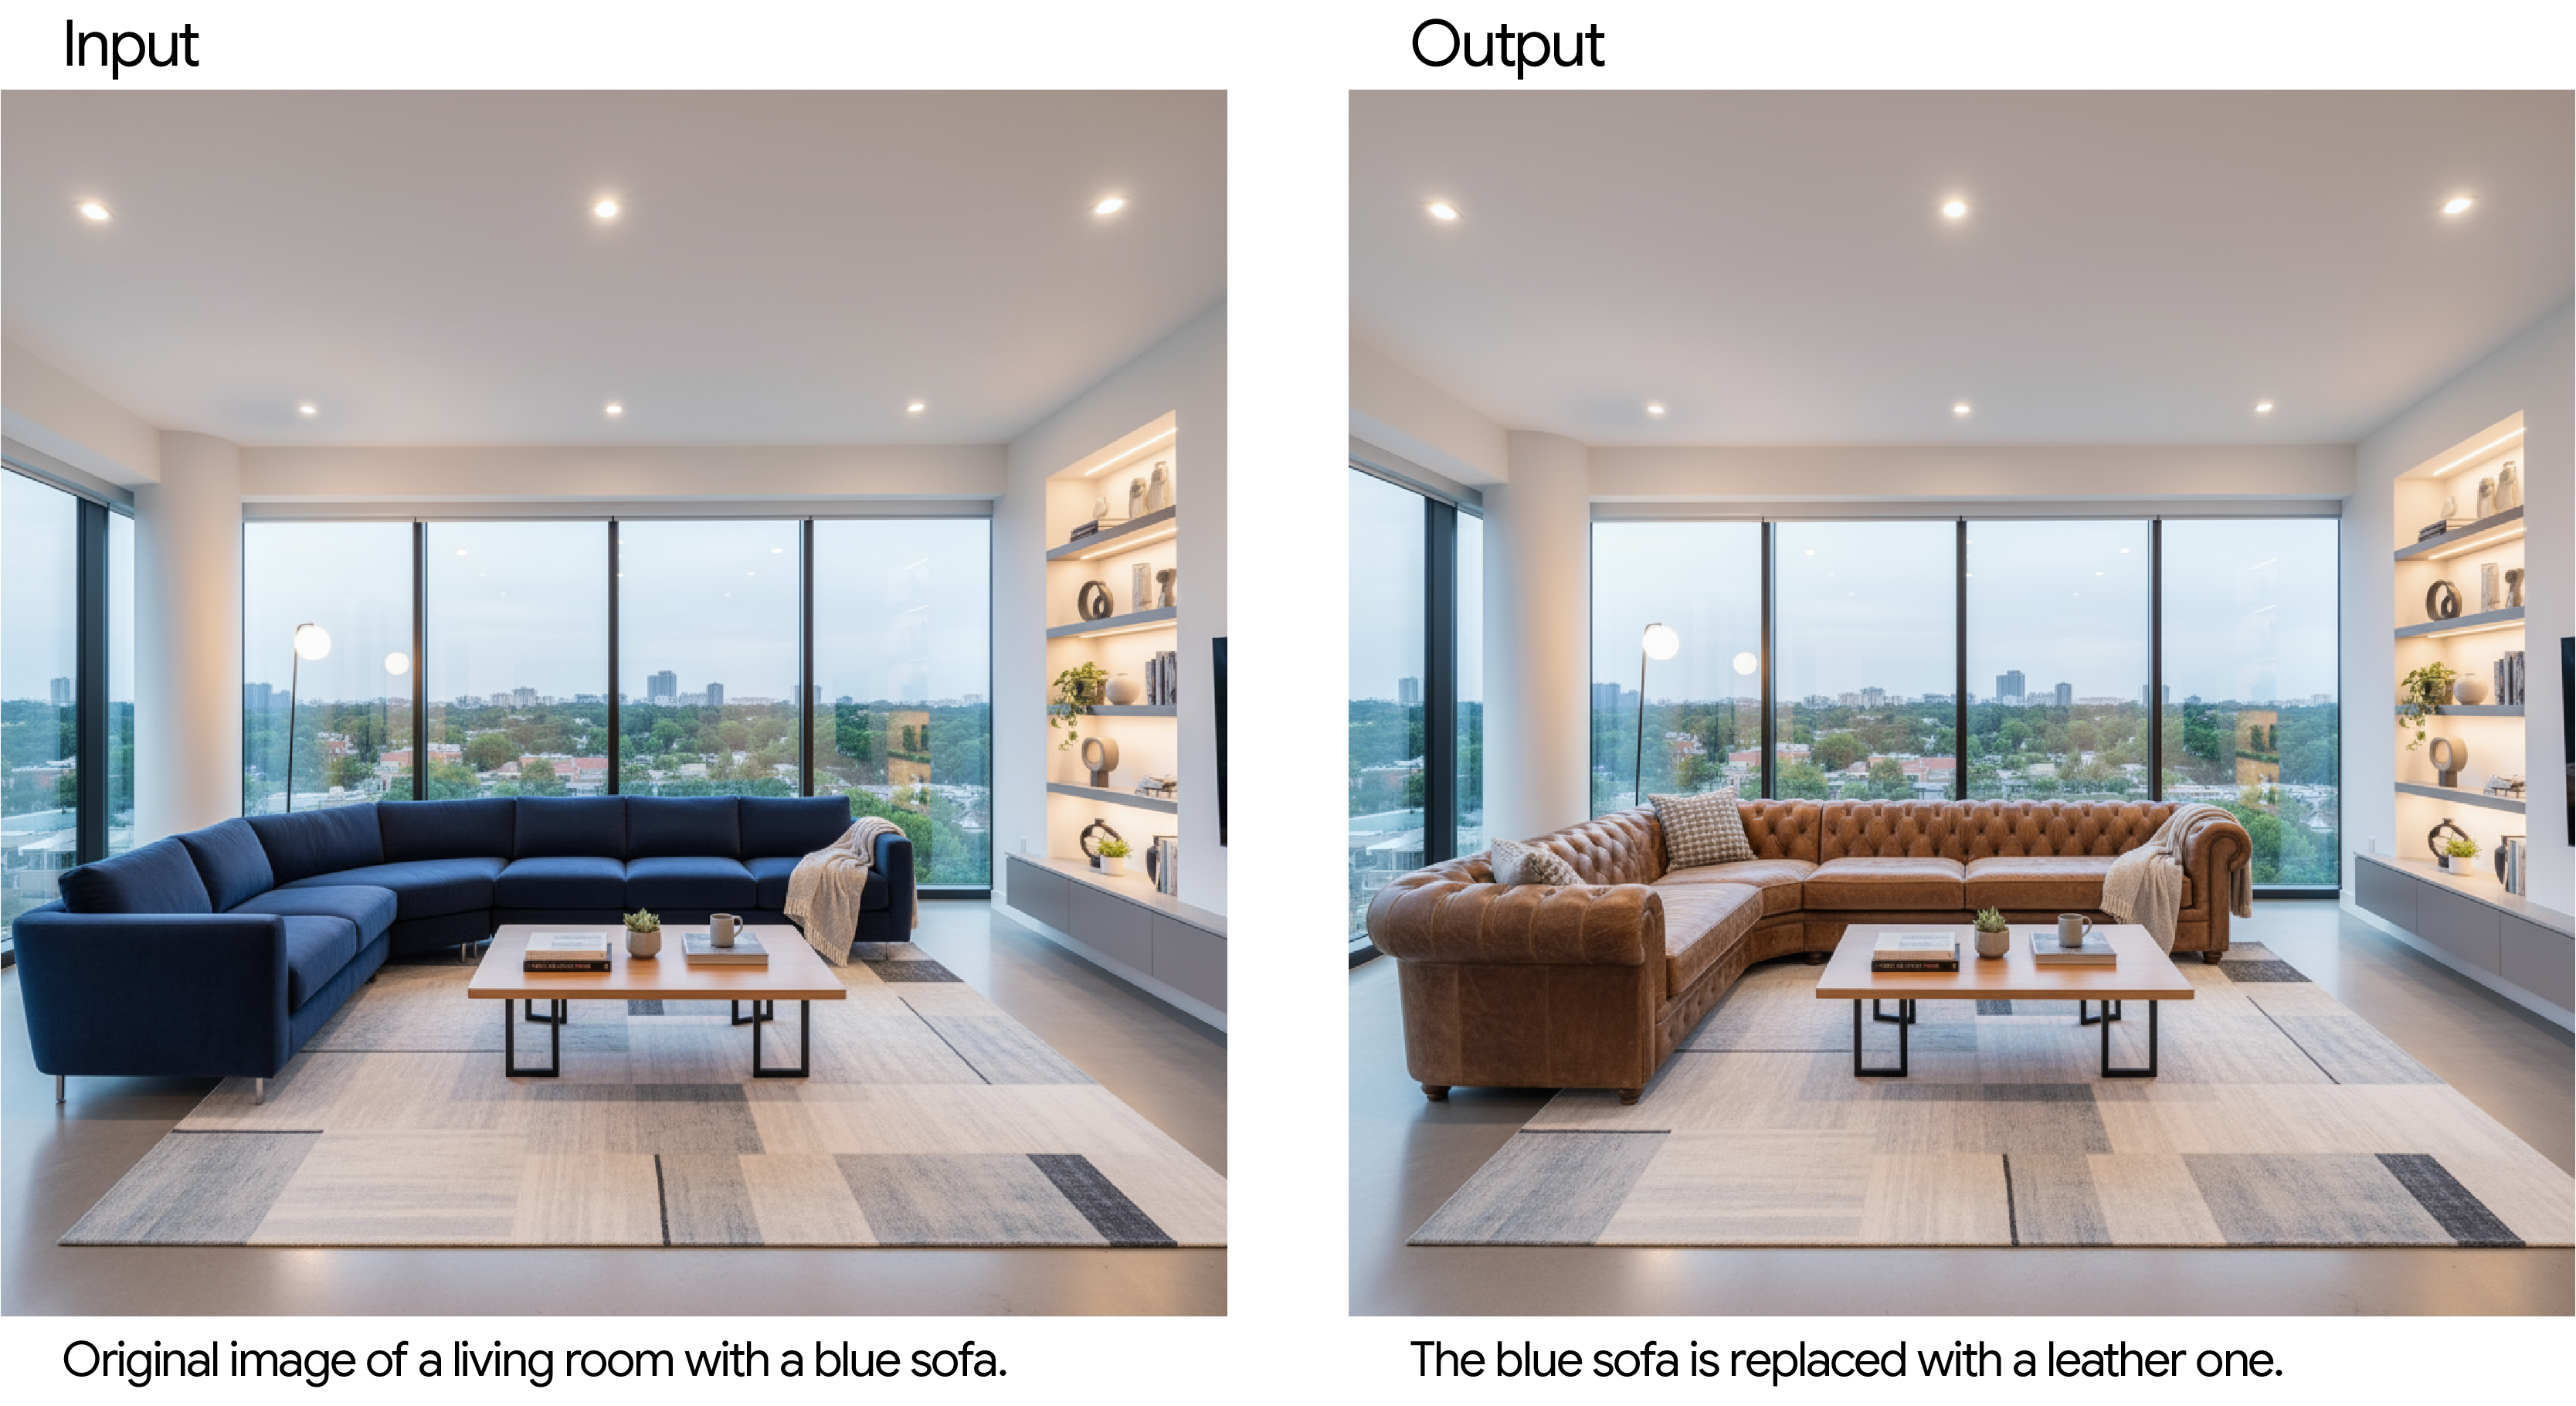
2. Inpainting: editing a specific area
You can conversationally tell Gemini 2.5 Flash Image to edit only one part of an image while leaving the rest completely untouched.
Template:
Using the provided image, change only the [specific element] to [new element/description]. Keep everything else in the image exactly the same, preserving the original style, lighting, and composition.
Example prompt:
Using the provided image of a living room, change only the blue sofa to be a vintage, brown leather chesterfield sofa. Keep the rest of the room, including the pillows on the sofa and the lighting, unchanged.
Example input & output:
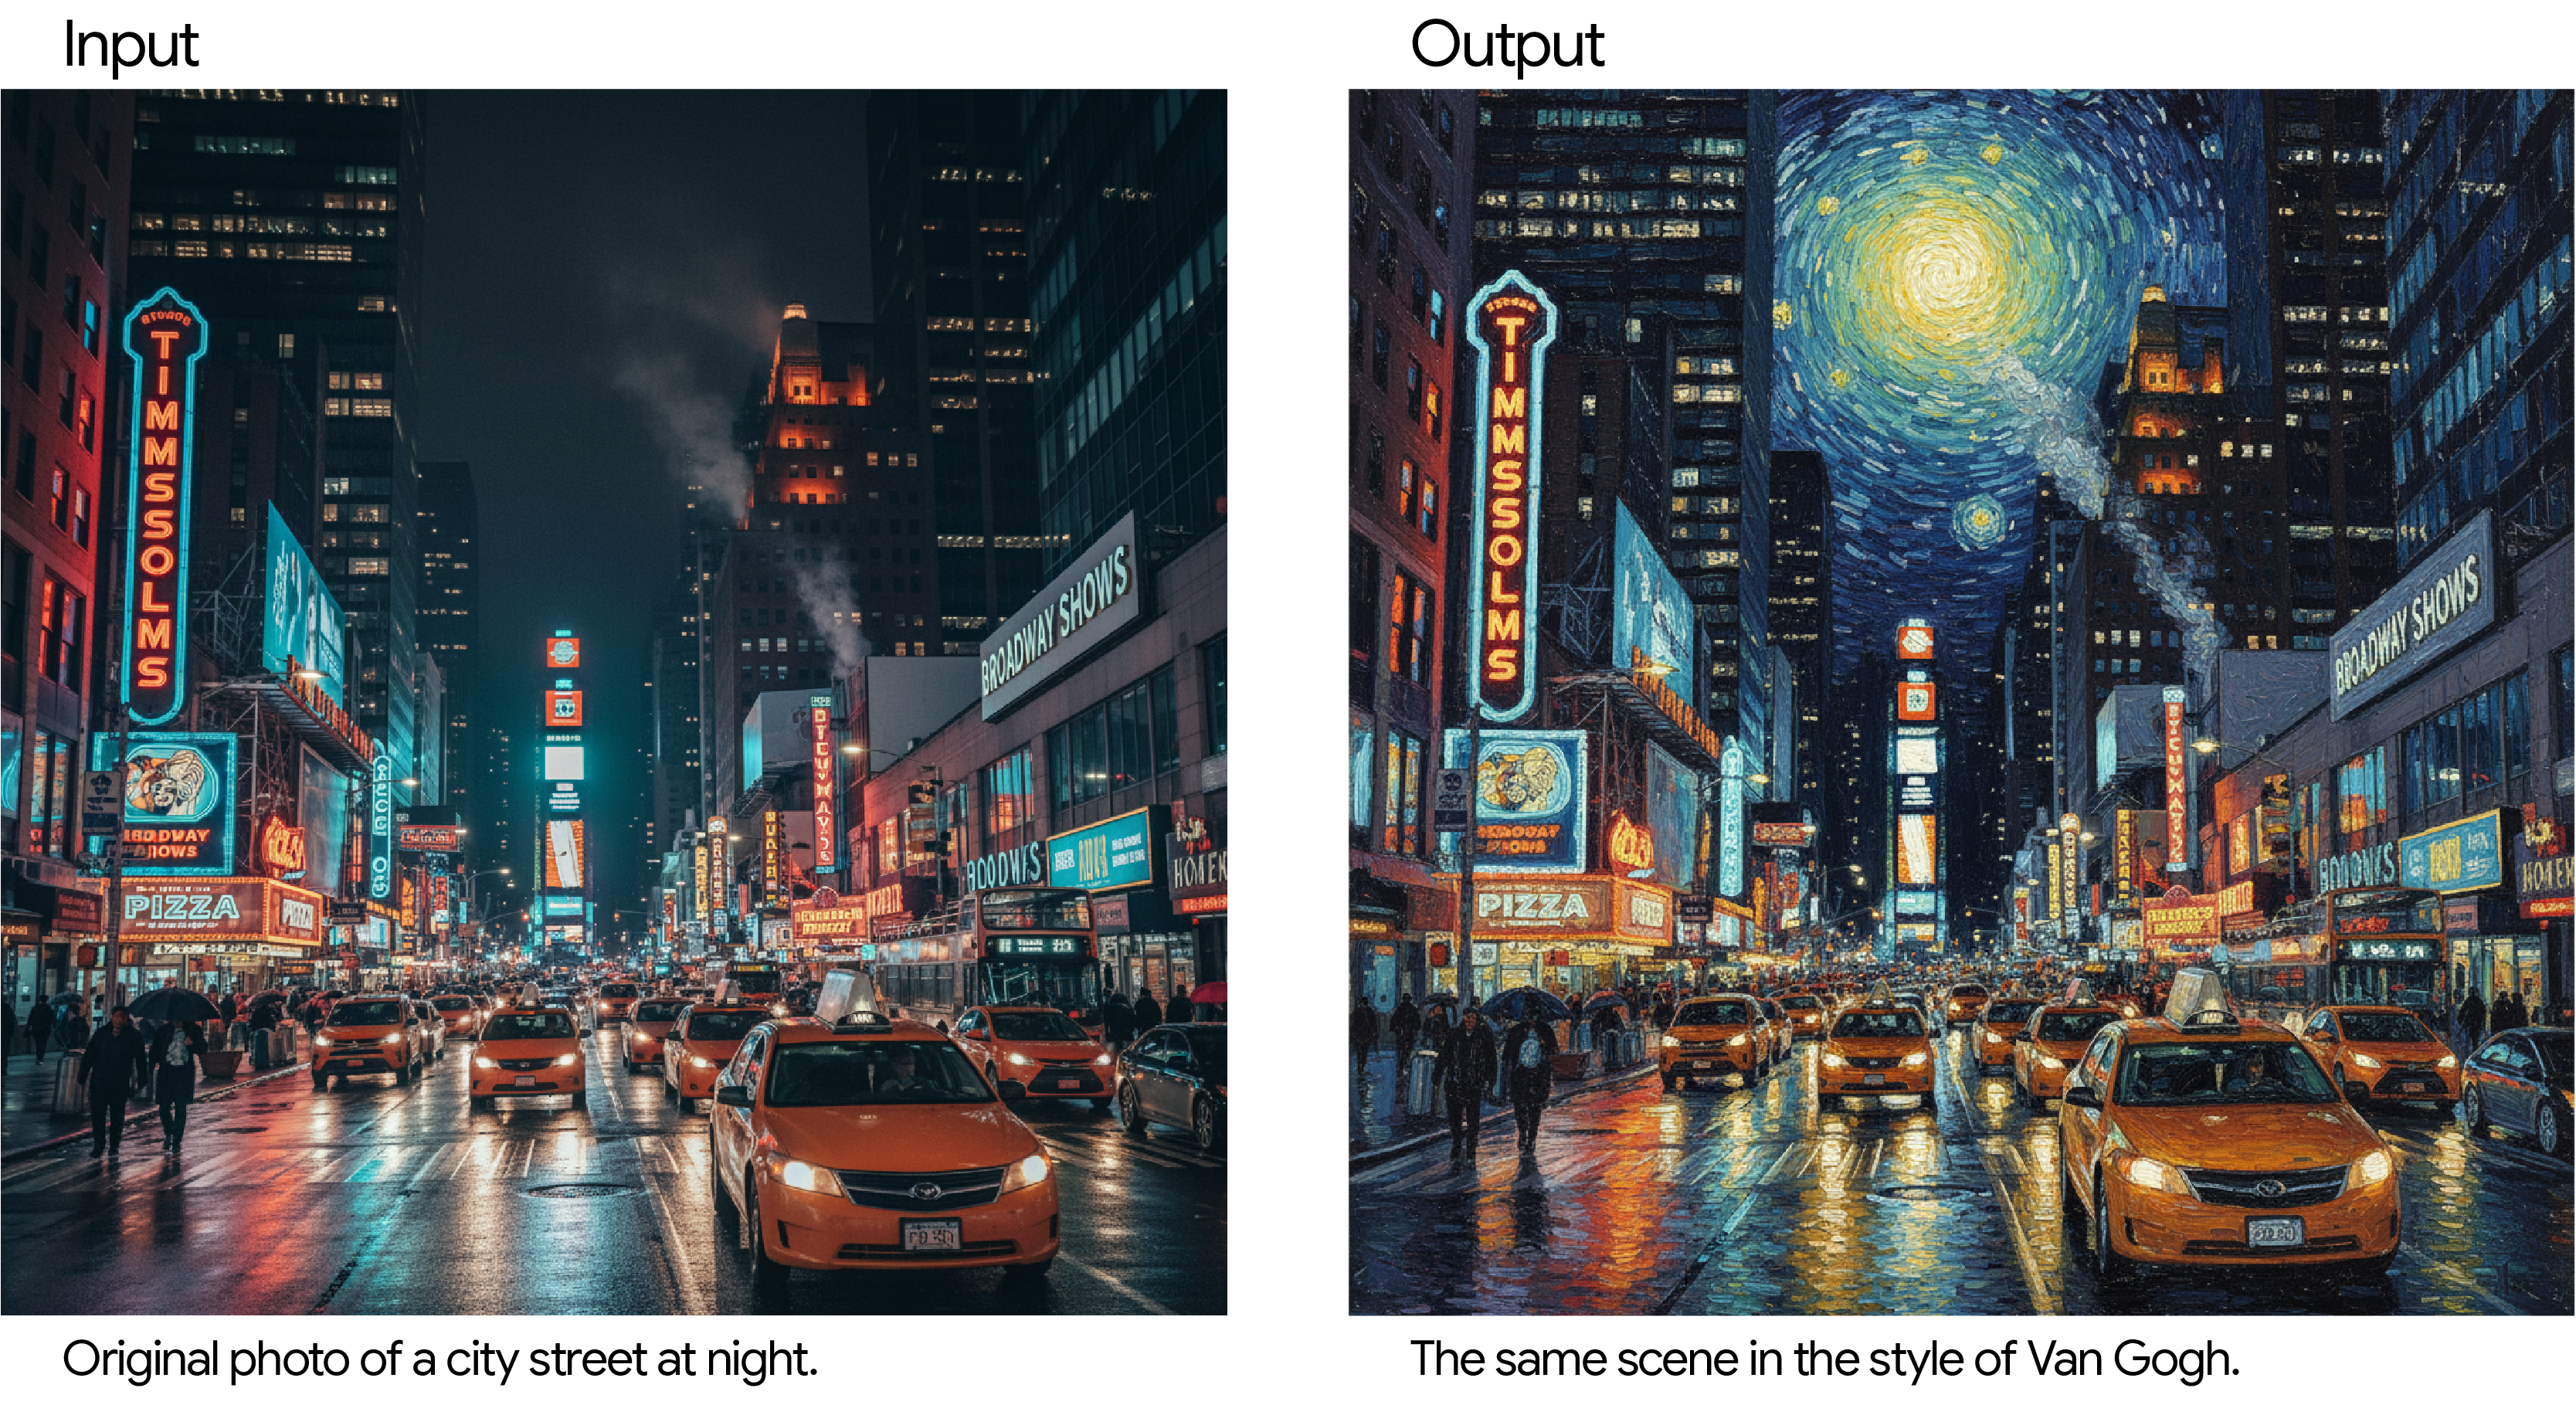
3. Style transfer
Provide a photo and ask the model to recreate its content in the specific style or art movement.
Template:
Transform the provided photograph of [subject] into the artistic style of [artist/art style]. Preserve the original composition but render it with [description of stylistic elements].
Example prompt:
Transform the provided photograph of a modern city street at night into the artistic style of Vincent van Gogh’s ‘Starry Night’. Preserve the original composition of buildings and cars, but render all elements with swirling, impasto brushstrokes and a dramatic palette of deep blues and bright yellows.
Example input & output:
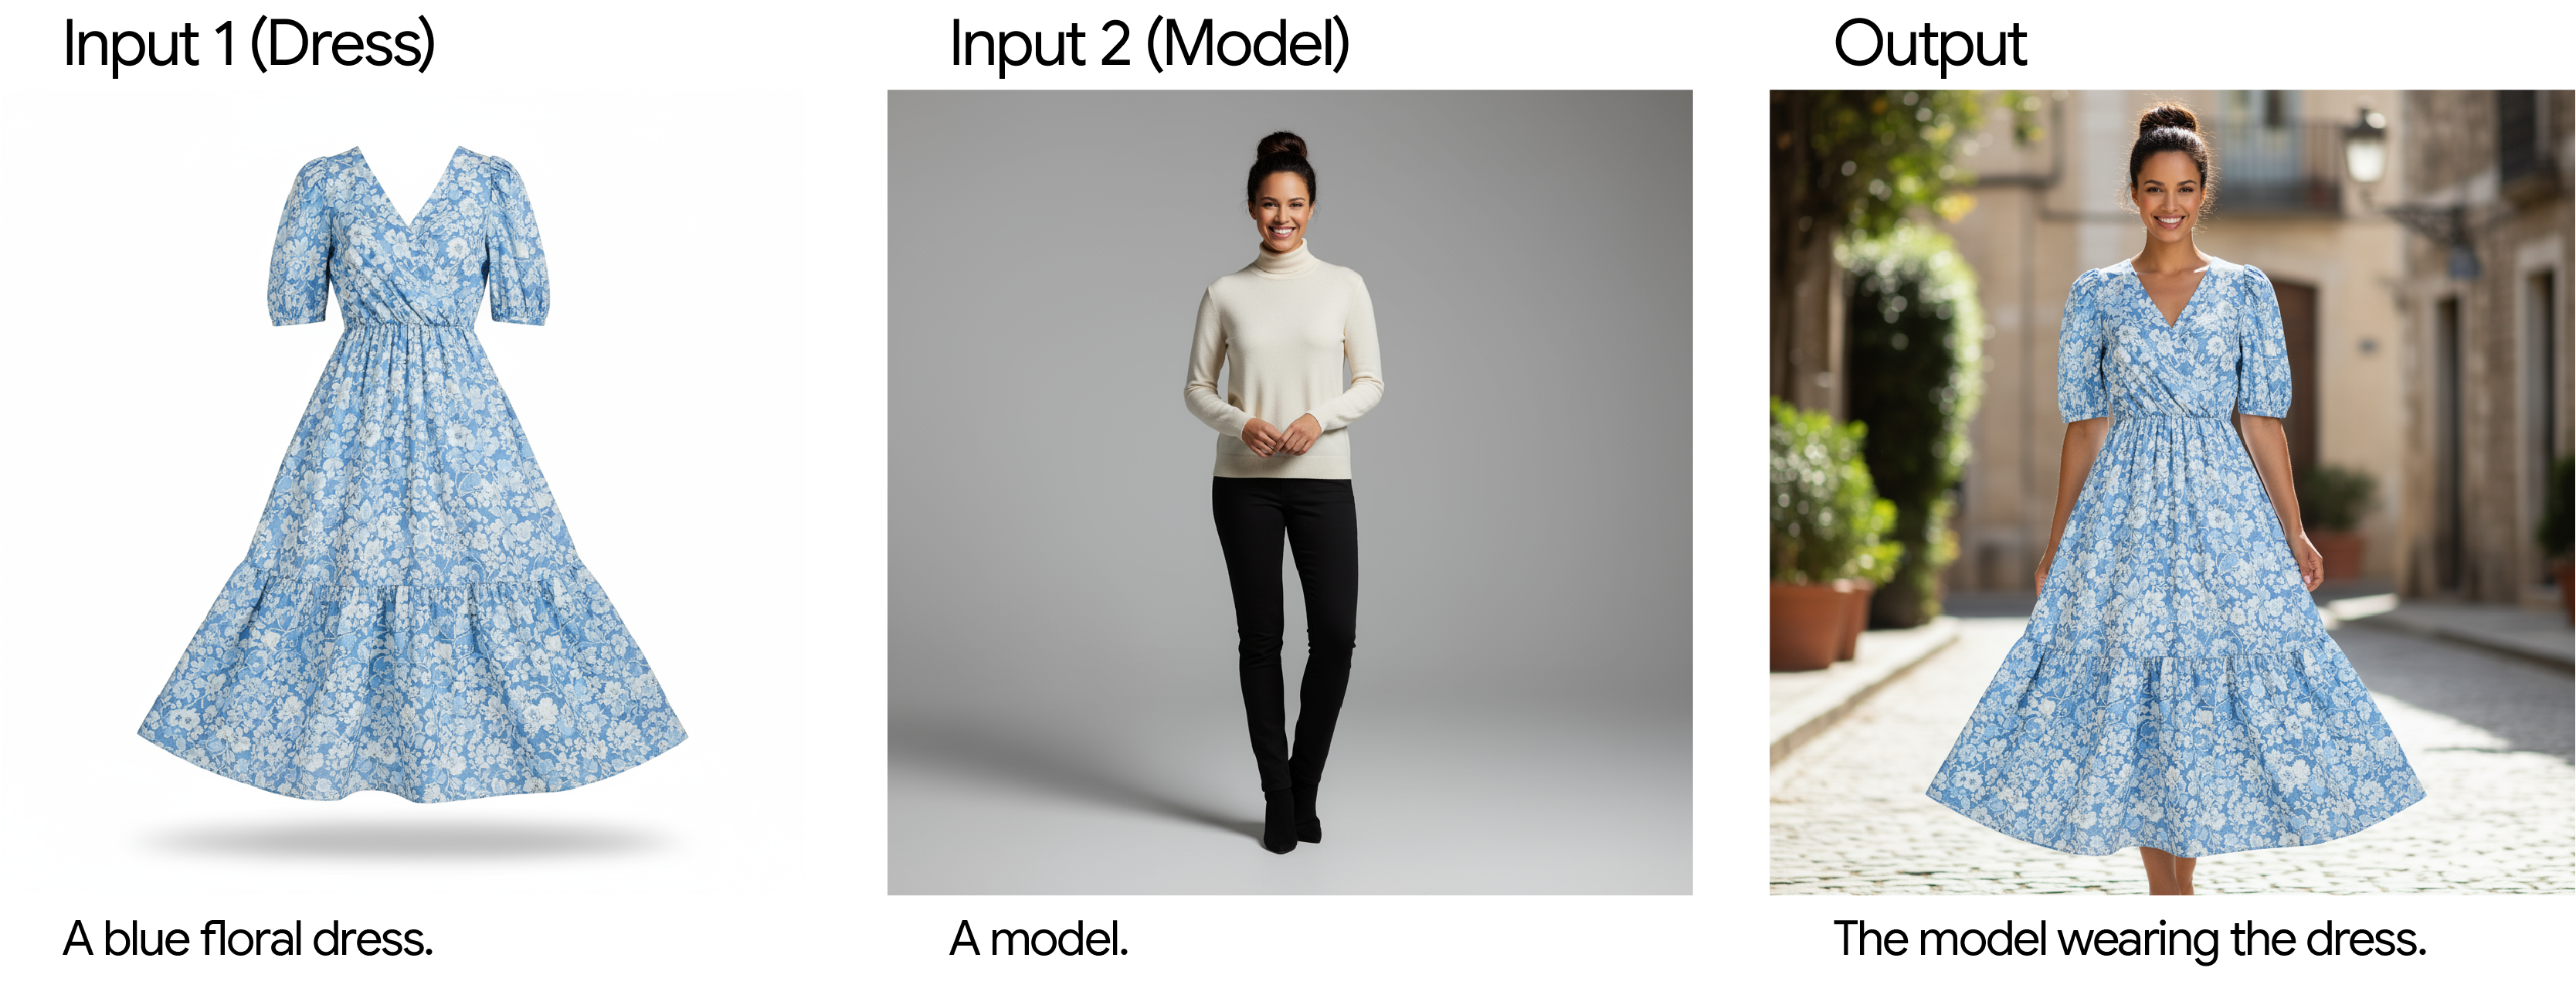
4. Advanced composition: Combining multiple images
Provide multiple images as context to create a brand new, composite scene. This is perfect for product mockups or creative collages.
Template:
Create a new image by combining the elements from the provided images. Take the [element from image 1] and place it with/on the [element from image 2]. The final image should be a [description of the final scene].
Example prompt:
Create a professional e-commerce fashion photo. Take the blue floral dress from the first image and let the woman from the second image wear it. Generate a realistic, full-body shot of the woman wearing the dress, with the lighting and shadows adjusted to match an outdoor environment.
Example input & output:
Best practices
As you build, here are a more tips for working with image generation:
- Be hyper-specific: The more detail you provide, the more control you have. Instead of “fantasy armor,” describe it: “ornate elven plate armor, etched with silver leaf patterns, with a high collar and pauldrons shaped like falcon wings.”
- Fix character consistency drifts: If you notice a character’s features begin to drift after many iterative edits, you can restart a new conversation with a detailed description to retain consistency.
- Provide context and intent: Explain the purpose of the image. For example, “Create a logo for a high-end, minimalist skincare brand” will yield better results than just “Create a logo.”
- Iterate and refine: Don’t expect a perfect image on the first try. Use the conversational nature of the model to make small changes. Follow up with prompts like, “That’s great, but can you make the lighting a bit warmer?” or “Keep everything the same, but change the character’s expression to be more serious.”
- Use “semantic negative prompts”: Instead of saying “no cars,” describe the desired scene positively: “an empty, deserted street with no signs of traffic.”
- Aspect ratios: When editing, Gemini 2.5 Flash Image generally preserves the input image’s aspect ratio. If it doesn’t, be explicit in your prompt:
"Update the input image... Do not change the input aspect ratio."If you upload multiple images with different aspect ratios, the model will adopt the aspect ratio of the last image provided. If you need a specific ratio for a new image and prompting doesn’t produce it, the best practice is to provide a reference image with the correct dimensions as part of your prompt.
- Control the camera: Use photographic and cinematic language to control the composition. Terms like
wide-angle shot,macro shot,low-angle perspective,85mm portrait lens, andDutch anglegive you precise control over the final image.
Limitations
As we continue to develop and improve our models, we believe in being transparent about areas for improvement.
While Gemini 2.5 Flash Image is a powerful and versatile tool, achieving perfection on the first attempt with highly nuanced requests can require some iteration. You may find that generating complex typography or maintaining absolute consistency of character features across multiple images sometimes needs refinement through follow-up prompts.
We are actively working to improve these areas and appreciate your creativity as we build the next generation of image tools together.
What’s next? Start creating!
You now have the foundational skills to help you create and edit incredible images with Gemini 2.5 Flash. The best way to improve is to practice. Here are some resources to help you on your journey:
- Review pricing: Understand the costs associated with using Gemini 2.5 Flash Image generation with the Gemini API for your projects.
- Try the Image Editing Applet: Test AI-Powered photo editing, apply creative filters, or make professional adjustments using simple text prompts.


