Some advertisers have access to a new creative workflow that allows them to upload up to 10 images and videos for a single ad. I am part of this test, and I believe it will be a helpful improvement.
This workflow allows advertisers to do the following:
- Upload up to 10 images and videos for a single ad
- Provide three cropped aspect ratios for each creative
- Customize text and URL destination by creative
- Opt in or out of placements by creative variation
- View performance by creative asset
In this post, we’ll walk through the following:
- Requirements
- Initial Setup
- Customizations
- Switch Back to Original Workflow
- View Performance
- How It’s Different
- How I’m Using It
- What Could Be Better?
Let’s get to it…
1. Requirements
First, know that not all advertisers have access to this test. If you have the new creative workflow, it will apply to all new and duplicated ads, not to existing ads. You’ll see this for image and video creatives only, not for Advantage+ catalog ads or carousels.
While this workflow applies to all campaign objectives, there are a few exceptions by conversion location…
- Awareness: All conversion locations
- Traffic: All except Facebook or Instagram
- Engagement: All except Facebook Page
- Leads: All except Website + Instant Forms or Website + Calls
- App Promotion: All
- Sales: All except Website + Calls or Website + In Store
2. Initial Setup
When you create a new ad following the requirements above, click to create an image or video ad.

Complete the Creative Setup step as you normally would and click “Next.”

The screen to add or upload images and videos will look mostly the same as the original workflow.

Normally, you can only upload or select one image or video. But now you can select up to 10. You can toggle between the Videos and Images filters to select from both.
When you do, those selected creatives will appear at the bottom.

If you hover over a thumbnail, you can remove or crop the creative.

Let’s assume you didn’t click the crop icon. We can still do that later. Click “Next” and then complete the steps in the creative setup wizard for text, image generation, and enhancements as you normally would.
3. Customizations
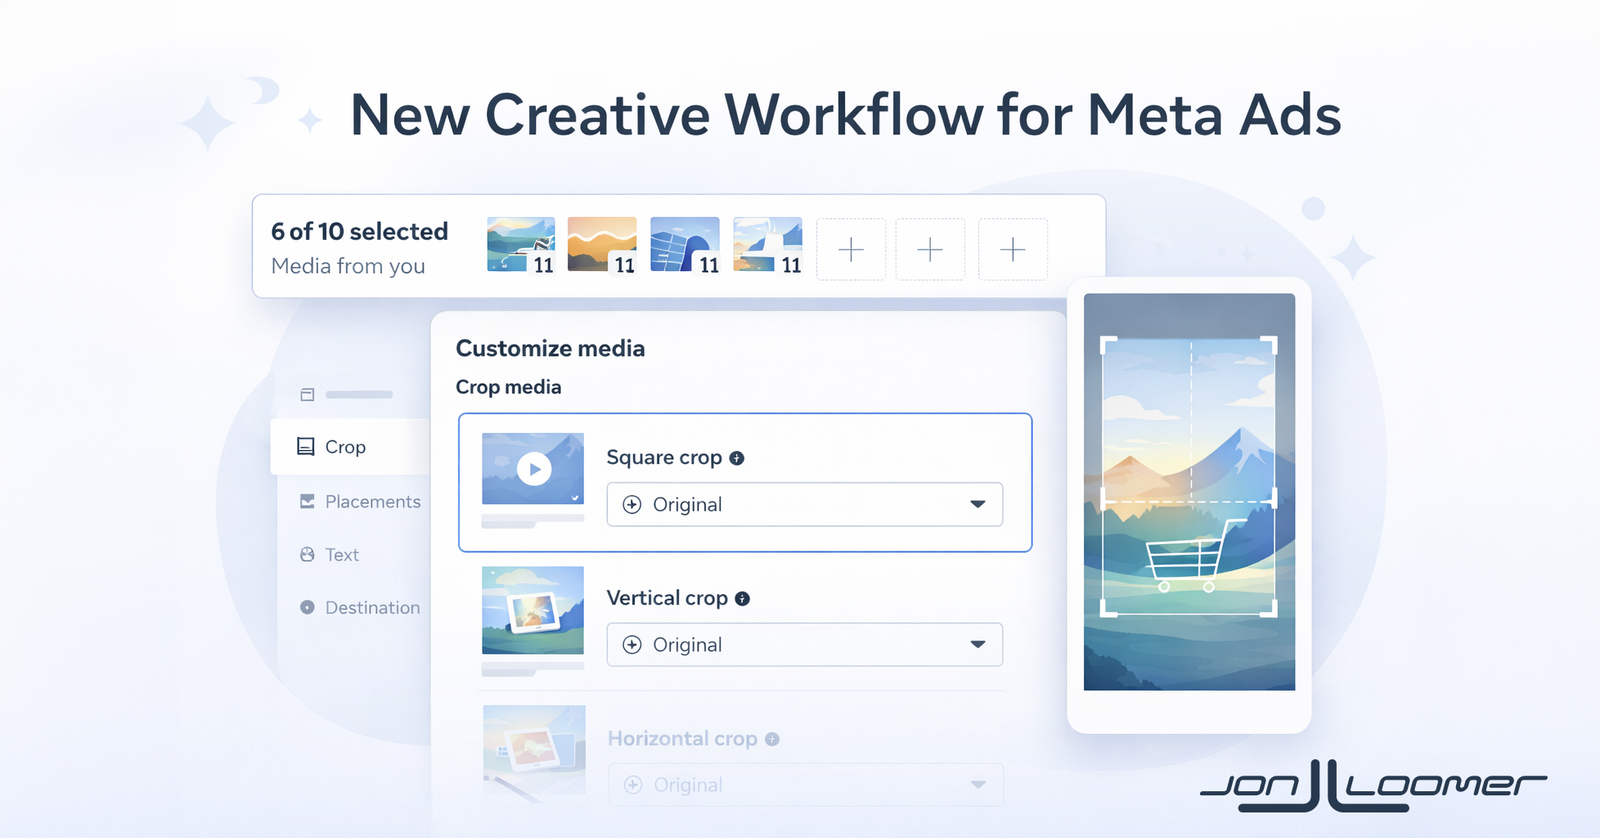
Once you complete the wizard, here’s how the Media section looks…

Recall that normally your creative would be displayed in placement groups, and you could customize it for each individual placement. But now we can customize all of the creative we provide.
Click “Customize Media.” It will look like this…

Using the old workflow, Meta normally asks for square, vertical, and horizontal versions of an individual creative. Now you can customize this for each image or video that you provide.
You can choose to keep the original or crop for each selected size.

If you choose to crop, Meta will automatically adjust the crop tool to fit the aspect ratio that is requested. You can then move or shrink the tool to focus on the area you want to represent the cropped version.
Once you’re done, click on Placements. Here, you can opt in or out of a placement for the chosen creative version.

Note that Text and Destination are grayed out when the first creative is selected. This version will automatically use the text and URL destination provided for your ad.
But if you select any of the other creatives, you can edit these things. If you don’t make any changes, Meta will use the text and destination from your original setup.

But this is where you could use very different text depending on the image or video. One drawback is that you don’t have the five options that you have for the first creative option.
You can also customize the destination URL by creative. One obvious use case for this would be if you want to use different images to promote different products. But you could also send people to different landing pages, depending on the image. I’m doing this so that my ad creative matches the creative on the landing page.

Otherwise, finish setting up your ad the way you normally would with Format Display Options, tracking, and URL parameters. Then preview and publish.
4. Switch Back to Original Workflow
I realize some people hate change, and this is likely to be confusing the first time you go through it. If you’d like, you can revert back to the original workflow.
Of course, it’s not easy to find. Hover over “Media” and then you’ll see a link to “Return to original single media experience” at the bottom of the tooltip.

5. View Performance
One very big addition to this new creative workflow is a way to break down results by creative asset. When live, you’ll see an option for “Media” under the Creative breakdown.

I didn’t have this option until I published my first ad with the new workflow.
6. How It’s Different
Maybe you’re thinking, “Oh, great. I can add up to 10 images and videos for a single ad. But can’t I do that with Dynamic Creative and Flexible Format?”
Yeah, you can. But whether you can use Dynamic Creative or Flexible Format will depend on the objective. And based on reports I’m seeing, Flexible Format is going away.
Another big element is the level of customization. With the new creative workflow, you can do the following with up to 10 images and videos:
- Crop three sizes for each
- Customize primary text, headline, and description for each
- Customize URL destination for each
- Opt into or out of placements for each
You are now able to do things that would have required creating multiple ads in the past.
But the biggest benefit of this new workflow over Flexible Format is the reporting granularity. Advertisers have complained about the lack of this element ever since Flexible Format became available.
7. How I’m Using It
It’s funny how this became available to me only a few days after I had a specific need for it. I immediately applied it to make my current ad setup more efficient.
I previously created six separate ads to promote my Cornerstone Advertising Tips lead magnet. Each ad used a different image and sent people to a different landing page that featured an image that matched the one they’d see in the ad. While each ad used slightly different text, they certainly could have been the same.
So I consolidated this approach with the new creative workflow. One ad with the same images I was using for those six separate ads. They all share the same five primary text and headline options, but I’ve customized the destination URL for each one.
The screenshots in this blog post are actually from the process I went through to create it.
Ultimately, this new workflow gives advertisers the tools to create ads that are truly in the spirit of creative diversification. In the past, you would have created separate ads for images and videos, but now you can combine them into one without having to choose specific placements for each format.
8. What Could Be Better?
Early on, my complaints are minimal. I like this a lot, and more issues are likely to pop up as I use it. But I have a couple of specific problems with it.
First, you can provide three crops for each image or video. But this is more limited than it needs to be.
For example, Meta says it supports either 5:4 or 1:1 for the square crop. Is this right? I often use 4:5 for Feeds, not 5:4. But regardless, you can only crop by 1:1.

Same thing for vertical. Meta says that 4:5, 3:4, 2:3, and 9:16 are all supported. But you can only crop to 9:16.

And, of course, the horizontal crop. Meta says that 3:2, 5:4, 1.91:1, and 16:9 are all supported. But you can only crop to 1.91:1 (I think?).

Why not offer the ability to adjust the crop to different aspect ratios if they qualify?
My only other request is related to ways to make this process faster and easier. If you have 10 creatives, you have to go into each image individually to crop each one.
I’m no designer, so I know that this has to be a challenging problem. I have no idea if an alternative that would allow you to crop multiple images at once is realistic. But that feels like a potential bottleneck.
Your Turn
Do you have the new creative workflow? What do you think?
Let me know in the comments below!