In this article, you will learn how to complete three beginner-friendly computer vision tasks in Python — edge detection, simple object detection, and image classification — using widely available libraries.
Topics we will cover include:
- Installing and setting up the required Python libraries.
- Detecting edges and faces with classic OpenCV tools.
- Training a compact convolutional neural network for image classification.
Let’s explore these techniques.
The Beginner’s Guide to Computer Vision with Python
Image by Editor
Introduction
Computer vision is an area of artificial intelligence that gives computer systems the ability to analyze, interpret, and understand visual data, namely images and videos. It encompasses everything from classical tasks like image filtering, edge detection, and feature extraction, to more advanced tasks such as image and video classification and complex object detection, which require building machine learning and deep learning models.
Thankfully, Python libraries like OpenCV and TensorFlow make it possible — even for beginners — to create and experiment with their own computer vision solutions using just a few lines of code.
This article is designed to guide beginners interested in computer vision through the implementation of three fundamental computer vision tasks:
- Image processing for edge detection
- Simple object detection, like faces
- Image classification
For each task, we provide a minimal working example in Python that uses freely available or built-in data, accompanied by the necessary explanations. You can reliably run this code in a notebook-friendly environment such as Google Colab, or locally in your own IDE.
Setup and Preparation
An important prerequisite for using the code provided in this article is to install several Python libraries. If you run the code in a notebook, paste this command into an initial cell (use the prefix “!” in notebooks):
|
pip install opencv–python tensorflow scikit–image matplotlib numpy |
Image Processing With OpenCV
OpenCV is a Python library that offers a range of tools for efficiently building computer vision applications—from basic image transformations to simple object detection tasks. It is characterized by its speed and broad range of functionalities.
One of the primary task areas supported by OpenCV is image processing, which focuses on applying transformations to images, generally with two goals: improving their quality or extracting useful information. Examples include converting color images to grayscale, detecting edges, smoothing to reduce noise, and thresholding to separate specific regions (e.g. foreground from background).
The first example in this guide uses a built-in sample image provided by the scikit-image library to detect edges in the grayscale version of an originally full-color image.
|
1 2 3 4 5 6 7 8 9 10 11 12 13 14 15 16 17 18 19 20 21 22 23 24 25 26 27 28 |
from skimage import data import cv2 import matplotlib.pyplot as plt
# Load a sample RGB image (astronaut) from scikit-image image = data.astronaut()
# Convert RGB (scikit-image) to BGR (OpenCV convention), then to grayscale image = cv2.cvtColor(image, cv2.COLOR_RGB2BGR) gray = cv2.cvtColor(image, cv2.COLOR_BGR2GRAY)
# Canny edge detection edges = cv2.Canny(gray, 100, 200)
# Display plt.figure(figsize=(10, 4))
plt.subplot(1, 2, 1) plt.imshow(gray, cmap=“gray”) plt.title(“Grayscale Image”) plt.axis(“off”)
plt.subplot(1, 2, 2) plt.imshow(edges, cmap=“gray”) plt.title(“Edge Detection”) plt.axis(“off”)
plt.show() |
The process applied in the code above is simple, yet it illustrates a very common image processing scenario:
- Load and preprocess an image for analysis: convert the RGB image to OpenCV’s BGR convention and then to grayscale for further processing. Functions like
COLOR_RGB2BGRandCOLOR_BGR2GRAYmake this straightforward. - Use the built-in Canny edge detection algorithm to identify edges in the image.
- Plot the results: the grayscale image used for edge detection and the resulting edge map.
The results are shown below:
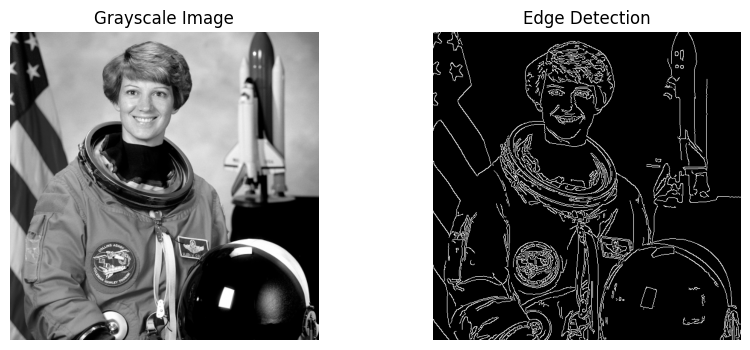
Edge detection with OpenCV
Object Detection With OpenCV
Time to go beyond classic pixel-level processing and identify higher-level objects within an image. OpenCV makes this possible with pre-trained models like Haar cascades, which can be applied to many real-world images and work well for simple detection use cases, e.g. detecting human faces.
The code below uses the same astronaut image as in the previous section, converts it to grayscale, and applies a Haar cascade trained for identifying frontal faces. The cascade’s metadata is contained in haarcascade_frontalface_default.xml.
|
1 2 3 4 5 6 7 8 9 10 11 12 13 14 15 16 17 18 19 20 21 22 23 24 25 26 27 28 29 30 31 |
from skimage import data import cv2 import matplotlib.pyplot as plt
# Load the sample image and convert to BGR (OpenCV convention) image = data.astronaut() image = cv2.cvtColor(image, cv2.COLOR_RGB2BGR)
# Haar cascade is an OpenCV classifier trained for detecting faces face_cascade = cv2.CascadeClassifier( cv2.data.haarcascades + “haarcascade_frontalface_default.xml” )
# The model requires grayscale images gray = cv2.cvtColor(image, cv2.COLOR_BGR2GRAY)
# Detect faces faces = face_cascade.detectMultiScale( gray, scaleFactor=1.1, minNeighbors=5 )
# Draw bounding boxes output = image.copy() for (x, y, w, h) in faces: cv2.rectangle(output, (x, y), (x + w, y + h), (0, 255, 0), 2)
# Display plt.imshow(cv2.cvtColor(output, cv2.COLOR_BGR2RGB)) plt.title(“Face Detection”) plt.axis(“off”) plt.show() |
Notice that the model can return one or multiple detected objects (faces) in a list stored in faces. For every object detected, we extract the corner coordinates that define the bounding boxes enclosing the face.
Result:
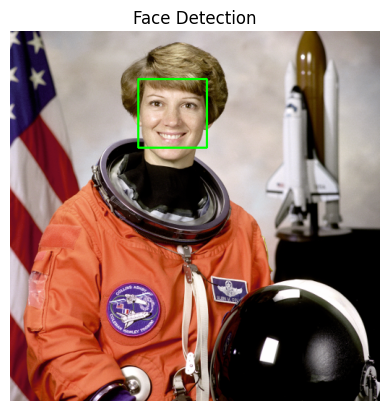
Face detection with OpenCV
Image Classification With TensorFlow
Image classification tasks play in another league. These problems are highly dependent on the specific dataset (or at least on data with similar statistical properties). The main practical implication is that training a machine learning model for classification is required. For simple, low-resolution images, ensemble methods like random forests or shallow neural networks may suffice, but for complex, high-resolution images, your best bet is often deeper neural network architectures such as convolutional neural networks (CNNs) that learn visual characteristics and patterns across classes.
This example code uses the popular Fashion-MNIST dataset of low-resolution images of clothes, with examples distributed into 10 classes (shirt, trousers, sneakers, etc.). After some simple data preparation, the dataset is partitioned into training and test sets. In machine learning, the training set is passed together with labels (known classes for images) so the model can learn the input–output relationships. After training the model — defined here as a simple CNN — the remaining examples in the test set can be passed to the model to perform class predictions, i.e. to infer which type of fashion product is shown in a given image.
|
1 2 3 4 5 6 7 8 9 10 11 12 13 14 15 16 17 18 19 20 21 22 23 24 25 26 27 28 29 30 31 32 33 34 35 36 37 38 39 |
import tensorflow as tf from tensorflow.keras import layers, models
# Load Fashion-MNIST dataset (publicly available) (train_images, train_labels), (test_images, test_labels) = \ tf.keras.datasets.fashion_mnist.load_data()
# Normalize pixel values for more robust training train_images = train_images.astype(“float32”) / 255.0 test_images = test_images.astype(“float32”) / 255.0
# Simple CNN architecture with one convolution layer: enough for low-res images model = models.Sequential([ layers.Reshape((28, 28, 1), input_shape=(28, 28)), layers.Conv2D(32, 3, activation=“relu”), layers.MaxPooling2D(), layers.Flatten(), layers.Dense(64, activation=“relu”), layers.Dense(10, activation=“softmax”) ])
# Compile and train the model model.compile( optimizer=“adam”, loss=“sparse_categorical_crossentropy”, metrics=[“accuracy”] )
history = model.fit( train_images, train_labels, epochs=5, validation_split=0.1, verbose=2 )
# (Optional) Evaluate on the test set test_loss, test_acc = model.evaluate(test_images, test_labels, verbose=0) print(f“Test accuracy: {test_acc:.3f}”) |
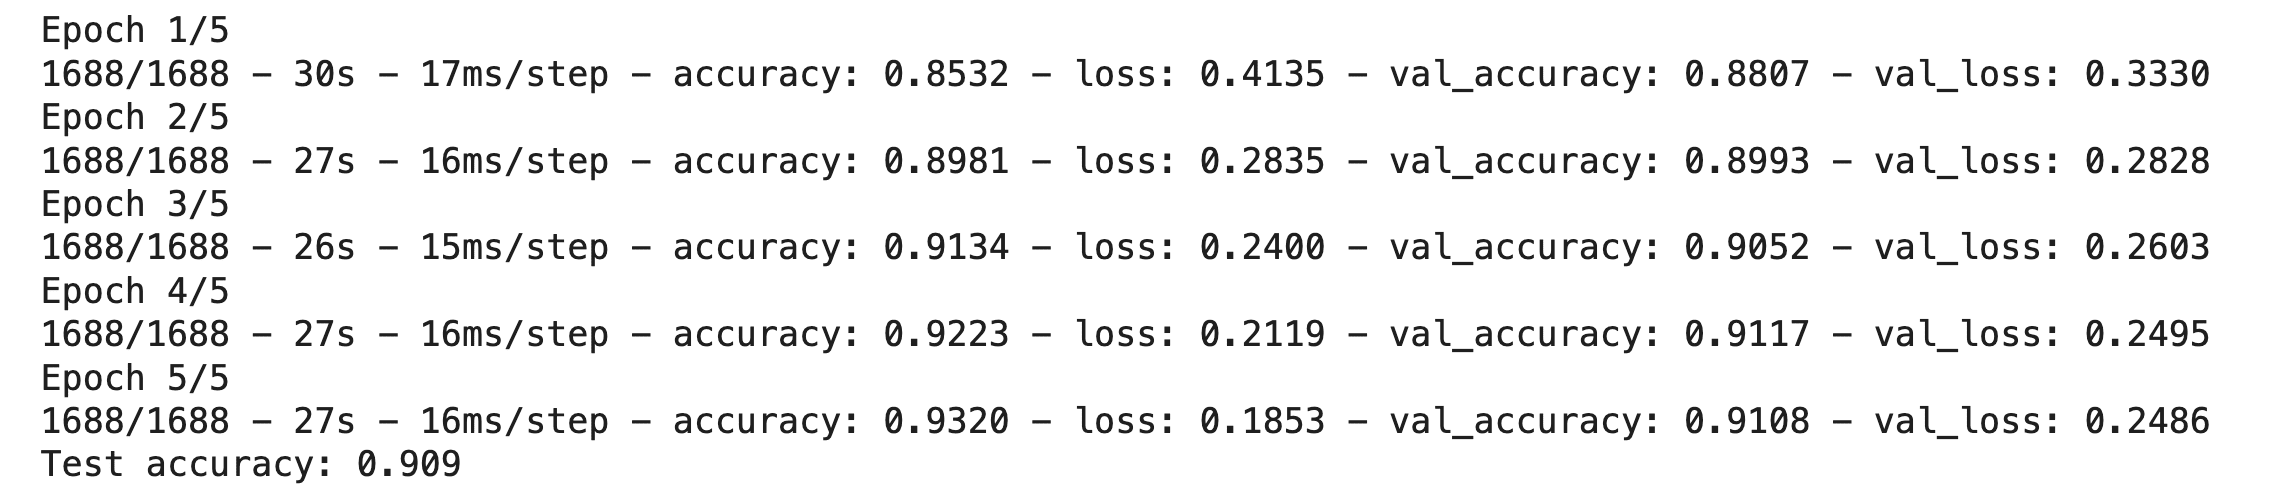
Training an image classification with TensorFlow
And now you have a trained model.
Wrapping Up
This article guided beginners through three common computer vision tasks and showed how to address them using Python libraries like OpenCV and TensorFlow — from classic image processing and pre-trained detectors to training a small predictive model from scratch.