
Meta advertising is far more streamlined and automated than it was years ago. A large percentage of the campaign creation process is either universal or nearly so. But what’s left in an advertiser’s toolbox is what ultimately differentiates performance.
I advocate for a simplified approach, and I make very few customizations away from defaults. When I do, there’s a reason that’s informed from deep analysis. The Meta ads features I use most either help me better understand my data or execute a fix when the defaults aren’t good enough.
In this post, I highlight the five Meta ads features in my toolbox that I can’t live without. I use and rely on them more than any other feature.
1. Creative Testing Tool
New in 2025, the creative testing tool transformed my process for creating ads. In the past, advertisers generally did one of two things when creating new ads, both of which are flawed.
Option 1: Publish them to the existing ad set and cross their fingers.
The problem that inevitably comes up with this approach is that Meta will spend most of your budget to one or two ads and you’re left wondering about the remaining ads. Were those other ads really that bad? Is it just random that Meta didn’t choose them?
It’s a complete unknown because without reasonable spend on those ads, there’s no data proving one way or the other. And because of that, it feels like they never got a fair shot.
Option 2: Create a separate campaign or ad set specifically for testing.
Using this approach, you have a “main” ad set and a completely separate campaign or ad set for testing. This way, you force delivery on the test ads, while aiming to limit the impact on the main ads. One common approach to testing is to create a separate ad set per ad, which allows you to have full control over the spend.
The most common problem with this approach, however, is that success in an isolated test doesn’t guarantee success in the main ad set. Once your test is completed, you have to duplicate or move it out of the test. And once it’s in that new environment, anything can happen.
The Best Option: Use the creative testing tool.
I now start any new ads with a test using the creative testing tool. But I do this within my “main” ad set, not in an isolated campaign.
Let’s assume I’m creating a new ad set with five ads. I start that ad set with a test by clicking the “set up test” button during ad creation.

The one weird quirk of this tool is that you can’t test existing ads, only new ads that are generated as duplicates. So the ad where that button was pushed won’t be published and part of the test (it’s confusing, I know).
But I create a test with those five ads…

Meta will then dedicate nearly identical budget to each of those ads.

When the test is complete, the ads will continue, but without forcing Meta to spend evenly on each ad. Once that happens, you’re no longer wondering what would happen if Meta spent more on one ad or another. You have test data. And if you feel that an ad that performed well during the test should be used more than it is, that data can inform your decisions.
Once I’m ready to create new ads, this process continues. I initiate another creative test, but it still happens within the main ad set. I dedicate a portion of the overall budget to the test. Once that test is over, I rinse and repeat.
This gives me more insight into how ads perform when given budget, while removing the need to move ads from one campaign or ad set to another after a test. I find it the best, most efficient, and most informed way to introduce new ads.
2. Value Rules
Value rules allow advertisers to increase or decrease the bid for various criteria like age range, gender, location, mobile operating system, placement, device platform, and conversion location.

What’s especially interesting about value rules is that they give advertisers more control over how ads are distributed at a time when control is consistently taken away. But that added control actually makes sense in this environment.
My preference is a simplified approach where I accept most of Meta’s defaults. Doing so keeps me within Meta’s best practices without disabling Advantage+. But there are times when I have information that Meta doesn’t, which requires an adjustment. In the past this meant making restrictions to targeting or placements, but now I can do it with value rules.
Here are the two primary ways I use value rules…
Impact Lead Quality
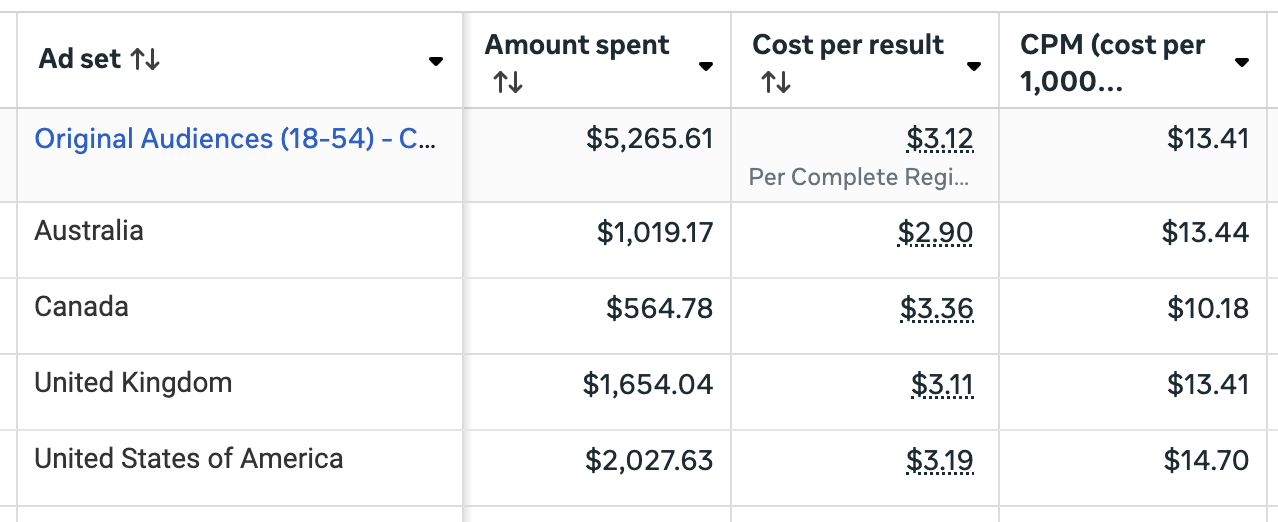
You have to be really careful when running lead generation ads, regardless of whether you’re using instant forms or driving people to a landing page. If you’re ever getting an insanely good Cost Per Lead, I’d immediately conduct a breakdown by age range.
Repeatedly, I’ve found that I get very cheap leads from the two oldest age ranges (65+ and 55 to 64). I’m not sure why that is, but this rarely results in quality leads. Since Meta is only focused on getting the lead itself, that means that as much as 70% of my budget will be spent on that group.
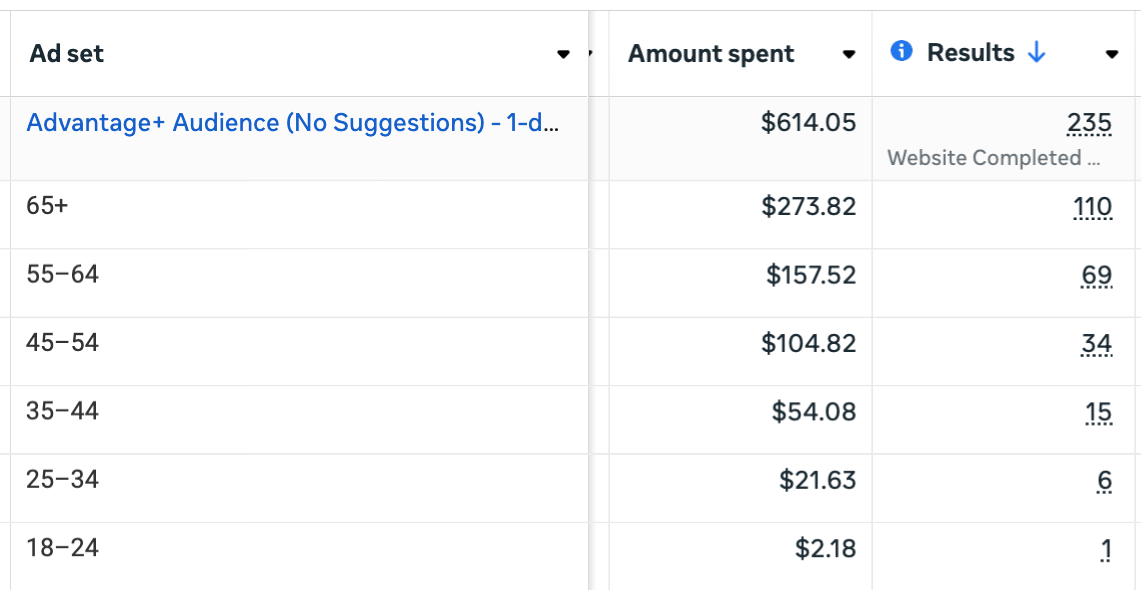
In years past, my response has been to remove those age ranges entirely. While 55-64 isn’t nearly the problem that 65+ is, Meta will move most of that budget to 55-64 if I remove 65+. So I removed both.
That was far from ideal since I do get paying customers from both age ranges, especially 55–64 (never mind that I’m not far outside of that range myself). But it was the only way to control this without knowingly wasting money.
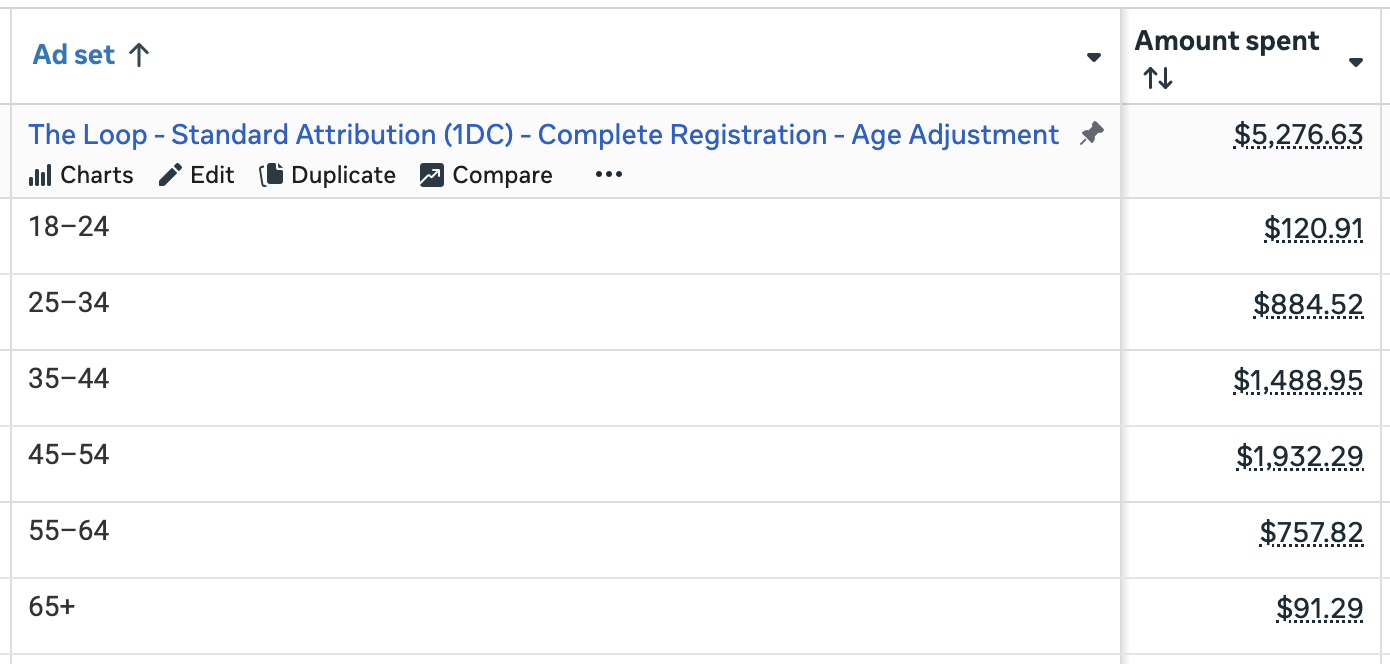
Until value rules, of course. Now I create value rules to lower my bid for both of those groups (a greater impact on 65+ than 55-64).
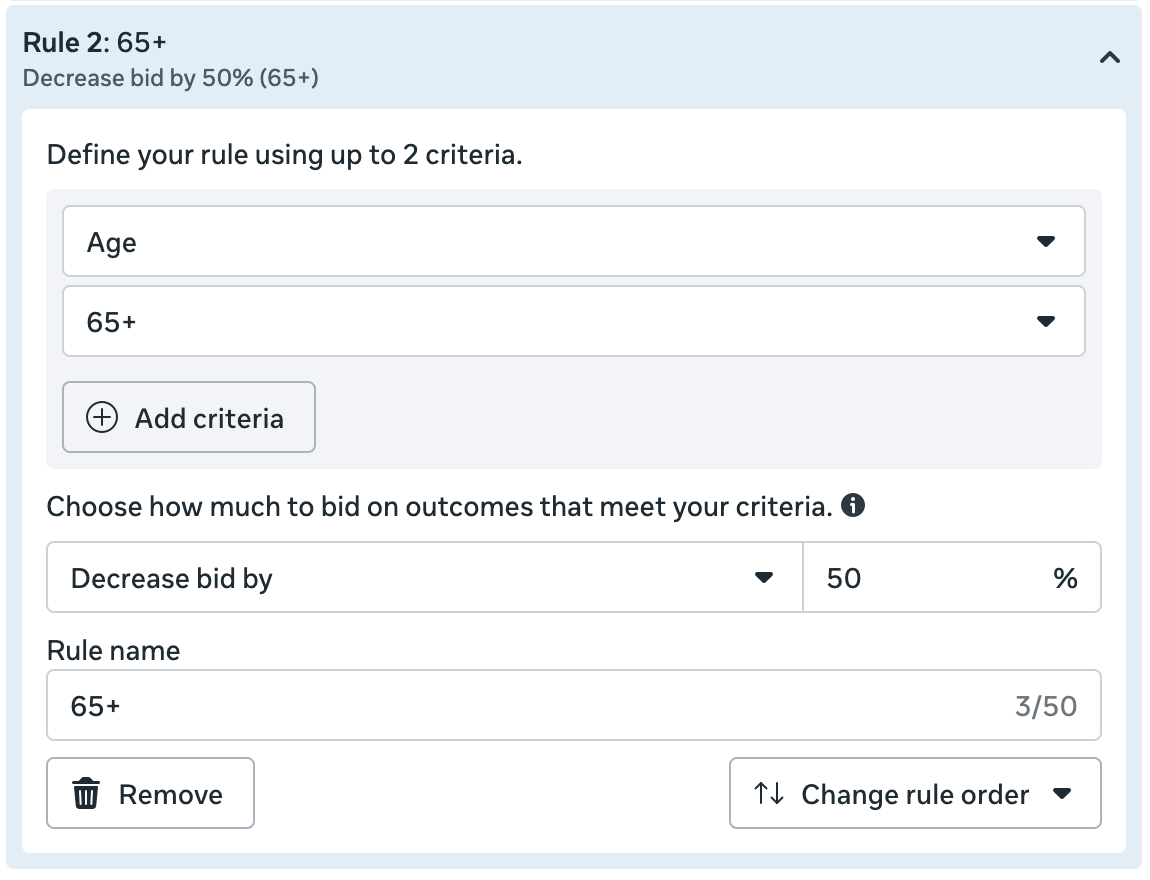
The result is that Meta spends a far smaller percentage on those groups, and I no longer need to remove them.
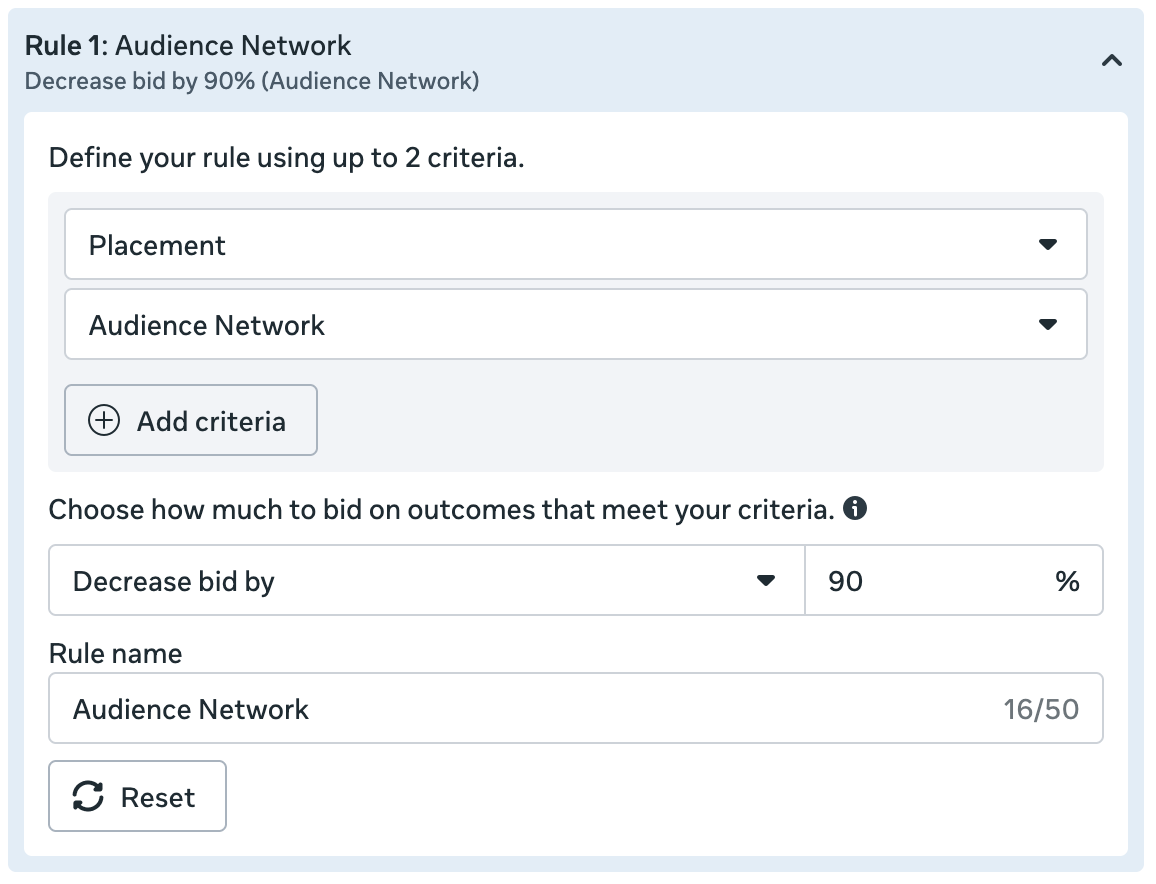
Limit Audience Network
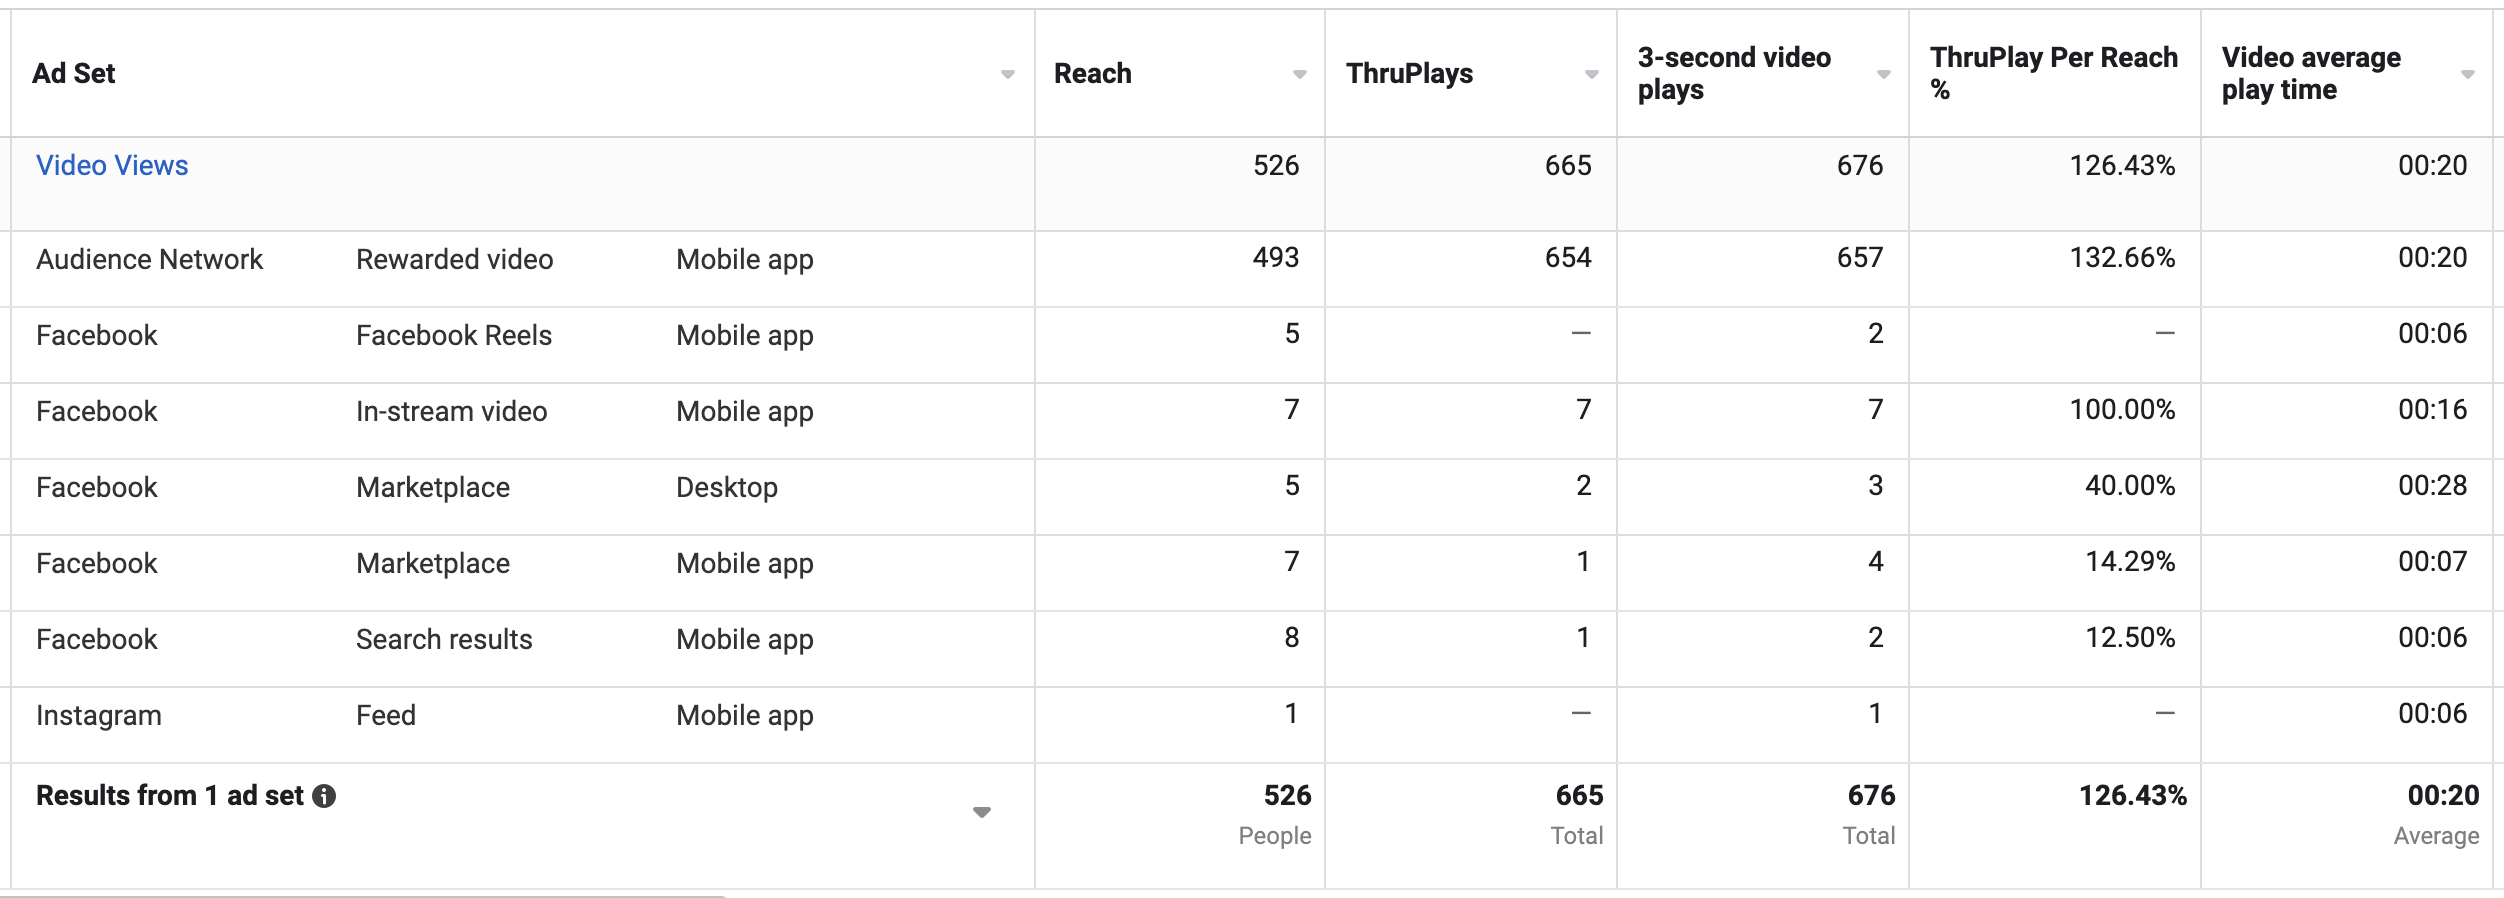
The pitfalls of the Audience Network placement are well documented. Third party apps monetize themselves by joining Audience Network and adding ad placements. The problem is that Meta has less control over these apps and placements, which has a direct impact on quality.
If you ever optimize for link clicks, landing page views, or any traffic-adjacent conversion event, Audience Network can be a big problem. It’s commonly a source of accidental clicks, bots, and click fraud before it’s detected. And if you optimize for ThruPlay views, you can expect low-quality, forced views on your videos from Audience Network Rewarded Video.
My response in the past was to remove Audience Network entirely. But that’s something I want to avoid if I can. And thanks to value rules, it’s possible.
While I can’t say I regularly optimize for link clicks, landing page views, or even ThruPlay views, I’ll occasionally optimize for a custom event that reflects quality website traffic. I’ll do this using custom events for things like time spent, scroll depth, clicks on my podcast player, and more.
And even then, Audience Network can be a problem. But instead of removing it, I create a value rule that effectively removes it by lowering the bid.
Since value rules are still new, I fully expect more use cases to become available with time.
3. Breakdowns
Breakdowns help uncover context that your results may otherwise hide.

This feature is simple: It takes your results and breaks it into separate rows by demographic or variable. This is super helpful for verifying that results are coming from expected places. Breakdowns may be the single most important tool for spotting problems before it’s too late.
There are eight essential breakdowns that I use, but I’ll save my absolute favorite for the next section.
You already saw above examples of how breakdowns by age and placement help me uncover distribution problems. But let’s highlight a few more.
Breakdown by country when targeting multiple countries at once…
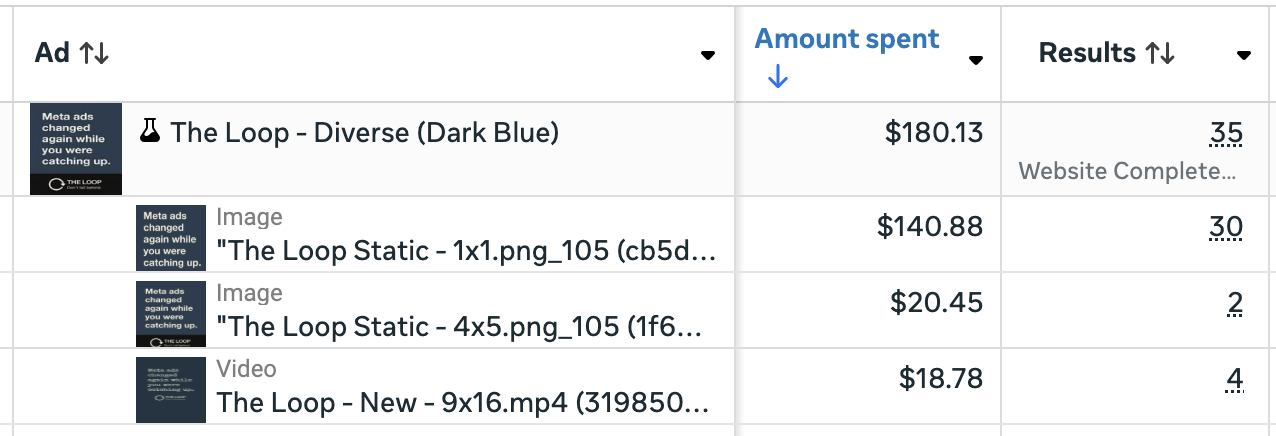
Breakdown by image, video, and slideshow when using multiple formats for one ad…
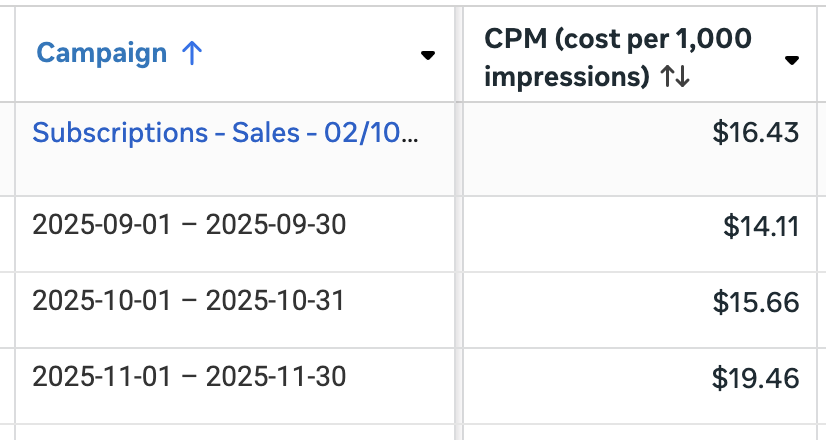
Breakdown by day, week, or month to help spot trends…
There are plenty more breakdowns available, but the most valuable uses will vary by advertiser.
4. Audience Segments
This is one of the newest and most valuable breakdowns. It also requires the most work. That means that very few advertisers are using this to the fullest, which is a shame.
Audience segments are defined in your Advertising Settings. There are options for Engaged Audience and Existing Customers.

Defining your audience segments is a critical step. You should use every custom audience available to you to define those who have bought from you (existing customers) and everyone else who has engaged with your brand (engaged audience). These should be as broad as possible.
Understand that this isn’t about targeting, though Meta hasn’t stated clearly that audience segments have no impact on the people you reach. The biggest benefit is to reporting.
Audience segments were initially made available for Advantage+ Shopping Campaigns. That made sense since ASC essentially eliminated targeting inputs. So a breakdown by audience segments provided greater visibility into the people seeing your ads.
Thankfully, audience segments were eventually rolled out to all manual Sales campaigns. Because of this, I use the Sales objective whenever possible, regardless of the conversion event I’m optimizing for.
This single feature has completely transformed my approach to targeting and remarketing. Years ago, general remarketing (targeting all website visitors, email subscribers, and page engagers) was a big part of my strategy. Even once Advantage+ Audience was introduced, I’d use these audiences as suggestions.
But because of this breakdown, I’m able to confirm that Meta automatically prioritizes a portion of my budget to remarketing, even when I don’t explicitly target these groups.

It also helps spot explanations for wild performance fluctuations between ads or ad sets. If a new ad is outperforming Meta’s long-time favorite, it’s easy to question why Meta isn’t spending more money on it. But with the breakdown by audience segments, I’ve been able to confirm this can almost always be explained by an initial spike in remarketing for new ads.
I strongly encourage that you make this a part of your toolbox. Spend the time necessary to make sure you’ve defined your audience segments thoroughly and accurately. Use Sales campaigns when you can. And check this breakdown every so often to see what’s going on.
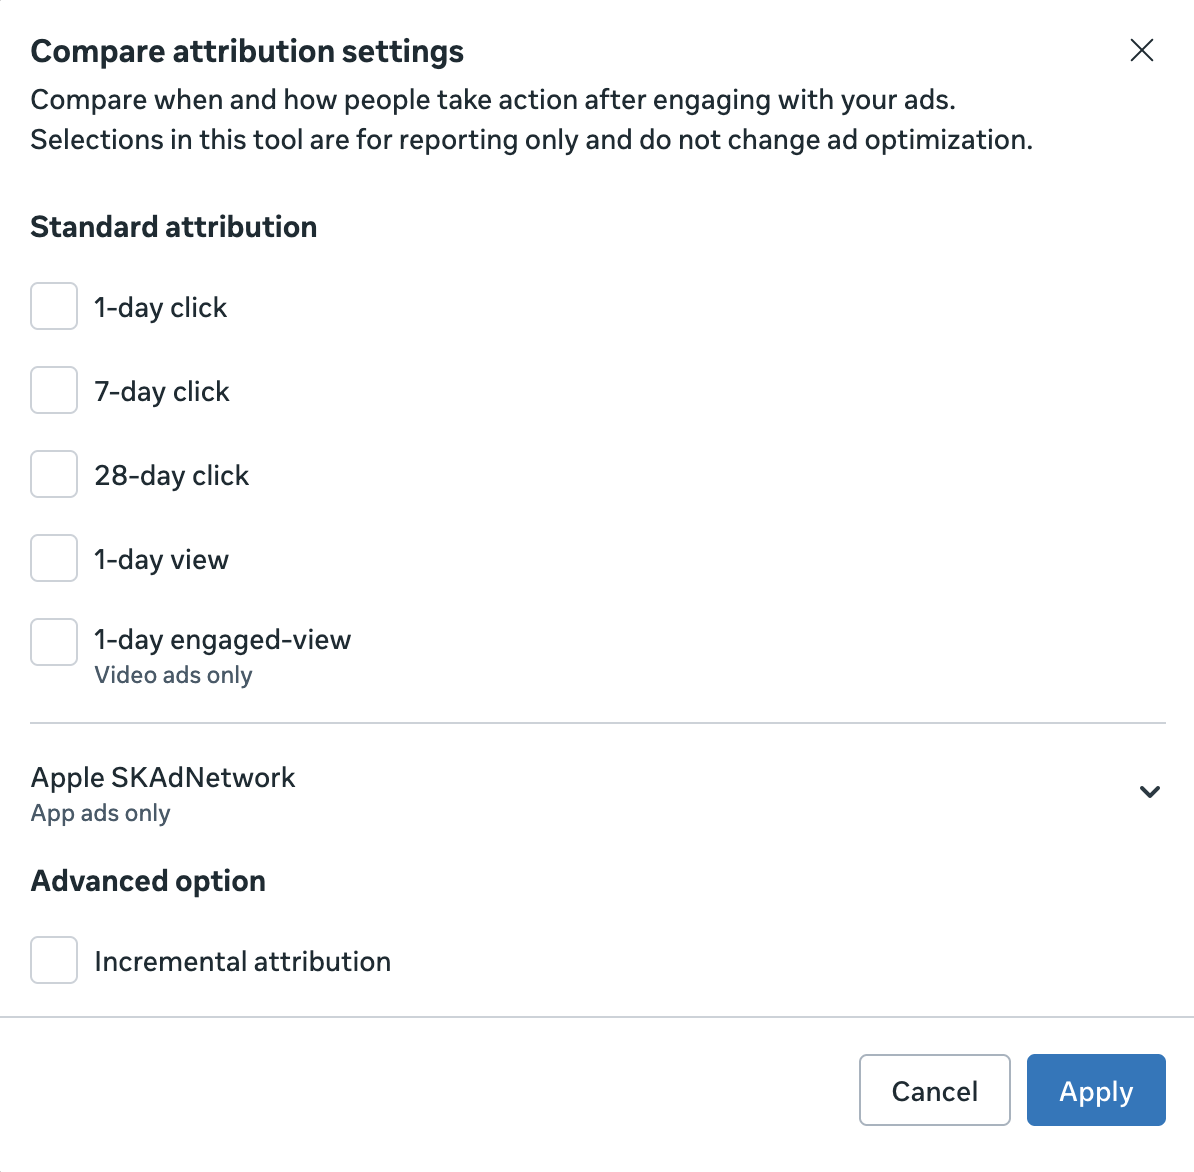
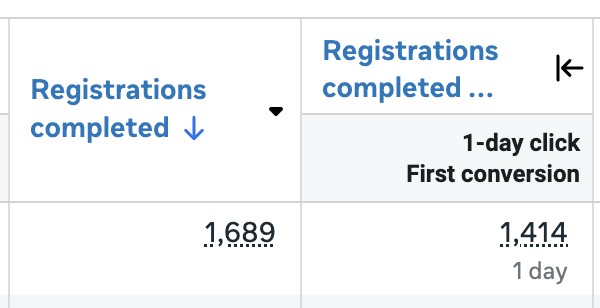
5. Compare Attribution Settings
The Compare Attribution Settings feature isn’t new, but the settings available within it are constantly growing.
Beware of accepting results at face value. Meta wants your ads to perform well, and it’s easy to fluff up the numbers if you don’t understand what’s happening under the hood.
This isn’t a matter of Meta lying about the results. Assuming you set up your events properly, these conversions happened. But the context is important.
Attribution is one of the easiest places to misunderstand performance without realizing it. There are four primary ways I use the Compare Attribution Settings feature to provide clarity.
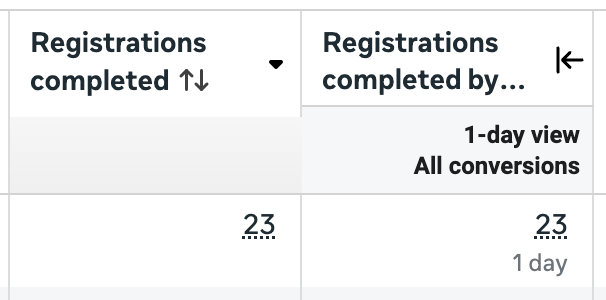
See how many of the conversions are 1-day view, particularly when remarketing is happening…
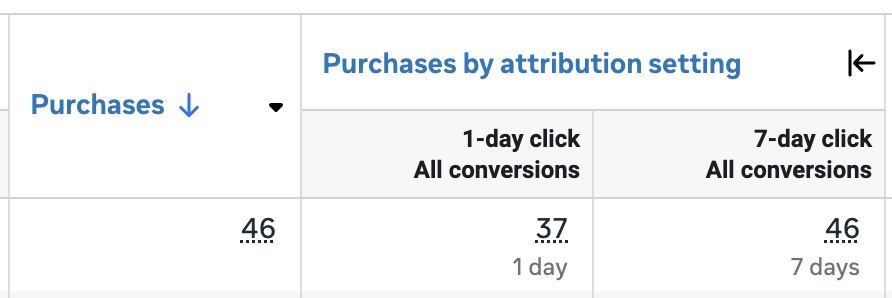
See how many of the conversions happened within 1 day versus 7 days of clicking to get a sense of the time to convert…
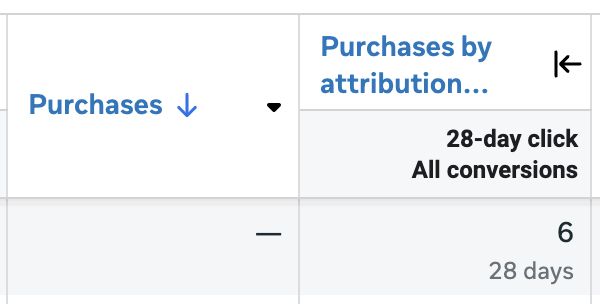
See how many purchases happened within 28-days of clicking when building my email list…
See the difference between First and All Conversions to help isolate unique customers…
This tool is so valuable, and it takes very little effort to use it. This isn’t about viewing the “real” conversions. All of these conversions happened. But context is important. Depending on the situation, some results mean more than others.
Your Turn
While I use several tools and features throughout my advertising workflow, those listed above are the ones I can’t live without. I encourage you to start using them if you aren’t already.
Any other features you’d add to this list?
Let me know in the comments below!